Main Courses
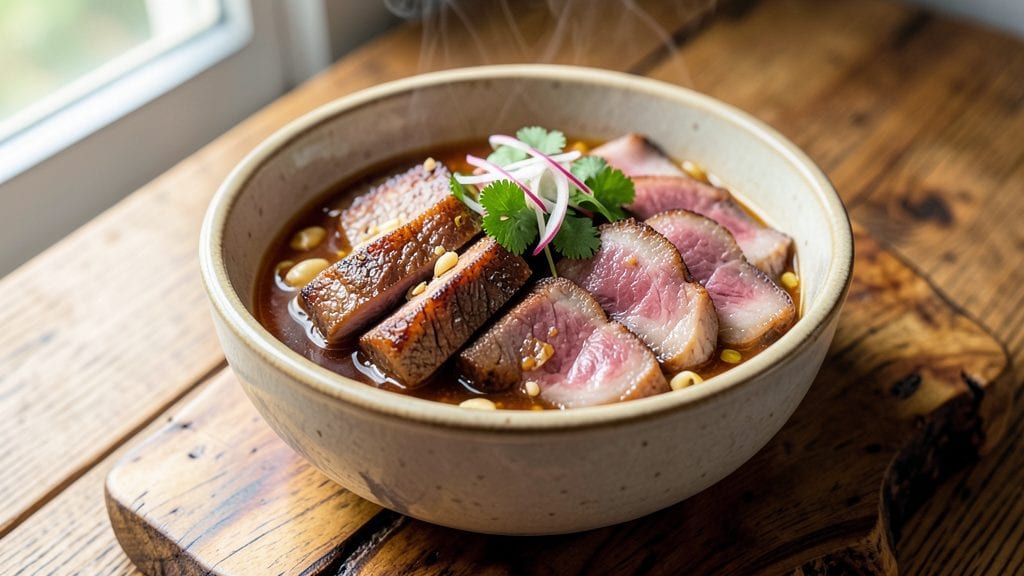
This pickled beef heart and tongue recipe transforms humble offal into a restaurant-worthy centerpiece with crispy edges and tangy depth. The secret lies in a precise balance of vinegar and spices that tenderizes while preserving texture, then finishes with a quick sear for that coveted crunch.
I developed this method after years of working with nose-to-tail butchery, where every cut deserved equal respect.
The process begins with thorough cleaning and marinating to remove any gamey flavors, then simmering in a vinegar-spiced bath until fork-tender. What sets this recipe apart is the final crisping stage, where high heat transforms the surface into golden, shatteringly crisp edges while keeping the interior juicy.
This technique turns what might seem intimidating into a showstopping dish that pairs beautifully with mashed potatoes or crusty bread.
By the time you plate these slices, you'll have a dish that's equal parts crispy and silky-smooth, with bright pickled notes cutting through the richness. The aroma alone transforms any meal into an event—imagine the reaction when you serve this centerpiece at your next dinner party.
The method is precise but not complicated, and the results are worth every step.
Perfect for adventurous eaters or anyone looking to elevate their nose-to-tail cooking skills. Let's get started with the full recipe—where every cut gets the attention it deserves.
Ingredients for pickled heart and tongue
Precision-cleaned offal meets vinegar-spiced bath for restaurant-quality texture and tang.
| Ingredient | Amount | Notes |
|---|---|---|
| Beef Heart 🥩 | 1 ½ lb | Whole, trimmed of connective tissue |
| Beef Tongue 🦅 | 1 whole | Fresh, ~1.5 lb each |
| White Vinegar 💧 | 2 cups | Distilled, 5% acidity minimum |
| Apple Cider Vinegar 🍎 | 1 cup | For balanced tanginess |
| Bay Leaves 🌿 | 2 whole | Fresh preferred, dried acceptable |
| Garlic Cloves 🧄 | 6 cloves | Smash slightly for infusion |
| Yellow Onion 🧅 | 1 whole | Thinly sliced, yellow variety |
| Black Peppercorns 🌶️ | 1 tbsp | Freshly cracked preferred |
| Allspice Berries 🌶️ | ½ tsp | Crushed for aromatic depth |
| Mustard Seeds 🌶️ | ½ tsp | Whole, yellow preferred |
| Diamond Crystal Kosher Salt 🧂 | 1 ½ tbsp | For proper seasoning balance |
| Unsalted Butter 🧈 | 2 tbsp | For final crisping stage |
| Extra-Virgin Olive Oil 🫒 | ¼ cup | High smoke point for searing |
| Fresh Thyme Sprigs 🌿 | 4 sprigs | For aromatic complexity |
| Water 💧 | 2 cups | Filtered preferred for clarity |
The quality of your offal is non-negotiable here. Whole Foods Market or trusted butchers carry the best cuts—look for beef heart with minimal connective tissue and beef tongue that's firm to the touch. If you're sourcing from a Costco or Sam's Club bulk section, inspect for vibrant color and minimal gamey odor. The tongue should be about 1.5 pounds each; hearts should be roughly 1.5 pounds total. Trim any visible fat or silver skin from the heart before proceeding—this ensures even cooking and proper texture. For the vinegars, Heinz or Texas Pete brands provide consistent acidity levels, while Bragg's apple cider vinegar adds subtle sweetness that balances the tang.
No white vinegar? Rice vinegar or champagne vinegar work in a pinch, though they'll alter the flavor profile slightly. Substituting apple cider vinegar with white? Use equal parts lemon juice instead to maintain acidity. Fresh bay leaves are ideal, but if you're using dried, reduce to one-third the amount—they're more potent. For the spices, Penzeys or McCormick Gourmet offer high-quality whole spices that release more aroma when crushed. The mustard seeds should be toasted briefly in a dry pan before adding to the vinegar bath for enhanced flavor complexity. If you're short on time, pre-crushed spices from Trader Joe's work fine, though they lack the depth of freshly ground.
Store any unused vinegar mixture in an airtight container in the refrigerator for up to 2 weeks. The offal itself keeps for 5 days in the fridge once pickled, though it's best enjoyed within 3 days for optimal texture. For longer storage, freeze the cooked and crisped slices for up to 3 months—thaw overnight in the refrigerator before reheating. When reheating, use a dry skillet over medium heat for 2-3 minutes per side to restore that crispy exterior. The pickling liquid can be reused for up to 2 additional batches if strained and stored properly, making this a cost-effective technique for adventurous cooks.
Why You'll Love This Recipe
- One-Pot Magic: I swear by this recipe because it’s literally one pot, one simmer, and done. No chopping, no fussing—just toss in the beef heart and tongue, pour on the vinegars, add bay leaves, and let it work its magic. Honestly, the hardest part is waiting for it to cool.
- Tangy, Meat-Lover’s Dream: That balance of white and apple cider vinegar? It’s chef’s kiss—bright enough to cut through the richness of the heart and tongue, but still rich enough to make your taste buds sing. The bay leaves add this earthy depth that turns it from good to "I need seconds" good.
- Meal Prep MVP: Between us, this recipe is my lazy Sunday secret weapon. Make a big batch, and you’ve got protein-packed snacks for the week—perfect for charcuterie boards, sandwiches, or just snacking straight from the jar. (Yes, even on a Tuesday night.)
- Budget-Friendly Powerhouse: Beef heart and tongue are way cheaper than steak, and this method makes them taste like a gourmet treat. A single batch stretches forever, and the vinegar keeps it fresh for ages. I’ll be real: my wallet and my taste buds both thank me.
Step-by-step instructions for pickled beef heart and tongue
Transform tough cuts into tender, tangy delights with this precise braising technique.
Prepare and Sear the Meats for Maximum Flavor
Begin by trimming all visible connective tissue from the 1.5 lb beef heart and 1 whole beef tongue, then slice the heart into ½-inch thick strips and cut the tongue into 1-inch thick slices. Pat both meats completely dry with paper towels—this ensures proper searing and prevents steam from interfering with the crisp edges.
Heat 0.25 cup extra-virgin olive oil in a heavy Dutch oven over medium-high heat until shimmering. Working in batches to avoid crowding, sear the beef heart strips for 2-3 minutes per side until they develop a deep mahogany crust. Remove and set aside. Repeat with the beef tongue slices, searing for 3-4 minutes per side until golden brown and slightly charred in spots. The goal is to create a flavorful crust that will later soften into tender meat during braising.
Build the Aromatic Vinegar Base
In the same Dutch oven, reduce heat to medium and add 1 whole yellow onion, sliced into ¼-inch rounds, along with the 6 smashed garlic cloves, 1 tbsp cracked black peppercorns, 0.5 tsp crushed allspice berries, and 0.5 tsp mustard seeds. Sauté for 5 minutes until the onions soften and the spices release their aromatic oils—you should detect a complex blend of peppery, citrusy, and earthy notes.
Pour in the 2 cups white vinegar and 1 cup apple cider vinegar, scraping up any browned bits from the bottom of the pot. Add the 2 whole bay leaves and 4 sprigs fresh thyme, then bring the mixture to a gentle simmer. The vinegar should reduce slightly, deepening its tanginess and creating a flavorful liquid that will later tenderize the meats.
Braise Until Fork-Tender with Crispy Edges
Return the seared beef heart and tongue to the Dutch oven, along with the 1.5 tbsp diamond crystal kosher salt. Pour in 2 cups water, then bring the mixture to a gentle boil. Once boiling, reduce heat to low, cover tightly, and let it simmer for 2 hours for the beef heart and 2.5 hours for the beef tongue—this slow cooking breaks down collagen and transforms tough fibers into silky texture.
After the initial braising time, uncover the pot and increase heat to medium-low. Simmer uncovered for an additional 30-45 minutes until the liquid reduces by about one-third and the meats develop a glossy sheen. The edges should begin to crisp slightly as the surface moisture evaporates, creating that sought-after texture contrast. Taste the braising liquid and adjust seasoning if needed.
Finish with Butter for Richness and Crispy Edges
Remove the meats from the braising liquid and transfer them to a serving platter. Strain the cooking liquid through a fine-mesh sieve to remove any herbs or spices, then return it to the Dutch oven. Increase heat to medium-high and add the 2 tbsp unsalted butter, stirring constantly until the butter melts and the liquid emulsifies into a glossy sauce.
Return the meats to the sauce, spooning it generously over the top. Let them sit for 5 minutes to absorb the flavors while the residual heat creates those final crispy edges. Serve immediately with the tangy braising sauce spooned alongside, ensuring each bite delivers both the tender meat and its complex vinegar-infused companion.
Pro Tips For Making Pickled Heart And Tongue
- Trim the Fat First: Beef heart and tongue come with layers of fat that turn rancid in pickling—peel off every visible slice before slicing. I learned this the hard way when my first batch tasted like old frying oil after three days.
- Boil Tongue Low and Slow: Tongue needs 2.5 hours at a bare simmer (180°F/82°C)—any hotter and it’ll shred. Use a heavy pot and check the water level every 30 minutes; topping off keeps it tender, not rubbery.
- Don’t Skip the Salt Cure: Rub heart and tongue with 1 tablespoon kosher salt per pound before pickling—this firms up the texture and prevents them from turning mushy. Let it sit 12 hours uncovered in the fridge; yes, it’ll look weird, but it works.
- Mix Vinegars for Balance: Use 3 parts white vinegar to 1 part apple cider—white gives sharp tang, while cider adds depth. Skip the cider, and your pickles taste harsh; skip the white, and they’re too sweet. (I used to eyeball it until I burned my tongue twice.)
Essential equipment for this recipe
Dutch Oven Essentials
A heavy-duty Dutch oven is non-negotiable for this recipe—it distributes heat evenly and handles the long braising time without hot spots. I recommend a 5-6 quart enameled cast iron like the Le Creuset Signature or Lodge Pre-Seasoned Dutch Oven.
The enameled version prevents rust and makes cleanup easier, while cast iron retains heat beautifully. If you're on a budget, the Amazon Basics enameled Dutch oven works well for occasional use. 🔥
Precision Thermometer
Monitoring internal temperatures ensures perfect doneness without overcooking. A meat thermometer with a probe (like the ThermoWorks Thermapen ONE) gives instant readings. Insert the probe into the thickest part of the tongue—it should reach 195°F for silky tenderness.
For the heart, aim for 160°F to maintain texture. I test both meats at the end of braising to guarantee they're fork-tender but not mushy.
Fine-Mesh Sieve
Straining the pickling liquid cleanly is key for a smooth sauce. A stainless steel fine-mesh sieve (like the OXO Good Grips) removes herbs and spices without letting sediment pass through.
I use mine to strain the braising liquid before finishing with butter—this ensures a velvety sauce without grit. For extra clarity, line the sieve with a cheesecloth for a second pass.
Tongs and Slotted Spoon
Long-handled tongs (like OXO Good Grips) and a slotted spoon are your best tools for handling the meats during searing and braising. The tongs grip the heart and tongue slices securely, while the slotted spoon lets you lift them out without dropping liquid.
I keep both within arm's reach while cooking to avoid overcrowding the pot. A heat-resistant silicone spatula also helps scrape up flavorful browned bits from the bottom.
Butter and Oil Measuring
Precision matters when adding 2 tbsp unsalted butter and 0.25 cup olive oil. Use a liquid measuring cup for the oil and a small ramekin for the butter to avoid spills.
I melt the butter slowly over medium-low heat to prevent burning, then whisk it into the reduced vinegar sauce for a glossy finish. A small whisk (like OXO Stainless Steel) helps emulsify the sauce smoothly.
Storage Containers
For leftovers, glass airtight containers (like Pyrex Simply Store) are ideal—they preserve flavors and prevent freezer burn. Label containers with dates since pickled meats keep for 5 days refrigerated or 3 months frozen.
I also store the pickling liquid separately in a glass jar for up to 2 weeks—it’s perfect for marinating other proteins like chicken or tofu. 💫
Nutrition facts
Frequently asked questions
Why do I need to sear the beef heart and tongue before braising?
Searing creates a flavorful crust that locks in juices and prevents the meats from absorbing too much of the vinegar during braising. The 2-4 minute sear on each side develops a deep mahogany color that transforms into tender, flavorful meat while maintaining that crispy edge. Skipping this step results in bland, mushy textures.
Can I substitute apple cider vinegar with something else?
Yes, but with adjustments. Use lemon juice in equal amounts for brightness, or white wine vinegar for a sharper tang. Avoid balsamic—it's too sweet and won't tenderize properly. The key is maintaining 5% acidity to break down collagen. For a milder flavor, try rice vinegar but reduce to 1 cup total instead of 3.
How do I know when the beef tongue is fully tender?
Use a meat thermometer—the tongue should reach 195°F internally. It should also pierce easily with a fork and have no resistance when pressed between fingers. Overcooking beyond this makes it mushy. For reference, the 2.5-hour braise time is ideal for a 1.5 lb tongue—adjust by 15 minutes per pound if using larger cuts.
What if my pickling liquid turns cloudy or smells off?
Cloudiness is normal during cooking, but if the liquid smells sour or fermented after cooling, discard it immediately. This indicates spoilage from bacteria. Always use fresh vinegar, clean equipment, and store leftovers in airtight containers for 5 days max. The meats themselves should be fine if they still smell pleasant and look unchanged.
Can I make this recipe with pork instead of beef?
Technically yes, but pork heart and tongue require shorter cooking times (1.5 hours for heart, 2 hours for tongue) due to their milder flavors and faster tenderness. Reduce vinegar to 1.5 cups total—pork absorbs less acid. The texture will be slightly more delicate, but the crisping technique remains the same. For best results, use fresh pork and avoid pre-cured cuts.