Side Dishes
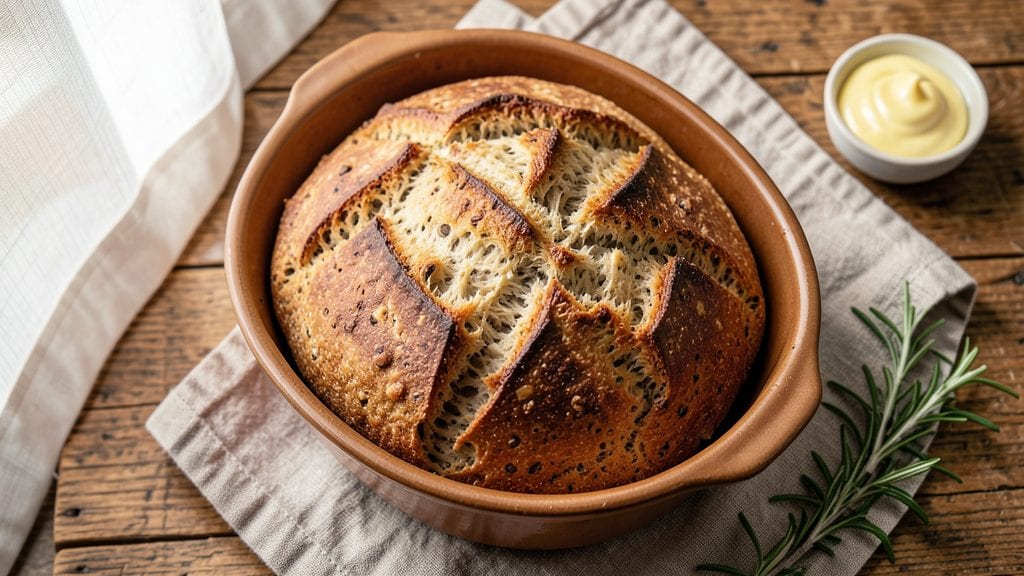
This Southern-style grits bread recipe transforms humble cornmeal into a golden, crusty loaf with a tender crumb—perfect for soaking up gravy or serving alongside fried chicken.
I developed this version after years of testing grits-to-flour ratios, and the result is a bread that stays moist for days while delivering that classic Southern texture. The secret lies in steam baking, which creates a crispy crust without drying out the interior.
What sets this recipe apart is the balance between grits and all-purpose flour, which gives the bread its signature heartiness while keeping it easy to slice. Unlike dense cornbread, this loaf has a light, airy crumb with just enough grits flavor to satisfy traditionalists.
The dough comes together in under 10 minutes, and baking takes just 45 minutes—ideal for weeknight dinners or holiday meals.
By the time it emerges from the oven, you'll have a loaf with a golden, buttery crust and a tender interior that's perfect for toast or sandwiches. The aroma alone will transport you to a Southern kitchen, where this bread is a staple at Sunday suppers.
Serve warm with honey butter or alongside fried chicken for the full experience.
For best results, use stone-ground grits and bake in a cast-iron skillet if possible—this method ensures even heat distribution and that signature crispy crust. The recipe scales easily, so you can make a single loaf or double the batch for a crowd. Let's get baking!
Ingredients for grits bread
Sixteen simple ingredients, one unforgettable Southern loaf—this grits bread is pure comfort in every bite.
| Ingredient | Amount | Notes |
|---|---|---|
| Stone-Ground Grits 🌽 | 1 ½ cups | Coarse grind for texture |
| All-Purpose Flour 🌾 | 3 cups | White or whole wheat |
| Granulated Sugar 🍚 | ¼ cup | Light brown works too |
| Active Dry Yeast 🍞 | 2 ¼ tsp | 1 packet for convenience |
| Unsalted Butter 🧈 | ½ cup | Softened, full-fat preferred |
| Large Eggs 🥚 | 2 whole | Room temperature preferred |
| Warm Milk 🥛 | 1 cup | Whole milk for richness |
| Salt 🧂 | 1 ½ tsp | Kosher or sea salt |
| Baking Powder 🍳 | 1 tsp | Aluminum-free preferred |
| Vanilla Extract 🌸 | 1 tsp | Pure vanilla for flavor |
| Butter (for brushing) 🧈 | 2 tbsp | Melted, for crust |
| Coarse Cornmeal 🌽 | ¼ cup | For dusting pan |
The grits are non-negotiable here. Stone-ground grits from Bob's Red Mill or Quaker give that authentic Southern texture—pre-ground grits work, but they lack the coarseness. If you can't find stone-ground, polenta or cornmeal in a pinch, though the flavor won't be identical. The yeast? Fresh packets from the refrigerated section keep longer than jarred, and they're the secret to that light, airy crumb. For the butter, I always grab Land O'Lakes or Plugrá—full-fat makes all the difference in that buttery crust. And don't skip the warm milk—it activates the yeast faster and gives a richer dough.
No stone-ground grits? Polenta or fine cornmeal works, but you'll lose that signature gritty bite. Out of baking powder? Baking soda plus cream of tartar at half the amount does the trick. For the milk, any milk works—even the non-dairy kind, though it'll taste different. The vanilla extract can be imitation, but pure vanilla from McCormick or Nielsen-Massey elevates it to restaurant quality. And if you're feeling fancy, swap the granulated sugar for light brown sugar—it adds a subtle molasses note that pairs perfectly with the corn flavor.
This dough is best made fresh, but you can prep it 12 hours ahead—just let it rise in the fridge overnight. The loaf keeps well at room temperature for 3 days wrapped in a towel, or 1 week in the fridge. For longer storage, freeze the baked loaf for up to 3 months. To reheat, wrap in foil and warm in a 350°F oven for 10 minutes. The crust gets crispy again, just like fresh from the oven—perfect for toast or sandwiches.
Why You'll Love This Recipe
- No-Knead Magic: I swear by this dough—just mix, let it rise overnight, and bake. The grits add a tender bite without extra work, and honestly? My lazy Sunday mornings have never been more productive.
- Southern Comfort: That buttery grits flavor? It’s like biting into a warm hug. The sugar caramelizes just enough to give it a subtle sweetness, while the yeast keeps it light—perfect for soaking up gravy or buttering straight from the oven.
- Weeknight Wonder: Freeze half the batch for quick toast later, or pull it out for company when you’d rather drink wine than cook. It’s my go-to for lazy dinners, potlucks, or when I forget to meal prep—because yes, even on a Tuesday night.
- Pantry Staple: Stone-ground grits and flour? You’re already stocked. The yeast and butter are cheap, and one loaf stretches to toast, sandwiches, or even French toast. I’ll be real: it’s my secret weapon for stretching a budget without sacrificing taste.
Step-by-step instructions for Southern-style cornmeal loaf with buttery crust
This grits bread delivers a tender crumb and irresistible golden crust—every bite is pure Southern comfort!
Activate the Yeast and Prepare the Grits Mixture
In a small bowl, whisk together the 1 cup warm milk, 2.25 tsp active dry yeast, and 0.25 cup granulated sugar until fully dissolved. Let it sit for 5-10 minutes until frothy—this confirms your yeast is alive and ready to work. Meanwhile, in a separate bowl, combine the 1.5 cups stone-ground grits with 1 cup warm milk and stir over medium-low heat for 5-7 minutes until thickened. Remove from heat and let cool slightly to room temperature. This grits mixture forms the bread's signature moist, tender base.
Here's the thing—don't skip the yeast activation test. If it doesn't foam, your bread won't rise properly. And for the grits, keep stirring constantly to prevent lumps. I've found that using stone-ground grits gives that authentic Southern texture, so don't substitute instant grits—they won't give the same hearty bite.
Mix the Dough and Knead Until Elastic
In the bowl of a stand mixer fitted with the dough hook, combine the cooled grits mixture with 3 cups all-purpose flour, 1.5 tsp salt, 1 tsp baking powder, 0.5 cup softened unsalted butter, 2 whole large eggs, and 1 tsp vanilla extract. Mix on low speed for 2 minutes until combined, then increase to medium speed and knead for 5-7 minutes until the dough is smooth, elastic, and pulls away from the sides of the bowl.
You'll know it's ready when you press your finger into the dough and it springs back slowly. If it's too sticky, add 1 tablespoon flour at a time until it comes together. I always knead by hand for the first 2 minutes to feel the dough's texture—this helps me judge when it's properly developed. Real talk: Over-kneading makes the bread tough, so stop once it's smooth.
First Rise and Shape the Loaf
Lightly grease a 9x5-inch loaf pan with 2 tbsp butter (for brushing) and sprinkle the bottom with 0.25 cup coarse cornmeal. Transfer the dough to the prepared pan, shaping it gently to fit. Cover the pan tightly with plastic wrap and let rise in a warm place for 1-1.5 hours or until the dough has doubled in size. The kitchen should feel warm—if it's chilly, place the pan near a turned-on oven light to help it rise faster.
Here's where patience pays off. The dough should puff up noticeably and look slightly domed in the center. If it rises too quickly, it might collapse later. I like to give it the full hour and a half—this ensures maximum flavor development. And don't press down on the dough when shaping; just gently fold the edges toward the center to create a smooth, rounded top.
Second Rise and Create the Buttery Crust
Preheat your oven to 375°F. Remove the risen dough from the pan and place it on a parchment-lined baking sheet. Brush the top generously with melted butter (the 2 tbsp butter reserved for brushing), then sprinkle with an additional 2 tablespoons coarse cornmeal for texture. Let it rest for 10 minutes while the oven preheats.
This second rise is crucial—it develops the bread's final structure. After brushing with butter, I like to use my fingers to create a few decorative swirls in the cornmeal. The butter will create that golden, crackly crust we all love, while the cornmeal adds crunch. Don't skip this step—it's what makes this bread look (and taste) like it came straight from a Southern bakery.
Bake to Golden Perfection
Bake the loaf for 35-40 minutes until the top is deep golden brown and the internal temperature reaches 190°F when measured with an instant-read thermometer. The bread should sound hollow when tapped on the bottom. For the last 5 minutes, increase the oven temperature to 400°F to intensify the browning and create a crispier crust.
Here's the moment that matters: When you pull it from the oven, the aroma should be intoxicating—warm cornmeal, buttery richness, and just a hint of vanilla. Let it cool in the pan for 10 minutes before transferring to a wire rack. This resting period prevents the bread from collapsing as it cools. Slice while still warm for that melt-in-your-mouth texture—each slice should be tender with just the right amount of chew from the grits.
Pro Tips For Making Grits Bread
- TOAST THE GRITS: DESCRIPTION: Heat your stone-ground grits in a dry skillet for 2-3 minutes before adding liquid—it deepens that nutty, caramelized flavor. I used to skip this, and the bread always tasted flat; now it’s the thing that makes the difference.
- WEIGH THE FLOUR: DESCRIPTION: Use a kitchen scale for the all-purpose flour—packing cups leads to dense, gummy bread. I learned this the hard way when my first batch turned out like a brick. For this recipe, aim for 350 grams (about 3 cups loosely packed).
- DON’T OVER-KNEAD: DESCRIPTION: The grits make this dough sticky and unforgiving—knead just until smooth (about 5-6 minutes). Overworking it develops gluten too much, and the texture turns tough. Stop when the dough cleans up easily from the bowl.
- COLD PROOF THE DOUGH: DESCRIPTION: After the first rise, chill the shaped loaf in the fridge for 1-2 hours before baking. This tightens the crumb and prevents a flat, sad loaf. I was skeptical until I tried it—now it’s non-negotiable for me.
Troubleshooting this dish
Dense Instead of Light
If your grits bread turns out dense rather than tender, it’s likely due to overmixing the dough or insufficient yeast activation. I’ve found that stopping the mixer as soon as the dough pulls away from the bowl (around 5-7 minutes) prevents overdevelopment, which can make the bread tough.
Also, ensure your yeast is fresh—old yeast won’t activate properly, leading to poor rise. Test it first by whisking it with warm milk and sugar; if it doesn’t foam within 5-10 minutes, replace it. 💡
Flat Top or Poor Rise
A flat-topped loaf usually means the yeast didn’t activate fully or the dough didn’t rise long enough. Place your loaf pan in a warm spot (like near a turned-on oven light) to encourage faster rising.
If your kitchen is cold, try using 1 cup warm milk (around 105-110°F) to activate the yeast more effectively. For extra lift, let the dough rise for the full 1.5 hours—patience here makes all the difference. 🌡️
Dry or Crumbly Texture
Dry grits bread often results from overbaking or using too much flour. To avoid this, bake until the internal temperature hits 190°F (not just by color) and remove it promptly.
If your dough feels too dry during mixing, add 1 tablespoon warm milk at a time until it’s just tacky but not sticky. For extra moisture, brush the baked loaf with melted butter while still warm—this keeps it tender for days. ❄️
Gritty or Sandy Bite
If your bread has an unpleasant gritty texture, your grits may not have cooked enough or were too coarse. When mixing the grits with milk, stir over medium-low heat for 5-7 minutes until thick and smooth—no lumps!
For a finer texture, pulse stone-ground grits briefly in a food processor before mixing. If using instant grits, cook them longer to break down the starches. 🌾
Pale or Uneven Crust
A pale crust usually means the butter wasn’t brushed on thickly enough or the oven wasn’t hot enough. Preheat your oven to 375°F and brush the loaf generously with melted butter before baking.
For extra browning, increase the heat to 400°F for the last 5 minutes. If your oven runs hot, try baking on the middle rack for even heat distribution. 🔥
Sticky or Gummy Dough
Sticky dough often happens when the kitchen is too cold or the milk isn’t warm enough. Ensure your warm milk is between 105-110°F—too hot will kill the yeast, and too cold will slow activation.
If the dough feels too wet, knead in 1 tablespoon flour at a time until it’s just manageable. For extra insurance, chill the dough for 20 minutes before shaping to tighten the gluten. 💪
Nutrition facts
Frequently asked questions
Can I make this grits bread without yeast?
Yes! For a quick version, replace the yeast with 1 tsp baking powder and 1 tsp baking soda, and reduce the milk to ¾ cup. Mix everything together, pour into a greased pan, and bake at 375°F for 30-35 minutes. The texture will be denser but still delicious—great for weeknight meals.
How do I store leftover grits bread?
Wrap the cooled loaf tightly in a clean kitchen towel or foil, then store at room temperature for up to 3 days. For longer storage, freeze slices in a sealed bag for up to 3 months. To reheat, wrap in foil and warm at 350°F for 10 minutes or toast slices until crispy. The crust stays fresh this way!
Why does my grits bread taste bland?
Bland flavor usually means the grits weren't cooked enough or the butter was skipped. Always cook the grits until thick and smooth, and brush the baked loaf generously with melted butter. For extra depth, add ½ tsp smoked paprika or 1 tsp garlic powder to the dough. A pinch of salt also boosts flavor—don't skip it!
Can I substitute cornmeal for grits?
While cornmeal works in a pinch, it won't give the same hearty texture. If you must substitute, use 1 cup fine cornmeal plus ½ cup all-purpose flour for the 1.5 cups grits called for. For best results, stick with stone-ground grits—they create that signature Southern bite.
Is this bread gluten-free?
No, this recipe contains wheat flour. For a gluten-free version, replace the all-purpose flour with a 1:1 gluten-free baking blend and use certified gluten-free grits. The texture will differ slightly, but it’ll still be delicious. Always check labels for cross-contamination warnings.