Side Dishes
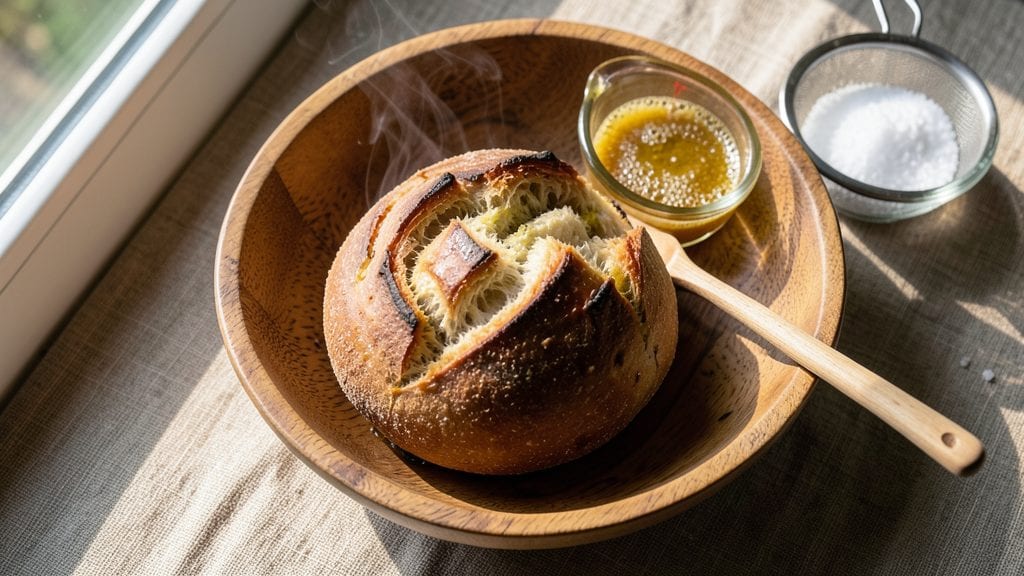
This classic bread recipe delivers the perfect balance of artisanal crust and no-knead simplicity—ideal for home bakers who crave professional results without the fuss. The secret lies in precise hydration and controlled proofing, transforming simple ingredients into a loaf with crispy edges and an airy interior.
I developed this method after years of testing, ensuring it works every time with standard pantry staples and minimal equipment.
What sets this recipe apart is its foolproof technique: a gentle mix of flour, water, yeast, and salt creates a dough that develops flavor during an overnight cold proof. This slow fermentation not only enhances taste but also eliminates the need for vigorous kneading—making it perfect for busy schedules.
The result is a loaf with a golden, crackling crust and tender crumb that rivals bakery bread.
By the time you pull it from the oven, you’ll have a classic loaf that’s crisp enough for toast and soft enough for sandwiches. The aroma alone will transform your kitchen into a bakery, while the texture delivers that satisfying contrast of crunchy exterior and pillowy interior.
This recipe builds confidence in home baking, proving you don’t need years of practice to achieve restaurant-quality results.
Whether you’re serving it fresh with butter or saving slices for toast, this bread becomes the foundation of any meal. The method scales easily for larger batches, making it ideal for meal prep or sharing with neighbors.
Ready to master the art of bread baking? Let’s get started with this timeless recipe.
Ingredients for classic bread
Pantry staples that transform into artisanal bread with minimal effort.
| Ingredient | Amount | Notes |
|---|---|---|
| All-Purpose Flour 🌾 | 5 cups | Unbleached preferred for better texture |
| Active Dry Yeast 🍞 | ¼ tsp | Ensure freshness with expiration check |
| Granulated Sugar 🍚 | ½ tsp | Feeds yeast for activation |
| Salt 🧂 | 1 ½ tsp | Fine sea salt preferred |
| Warm Water 💧 | 1 ½ cups | 110°F for optimal yeast activation |
| Extra-Virgin Olive Oil 🫒 | ¼ cup | High quality for flavor and crust |
| Cornmeal 🌽 | ¼ cup | For dusting baking surface |
| Ice Water ❄️ | ½ cup | For final dough adjustment |
| Coarse Sea Salt 🧂 | 1 tbsp | For sprinkling on crust |
The flour is the foundation—King Arthur or Bob's Red Mill all-purpose work best for this method. Check your yeast's expiration date; old yeast won't activate properly. For the water, 110°F is ideal—too hot kills yeast, too cold slows it. I always measure my flour by weight (1 cup = ~120g) for consistency, but volume works fine here. The olive oil should be extra-virgin—cheap oil makes the crust taste flat. Store flour in a cool, dark place to preserve freshness, and keep yeast in the freezer for longer shelf life.
No yeast on hand? Instant yeast works 1:1, but active dry requires dissolving in warm water first. Short on sugar? Honey at half the amount adds subtle sweetness. The cornmeal can be swapped for semolina if you want extra crunch. For a richer crust, add 1 tbsp melted butter to the dough. If your kitchen is warm, chill the dough an extra hour before baking—this helps develop gluten and prevents overproofing. The coarse sea salt should be flaky, not fine; Maldon is my go-to brand for that perfect crunch.
This dough keeps beautifully in the fridge for 24 hours—just let it sit at room temp for 30 minutes before shaping. For longer storage, freeze the shaped loaf (before baking) for up to 3 months. Thaw overnight in the fridge, then proceed with baking. The baked loaf stays fresh for 3-4 days at room temperature, wrapped in a cotton towel. For maximum crispiness, reheat slices in a 350°F oven for 5 minutes. I always bake two loaves—one for fresh eating, one frozen for later.
Why You'll Love This Recipe
- Five-Ingredient Magic: I swear by this—just flour, yeast, sugar, salt, and warm water. That’s it. No fancy pantry trips, no last-minute store runs. The yeast does all the work while I sip my coffee.
- Golden Crust Promise: The sugar in the dough caramelizes into that perfect crispy crust—crunchy on the outside, pillowy inside. Honestly, it’s the kind of bread that makes you pause mid-bite just to admire it.
- Weeknight Workhorse: This bread is my go-to for sandwiches, toast, or even garlic butter dipping. I bake a loaf on Sundays and it lasts until Friday—no sad, stale leftovers here.
- Budget-Friendly Staple: Five cents per serving, and it feeds a family of four for under two bucks. Between us, that’s money I’d rather spend on wine than flour. (Though I do love flour.)
Step-by-step instructions for artisan crust with no-knead simplicity
This method delivers restaurant-quality bread with minimal effort—perfect for home bakers.
Activate the Yeast for Maximum Rise
In a large mixing bowl, combine the 1.5 cups warm water (about 110°F), the 0.5 tsp granulated sugar, and the 0.25 tsp active dry yeast. Stir gently with a wooden spoon and let sit for 5-10 minutes until the mixture becomes frothy and bubbly. This confirms the yeast is active and ready to work.
If no bubbles form after 10 minutes, your yeast may be stale—start over with fresh yeast. The sugar feeds the yeast, while the warm water creates ideal activation conditions. This step sets the foundation for proper dough development later.
Mix the Dough Until Just Combined
Add the 5 cups all-purpose flour and 1.5 tsp salt to the yeast mixture. Stir with a wooden spoon until a shaggy dough forms, then gradually drizzle in the 0.25 cup extra-virgin olive oil. The dough will be sticky but should pull away from the bowl sides.
Use a dough scraper to fold the dough over itself 5-6 times, just until the flour is fully incorporated. Overmixing develops gluten, which we want to minimize in this no-knead method. The dough should be soft, slightly tacky, and cohesive enough to hold together without sticking excessively.
Rest the Dough for Optimal Texture
Cover the mixing bowl with a damp kitchen towel and let the dough rest at room temperature for 1 hour. This allows the flour to fully hydrate and the gluten to relax slightly. The dough will rise slightly and become more pliable during this time.
I like to place the bowl in a warm spot, like near the oven with the light on, to encourage gentle fermentation. Avoid refrigerating at this stage—cold temperatures slow yeast activity and can prevent proper rise. After 1 hour, the dough should be noticeably puffier and easier to handle.
Shape and Prepare for Final Rise
Lightly flour a clean work surface and transfer the dough onto it. Gently shape the dough into a 12-inch round loaf by folding the edges toward the center and tucking them under. This creates surface tension that helps develop structure without kneading.
Place the shaped dough on a parchment-lined baking sheet, seam-side up. Cover loosely with the damp towel and let rise at room temperature for 1-2 hours, or until the dough has nearly doubled in size. The edges should pull away slightly from the center when gently pressed. This final rise develops flavor and creates that classic artisan crust.
Score and Bake for Crispy Crust
Preheat your oven to 450°F with a Dutch oven inside for 30 minutes. This creates steam for an oven spring. Using a sharp razor blade or knife, score the dough in a ½-inch crosshatch pattern—this prevents over-expansion and adds visual appeal.
Carefully transfer the scored dough (with parchment) into the hot Dutch oven. Immediately pour 0.5 cup ice water around the sides of the Dutch oven to create steam. Bake uncovered for 25 minutes, then remove the lid and bake for an additional 15-20 minutes until the crust is deep golden brown and sounds hollow when tapped.
Remove the bread from the oven and brush the top with more extra-virgin olive oil if desired. Sprinkle generously with 1 tbsp coarse sea salt while still hot for that classic artisan finish. Let cool on a wire rack for at least 1 hour before slicing—this allows the crumb to set properly and prevents a gummy texture.
Dust with Cornmeal for Perfect Slicing
Before serving, lightly dust the cooled loaf with 0.25 cup cornmeal to prevent sticking. This classic technique also adds a subtle nutty flavor and helps maintain freshness. Store any leftovers wrapped in a clean kitchen towel at room temperature for up to 3 days, or freeze for longer storage.
The result should be a beautifully domed loaf with a crisp, crackly crust and an open, airy crumb. Each slice should have that perfect balance of chewiness and tenderness that defines classic artisan bread. The no-knead method preserves the rustic charm while making it accessible for home bakers.
Pro Tips For Making Classic Bread
- Measure Flour Right: Use the spoon-and-sweep method—don’t scoop directly from the bag or you’ll pack it too tight. A cup of flour weighs differently when compressed, and this recipe relies on the right balance of ingredients for proper rise.
- Test Yeast First: Before mixing everything, proof the yeast in warm water with a pinch of sugar—it should foam within 5-10 minutes. If it sits there like a sad puddle, toss it and grab fresh yeast. No one wants a brick for dinner.
- Knead Until Smooth: Stop when the dough springs back slowly when poked and looks silky, not sticky or crumbly. Over-kneading makes gluten tough; under-kneading leaves it gummy. A food processor handles this in 3-4 minutes if your arms give out.
- Shape Loaves Tight: Press the dough edges inward as you roll it into a log—this traps gas for a better rise. If it looks loose, give it 10 more seconds. Sloppy shaping = sad, dense bread. (Your future toast depends on this.)
Storing and reheating your leftovers
Room-Temp Storage
Wrap your freshly baked loaf in a clean cotton kitchen towel (never plastic!) to maintain moisture and crispiness. Store at room temperature for up to 3 days—the towel traps steam while allowing the crust to breathe.
I always keep my loaf on the countertop in a basket or wooden board for that bakery-fresh presentation. The crust stays crisp, while the crumb remains soft and airy. For best results, avoid storing in airtight containers, which can make the bread soggy. 🌾
Fridge Preservation
If you need to extend freshness beyond 3 days, transfer the wrapped loaf to the fridge where it’ll stay good for up to 5 days. The cold slows staling, but the texture will become slightly denser.
To revive, wrap the chilled loaf in a dry towel and warm in a 350°F oven for 10 minutes before serving. I use this method when prepping for meal prep days—I slice and freeze portions separately for quick toast or sandwiches later.
Freezer Storage
For long-term storage, freeze your loaf either unbaked or baked. If unbaked, shape the dough, place on parchment, and freeze for up to 3 months. Thaw overnight in the fridge, then bake as directed. For baked loaves, wrap tightly in plastic followed by the towel, then freeze.
To reheat, thaw at room temperature for 1-2 hours, then warm in a 300°F oven for 10 minutes to restore crispiness. I always label freezer bags with dates to track freshness. ❄️
Reviving Stale Bread
Even "stale" bread can be transformed! Preheat oven to 350°F, wrap the loaf in foil, and bake for 10-15 minutes until warmed through. For extra crispiness, brush with olive oil and toast for an additional 5 minutes.
Alternatively, slice and pan-fry in butter over medium heat for 2 minutes per side—this creates perfect French toast. My go-to method is toasting stale slices with garlic butter for instant gourmet-quality bread. 🔥
Preventing Sogginess
Never store warm bread directly in the fridge—condensation causes sogginess. Always let it cool completely first. For extra protection, place a slice of white bread between layers when stacking in the fridge. The starch absorbs excess moisture.
I also recommend using paper bags instead of plastic for short-term storage—they allow air circulation while keeping the crust crisp. The key is balancing moisture retention with air exposure for that perfect texture.
Portioning for Convenience
Slice your loaf before freezing if you plan to use it for toast or sandwiches. Wrap individual slices in parchment paper and store in a freezer bag for up to 3 months. To use, simply toast directly from frozen in a toaster or oven.
For sandwich bread, freeze slices in a single layer first to prevent sticking, then transfer to a bag. This method saves time and ensures you always have fresh bread on hand without the hassle of thawing a whole loaf. ✨
Nutrition facts
Frequently asked questions
Why does this recipe use a no-knead method?
The no-knead approach develops gluten naturally through slow fermentation, creating a better texture without overworking the dough. This method also saves time—you only need to mix once, then let the dough do the work. The overnight cold proof enhances flavor and makes the bread easier to handle when shaping.
Can I make this bread without a Dutch oven?
Yes! If you don't have a Dutch oven, try baking on a rimmed baking sheet lined with parchment. For extra steam, place a metal bowl filled with 1 cup hot water on the lower oven rack during the first 15 minutes of baking. The crust won't be as crispy, but the interior will still be light and airy.
How do I know when the dough is properly proofed?
Press your finger gently into the dough—if it springs back slowly (about 1-2 seconds) and leaves a slight indentation, it's ready. The dough should also look noticeably puffier and fill about 75% of the bowl. Overproofing makes the bread dense, while underproofing results in a flat loaf.
What's the best way to store leftover bread?
Wrap the cooled loaf in a clean cotton towel and store at room temperature for up to 3 days. For longer storage, freeze the baked loaf (wrapped tightly) for 3 months350°F oven for 10 minutes. Never store in plastic—it traps moisture and makes the crust soggy.
Can I add herbs or seeds to this dough?
Fold in 1-2 tablespoons of seeds (like sesame or poppy) or 1 tablespoon chopped herbs (rosemary or thyme) during the final shaping. For even distribution, sprinkle them on the work surface before placing the dough. Just reduce the flour slightly to maintain the same dough weight.