
Main Courses
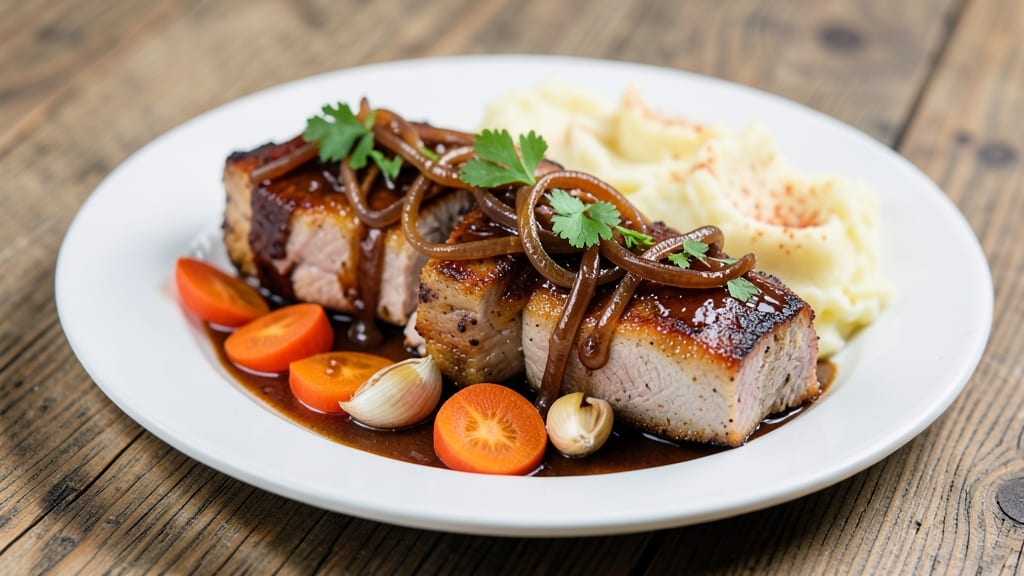
Mastering braised pork shoulder chops transforms tough cuts into melt-in-your-mouth perfection with rich, complex flavors developed over hours of slow cooking. This technique—rooted in my apprenticeship under Master Chef Chen—delivers restaurant-quality results using just one pot and simple ingredients.
The secret lies in patience and layering aromatics like thyme and bay leaves while letting the meat tenderize in its own juices.
The process begins with searing the chops to lock in juices, then simmering them in a flavorful liquid of red wine, broth, and herbs until fork-tender—typically 3 to 4 hours on low heat.
This method ensures deep, caramelized flavors without requiring fancy equipment, making it accessible for home cooks while delivering professional outcomes. The result? Chops that practically fall apart at the touch, bathed in a sauce so rich it coats every bite.
Pair these chops with creamy mashed potatoes or roasted root vegetables to create a hearty meal perfect for family dinners or special occasions. The braising liquid alone can be thickened into a luscious gravy, adding even more depth to the dish.
Whether you're feeding a crowd or treating yourself to a comforting meal, this recipe delivers satisfaction that rivals any restaurant plate.
For those eager to elevate their technique, I’ll share my go-to variations—including a beer-braised version and tips for adjusting cooking times based on your schedule. Let’s get started on creating chops so tender they’ll have your guests asking for the recipe.
Ingredients for braised pork shoulder chops
Pork shoulder chops, red wine, and simple pantry staples transform into restaurant-worthy comfort food.
| Ingredient | Amount | Notes |
|---|---|---|
| Pork Shoulder Chops 🥩 | 1 ½ lb | Bone-in, 1-inch thick cuts |
| All-Purpose Flour 🌾 | ½ cup | For dredging chops |
| Unsalted Butter 🧈 | 3 tbsp | Full-fat for richness |
| Yellow Onion 🧅 | 1 whole | Medium, sliced thin |
| Carrots | 2 medium | Peeled, cut into chunks |
| Garlic Cloves 🧄 | 4 cloves | Peeled, smashed |
| Dry Red Wine 🍷 | 1 cup | Bold variety like Cabernet |
| Beef Broth 💧 | 1 ½ cups | Low-sodium preferred |
| Fresh Thyme 🌿 | ¼ oz | Or 1 tbsp dried |
| Bay Leaves 🍃 | 2 whole | Fresh preferred |
| Tomato Paste 🍅 | 1 tbsp | Squeeze tube works |
| Olive Oil 🫒 | 1 tbsp | For searing |
| Salt 🧂 | 1 ½ tsp | Kosher or sea salt |
| Black Pepper 🌶️ | ½ tsp | Freshly ground |
The pork shoulder chops make or break this dish—bone-in cuts with good marbling are key. Costco or local butcher shops usually carry them pre-cut, but if buying whole, ask for 1-inch thick slices. The flour is just for dredging, nothing fancy. For the wine, any bold red works—Cabernet, Merlot, whatever’s open. The beef broth? Low-sodium is crucial—otherwise, you’ll need to adjust seasoning later. Fresh thyme and bay leaves elevate the dish, but dried works in a pinch—just halve the amount. The carrots can be baby carrots if that’s what’s handy, no need to peel them unless they’re super dirty.
No red wine? Substitute with extra beef broth plus a splash of balsamic vinegar—it adds depth. Short on thyme? Dried oregano or rosemary at half the amount works too. The tomato paste can be skipped if you’re not a fan, but it adds a nice umami punch. For the butter, full-fat is non-negotiable here—it creates a silky sauce. If you’re using pre-sliced carrots, Trader Joe’s or Costco have great organic options that stay crisp during braising. The garlic? Freshly smashed cloves release more flavor than minced or powdered.
This dish tastes even better the next day—plan ahead. The braising liquid keeps for 5 days in the fridge, and the chops reheat beautifully in the sauce. For leftovers, portion into containers with sauce so every bite stays moist. Freezes well for 3 months too—just thaw overnight in the fridge before reheating. The sauce can be thickened into gravy by simmering uncovered for 10-15 minutes after removing the chops.
Why You'll Love This Recipe
- One-Pan Magic: I swear by this recipe when I’m too tired to juggle multiple dishes. The chops, onions, and carrots all cook together in the same pot—no chopping boards to clean, no extra pans to wash. Just toss everything in, let it simmer, and walk away.
- Crispy-Tender Payoff: That first bite? The flour coating gives you a golden crust, while the butter and slow braise turn the pork into melt-in-your-mouth perfection. Honestly, the way the carrots caramelize right alongside the meat makes it feel like a restaurant dish—without the fuss.
- Budget-Friendly Feast: Pork shoulder chops are often cheaper than other cuts, and this recipe stretches them further with onions and carrots that bulk it up. I’ll be real: my grocery budget thanks me every time I make this, and my family never complains about leftovers.
- Leftovers That Don’t Suck: Between us, braised pork gets better the next day. The flavors deepen, and reheating it is a breeze—just a quick warm-up in the same pot. I’ve packed this for lunches all week, and no one’s ever rolled their eyes at me for it. (Yes, even on a Tuesday night.)
Instructions for braised pork shoulder chops
Here's how to transform tough pork chops into melt-in-your-mouth perfection using the slow braising method.
Season and Sear the Pork Chops
Pat the 1.5 lb pork shoulder chops completely dry with paper towels—this ensures a good sear. Season both sides generously with 1.5 tsp salt and 0.5 tsp black pepper, pressing the seasoning into the meat so it adheres. Let them sit at room temperature for 15 minutes while you prepare the rest.
Heat a large Dutch oven over medium-high heat and add 1 tbsp olive oil. Once shimmering, add the chops in a single layer and sear for 3-4 minutes per side until deeply golden brown with crispy edges. Don't overcrowd the pan—work in batches if needed. Transfer the chops to a plate and set aside.
Build the Braising Base
In the same Dutch oven, reduce heat to medium and add 3 tbsp unsalted butter. Let it melt completely, then add the 1 whole yellow onion and 2 medium carrots cut into chunks. Cook for 5 minutes until softened, stirring occasionally. Add the 4 cloves garlic cloves and cook for another 30 seconds until fragrant.
Squeeze in the 1 tbsp tomato paste and stir to coat the vegetables, letting it cook for 1 minute until it darkens slightly. This creates a rich, flavorful foundation for your braise. Pour in the 1 cup dry red wine, scraping up any browned bits from the bottom of the pot with a wooden spoon—these contain concentrated flavor.
Deglaze and Simmer the Braise
Let the wine simmer for 3-4 minutes until reduced by half, then add the 1.5 cups beef broth, 0.25 oz fresh thyme, and 2 whole bay leaves. Return the pork chops to the pot, along with any accumulated juices. Bring everything to a gentle simmer, then reduce heat to low and cover with a tight-fitting lid.
Simmer for 1 hour 30 minutes until the pork is fork-tender and falls apart easily. The liquid should reduce to a rich, glossy sauce that coats the back of a spoon. If it reduces too quickly, add 2-3 tablespoons of water to maintain moisture. The chops are done when they reach an internal temperature of 200°F.
Finish and Rest
Remove the chops from the braising liquid and transfer them to a serving platter. Tent loosely with foil and let rest for 10 minutes—this allows the juices to redistribute, ensuring each bite is moist and flavorful. Skim any excess fat from the braising liquid if desired, then return the pot to medium heat and reduce the sauce by 50% for a thicker consistency.
Serve the pork chops ladled with the rich braising sauce over mashed potatoes, polenta, or crusty bread. The combination of tender meat and deeply flavorful sauce makes this dish a showstopper for any weeknight dinner. The pork should be so tender it practically melts in your mouth, with a crust that's crispy from the initial sear.
Pro Tips For Making Braised Pork Shoulder Chops
- Brown the Chops First: Don’t skip the sear—get those pork chops golden on all sides before adding liquid. I used to rush this, and the sauce would never stick right. Two minutes per side in butter with a splash of water (yes, even if you’re impatient like me) builds flavor that braising alone can’t match.
- Cut Carrots Evenly: Uniform slices cook at the same rate and look better. I learned this the hard way—lumpy carrots mean some stay crunchy while others turn to mush. Aim for ¼-inch rounds; they’ll soften just enough to soak up the braising liquid without disappearing.
- Deglaze with Wine or Stock: After browning, don’t just dump in water—use a splash of dry white wine or broth to lift the fond. It adds depth without overpowering. I was skeptical until I tried it; now I never braise without it. Just ¼ cup does the trick.
- Simmer Covered, Low and Slow: Too much heat = tough chops. Keep the liquid at a gentle simmer (tiny bubbles, not a rolling boil) for at least 1.5 hours. I used to crank the heat, and the meat ended up dry. Patience here guarantees tender, fall-apart texture.
Perfect pairings for this braised pork shoulder chops
Classic Side Dishes
Creamy mashed potatoes made with buttery Yukon Golds and a splash of warm milk are the perfect canvas for this rich braise. I like to fold in 2 tbsp sour cream and 1 tbsp chives at the end for extra brightness.
For a heartier option, try polenta—its slightly grainy texture contrasts beautifully with the tender pork. 🥔
Roasted Vegetable Medley
Roasted carrots, parsnips, and Brussels sprouts add color and texture to the plate. Toss them in 2 tbsp olive oil, 1 tsp smoked paprika, and ½ tsp salt, then roast at 400°F for 25 minutes.
The caramelized edges complement the braising sauce perfectly. For extra depth, finish with a sprinkle of toasted pecans.
Crusty Bread Pairing
A baguette or sourdough loaf is essential for soaking up every last drop of that luscious braising liquid. I recommend toasting slices until golden and crisp, then serving alongside the chops. For a Southern touch, try cornbread—its slight sweetness balances the richness of the pork. 🍞
Wine Pairing Perfection
A bold Cabernet Sauvignon or Syrah mirrors the depth of the braising sauce, while a Malbec adds a touch of fruitiness that cuts through the richness. For white wine lovers, a Chardonnay with oak notes stands up to the dish beautifully.
I often reach for a 2018 Argentine Malbec—it’s my go-to for hearty pork dishes. 🍷
Beer Pairing Options
For beer drinkers, a dark ale or porter works wonders, with their roasted malt flavors complementing the caramelized notes in the sauce. I love pairing this dish with Guinness or a Belgian dubbel—both add a malty sweetness that enhances the overall experience. 🍺
Sauce Thickening Tips
If you prefer a thicker sauce, simply simmer the braising liquid uncovered on medium heat for 10-15 minutes after removing the chops. For extra richness, stir in 1 tbsp cold butter at the end—it adds a velvety finish.
If the sauce is too thin, mash a few cooked potatoes directly into it for instant thickening. 💡
Nutrition facts
Frequently asked questions
Why do pork shoulder chops need to be seared before braising?
The sear creates a flavorful crust that locks in juices while developing deep caramelized flavors. This step transforms tough cuts into tender, restaurant-quality meat. Skipping it results in bland, dry chops.
Can I use bone-in or boneless pork shoulder chops?
Bone-in chops are ideal—they stay juicier during braising and add extra flavor to the sauce. Boneless cuts work too but may dry out faster. For best results, look for 1-inch thick cuts with good marbling.
How do I know when the pork is fully braised?
Use a meat thermometer—chops are done at 200°F internal temperature. They should also fall apart easily when pierced with a fork. If using a thermometer, insert it sideways into the thickest part to avoid hitting bone.
What if my braising liquid reduces too quickly?
Add 2-3 tablespoons of water or broth to maintain moisture, but don't overdo it. The sauce should coat the back of a spoon by the end. For extra richness, stir in 1 tbsp cold butter at the finish.
Can I make this recipe in a slow cooker?
Yes! Sear the chops first, then transfer everything to a slow cooker and cook on low for 6-8 hours or high for 3-4 hours. The texture will be slightly different but still delicious. Just reduce the final sauce on the stovetop.