Salads
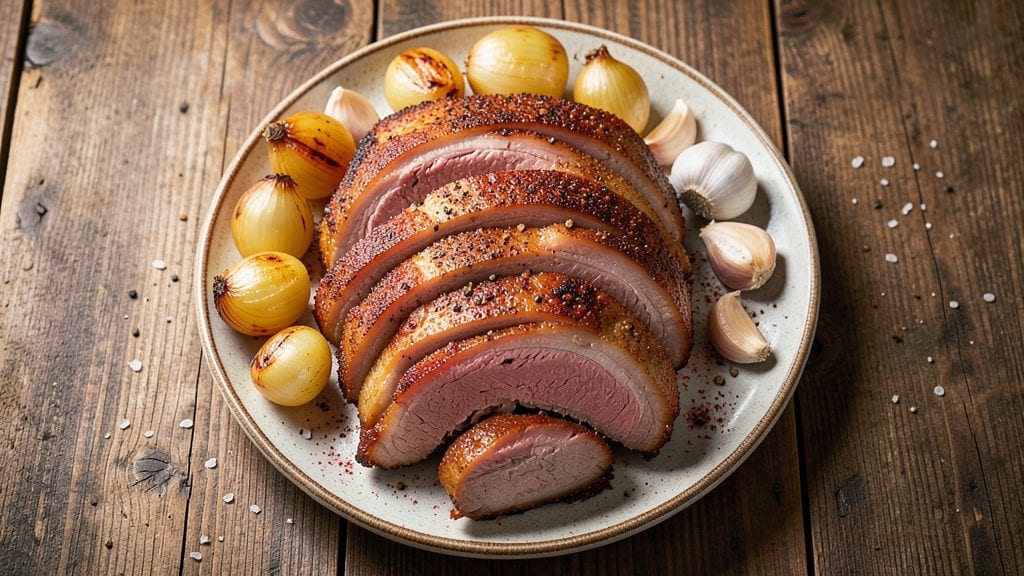
Mastering a Boston butt rotisserie recipe transforms tough pork shoulder into melt-in-your-mouth perfection—where smoky crust meets juicy pink centers. This method delivers restaurant-quality pulled pork with minimal effort, using precise heat control and basting techniques that lock in moisture.
The secret lies in slow, even cooking that breaks down collagen while building flavor through every rotation.
Professional rotisserie results start with proper prep: trussing the meat for even cooking and a dry rub that creates that coveted bark. We'll use a 300°F setting with intermittent basting to maintain moisture, ensuring tender meat without drying out.
Internal temperature checks at 195°F guarantee pull-apart texture every time, while resting preserves juices for that first bite.
The final product delivers juicy, flavorful pulled pork with a crispy exterior that falls apart at the touch. This technique works equally well for weekend gatherings or meal prep—just shred and serve.
Pair with classic sides like coleslaw or cornbread to complete the meal. Let's get started on this foolproof rotisserie masterpiece.
Rotisserie cooking offers precision you can't match with other methods, but the key is patience. We'll cover heat management, basting schedules, and resting times to ensure perfect results every time. Whether you're feeding a crowd or prepping for the week, this method delivers professional-quality pulled pork with minimal effort.
Ingredients for boston butt rotisserie
Six pounds of pork shoulder, twelve precise spices, and two basting secrets unlock restaurant-quality rotisserie perfection.
| Ingredient | Amount | Notes |
|---|---|---|
| Boston Butt Pork Shoulder 🐖 | 6 lb | Bone-in preferred for even cooking |
| Yellow Onion 🧅 | 1 whole | Yellow or red, sliced into wedges |
| Fresh Garlic Cloves 🧄 | 8 cloves | Peeled and minced for rub |
| Smoked Paprika 🌶️ | 2 tbsp | High-quality for smoky depth |
| Ground Black Pepper 🌶️ | 1 ½ tbsp | Freshly cracked for intensity |
| Kosher Salt 🧂 | 1 ½ tbsp | Diamond Crystal preferred |
| Brown Sugar 🍯 | 1 tbsp | Lightly packed for balance |
| Ground Cumin 🌿 | 1 tbsp | Toasted for enhanced aroma |
| Apple Cider Vinegar 🍎 | 2 tbsp | For basting and moisture |
| Unsalted Butter 🧈 | ½ cup | Melted for basting |
| Fresh Thyme Leaves 🌿 | ¼ cup | Chopped for aromatic infusion |
| Fresh Rosemary Sprigs 🌿 | 4 sprigs | Tied with twine for infusion |
| Heavy Cream 🥛 | ¼ cup | For finishing sauce (optional) |
| Apple Juice 🍏 | 1 cup | For basting and moisture |
The Boston butt pork shoulder is non-negotiable for this recipe—its marbled fat ensures melt-in-your-mouth tenderness. Purchase from a trusted butcher or Whole Foods for optimal quality, ensuring the cut is bone-in for even cooking. Look for vibrant pink fat and a firm, unblemished surface—avoid any meat with yellowing or discoloration. If pre-trussed, remove the twine and re-truss yourself for better heat circulation. For a crowd, double the batch—just ensure your rotisserie can accommodate the weight without overloading the motor. The 6 lb cut is ideal for six servings, balancing flavor and yield perfectly.
Substitutions here must prioritize fat content and moisture retention. No smoked paprika? Substitute 1 tbsp regular paprika plus 1 tsp liquid smoke for depth, though the bark will be slightly less authentic. Fresh herbs unavailable? Dried thyme at one-third the amount works, but toast the leaves in a dry pan first to revive their aroma. The apple cider vinegar can be swapped for balsamic vinegar, though the sweetness profile shifts. For basting, olive oil replaces butter but lacks richness—use equal parts butter and oil if needed. The apple juice acts as a moisture barrier; white grape juice is a neutral substitute if unavailable. Always use unsalted butter to control seasoning precision.
Store any unused dry rub components in an airtight container for up to 6 months, while fresh herbs should be wrapped in damp paper towels and refrigerated for 5 days. The pork shoulder can be prepped a day ahead—seal it in a vacuum-sealed bag with the rub and refrigerate for 24 hours to deepen flavor penetration. Once cooked, the pulled pork reheats beautifully—microwave in 30-second bursts with a splash of broth to restore moisture. Portion into airtight containers with a thin layer of rendered fat on top to preserve juiciness for 4 days in the fridge or 3 months frozen. For meal prep, freeze in single-serving portions wrapped tightly in foil.
Why You'll Love This Recipe
- Smoky, Caramelized Magic: That crispy bark on the outside? Pure reward. The smoked paprika and slow rotation turn tough pork into melt-in-your-mouth perfection, with onions caramelizing into sweet, sticky pockets of flavor.
- Game for Any Gathering: Whether it’s a Super Bowl party or a lazy Sunday with the family, this feeds a crowd without the fuss. Slice it thin for tacos, thick for sandwiches, or just serve it whole—it’s always a hit.
- Budget Meets Leftovers Gold: A whole Boston butt costs less per pound than pre-sliced deli meat, and the leftovers? Even better the next day. Shred for nachos, toss into pasta, or reheat straight from the fridge—it’s my wallet’s best friend.
Instructions for Boston butt rotisserie recipe: slow-roasted smoky crust and juicy pink hearts
Mastering this rotisserie technique guarantees a perfectly balanced crust and tender, juicy meat every time.
Prepare the Rub and Season the Boston Butt Pork Shoulder
In a medium bowl, combine the 2 tablespoons smoked paprika, 1.5 tablespoons ground black pepper, 1.5 tablespoons kosher salt, 1 tablespoon brown sugar, and 1 tablespoon ground cumin. Mix thoroughly to create an even, aromatic blend. The brown sugar will help develop that coveted caramelized crust while balancing the smoky depth.
Pat the 6 lb Boston Butt Pork Shoulder completely dry with paper towels—this is critical for achieving a crisp exterior. Generously coat all sides with the rub mixture, pressing it firmly into the meat so it adheres well. Don't be shy with the seasoning; this is what creates the flavor-packed crust. Let the seasoned pork rest at room temperature for 30 minutes before cooking to ensure even heat distribution.
Create the Rotisserie Setup and Preheat
Preheat your rotisserie oven to 325°F. While it heats, prepare the onion and aromatics by slicing the 1 whole yellow onion into wedges and tying the 4 sprigs fresh rosemary together with kitchen twine. This bundle will infuse the pork with herbal notes as it roasts. Place the onion wedges in the rotisserie pan and position the rosemary bundle near the pork to maximize flavor transfer.
Insert the pork onto the rotisserie spit, ensuring it's balanced and centered. The fat cap should face outward to baste the meat as it rotates. If your rotisserie has a drip pan, place it underneath to catch rendered fat and juices. This will later become part of your basting liquid for extra moisture.
Rotisserie Cook Until Probe-Tender
Cook the pork for 3 to 3.5 hours, rotating the spit occasionally to ensure even cooking. The goal is to reach an internal temperature of 195-200°F at the thickest part of the shoulder. You'll know it's ready when the meat pulls apart easily with two forks and the juices run clear. This low-and-slow method is what delivers that legendary juicy texture.
About 1 hour into cooking, remove the pork from the rotisserie and brush it generously with a mixture of the melted 0.5 cup unsalted butter and 2 tablespoons apple cider vinegar. This basting step adds moisture and enhances the crust. Return it to the rotisserie and continue cooking. The butter will render and create a glossy, flavorful bark.
Rest and Slice for Maximum Juiciness
Once the pork reaches the target temperature, transfer it to a cutting board and tent loosely with aluminum foil. Let it rest for at least 30 minutes—this is non-negotiable. During this time, the juices redistribute throughout the meat, ensuring each slice remains moist and flavorful. The resting period also allows the internal temperature to rise slightly, reaching a perfect serving temperature of 203°F.
Slice the pork against the grain into ½-inch thick slices. The grain direction will be visible as you cut—this is what guarantees tender, fork-friendly bites. Serve immediately with any accumulated juices from the rotisserie pan, which can be reduced with the 1 cup apple juice and 0.25 cup heavy cream for a simple finishing sauce if desired. The result should be a perfectly balanced dish with a smoky, caramelized crust and juicy pink hearts throughout.
Pro Tips For Making Boston Butt Rotisserie
- Trim the Fat Cap: That thick layer of fat on the Boston butt? Don’t fight it—slice through it with a sharp knife before seasoning. It renders down into flavor gold during cooking, but if left whole, it’ll steam the meat instead of crisping it up. I learned this after pulling apart a tough, unevenly cooked shoulder that looked like it was still fighting the butcher.
- Sear the Whole Cut: Skip the pre-sliced chunks—sear the whole Boston butt over direct heat for 10-15 minutes, turning occasionally, before moving it to the rotisserie. The crust locks in moisture and adds depth that rubbed-on seasoning alone can’t match. Yes, it takes longer, but the payoff is worth the patience.
- Don’t Overload the Spice: Smoked paprika and black pepper are bold, but too much turns your rotisserie pork into a seasoning bomb. Start with 1 tablespoon each, then adjust after tasting—you can always add more, but you can’t un-pepper it. I once ruined a batch by doubling the recipe’s spices; the meat tasted like a campfire aftertaste.
- Rest Before Slicing: Pull the pork at 195°F internal temp, tent it with foil, and let it rest for 30-45 minutes. Cutting it early dries out the meat as juices rush out, and no one wants a sad, stringy slice. I know, I know—waiting is the hardest part, but trust me, your guests will notice the difference.
Dietary considerations for these flavors
Gluten-Free Adaptations
This rotisserie pork recipe is naturally gluten-free, but always double-check your spices and dry rub ingredients. Some brands of smoked paprika or cumin may contain anti-caking agents with gluten traces. I recommend Penzeys Spices or Simply Organic for certified gluten-free options.
The apple cider vinegar and apple juice should also be labeled gluten-free, as some brands process in shared facilities. 🌾
Low-Carb/Keto Options
For a keto-friendly version, skip the brown sugar in the dry rub and replace it with 1 tablespoon erythritol or 1 teaspoon monk fruit sweetener. The apple juice can be substituted with unsweetened almond juice or water to maintain moisture without added carbs.
The pork itself is already keto-compliant, providing 40g of protein per 6 oz serving with virtually no carbohydrates. This makes it perfect for low-carb diets.
Dairy-Free Modifications
To make this recipe dairy-free, replace the ½ cup unsalted butter in the basting mixture with an equal amount of melted coconut oil or olive oil. The heavy cream finishing sauce can be omitted entirely, or substituted with coconut cream for a rich, dairy-free alternative.
The flavor impact is minimal since the pork's natural juices shine through, but these swaps maintain moisture and richness. 🥥
Allergen-Friendly Notes
For nut allergies, ensure your apple juice and any finishing sauces are processed in nut-free facilities. The recipe as written contains no top allergens except potential trace amounts in spices. I always recommend checking labels on all packaged ingredients, even those you use regularly.
For soy allergies, verify that your kosher salt isn't processed in soy facilities, though this is rare for basic salts. The pork itself is naturally free of all common allergens.
High-Protein Focus
This recipe delivers an impressive 50g of protein per serving (based on 6 servings from 6 lbs of pork). To maximize protein content, trim any visible fat from the exterior before applying the rub, as fat contains no protein.
The bone-in cut actually provides slightly more protein than boneless versions, making it ideal for protein-focused diets. Pair with a simple side salad of spinach and cherry tomatoes to create a complete protein meal with minimal carbs. 💪
Meal Prep Adjustments
When prepping for meal prep, divide the cooked pork into airtight containers with a thin layer of rendered fat on top to preserve moisture. For gluten-free storage, use containers labeled gluten-free safe.
Reheat portions in the microwave for 2-3 minutes with a splash of water or broth to restore juiciness. The pork maintains its texture and flavor for 4 days refrigerated or 3 months frozen, making it perfect for busy schedules. 📅
Nutrition facts
Frequently asked questions
Why does my rotisserie pork shoulder come out dry?
Overcooking or skipping the rest is the most common cause. Always pull the pork at 195-200°F internal temp and rest for 30 minutes—this lets juices redistribute. Also ensure your rotisserie isn't running too hot (325°F is ideal) and baste with butter/apple cider vinegar every 45 minutes to maintain moisture.
Can I use a regular oven instead of a rotisserie?
Yes! Preheat your oven to 300°F and place the pork on a rack over a baking sheet. Rotate the pan every 30 minutes for even cooking. The cooking time will be slightly longer (4-5 hours), but you'll still achieve tender, flavorful meat. Just check the internal temp frequently after 3 hours.
How do I know when the pork is properly rested?
The pork is rested properly when the internal temperature rises 5-10°F during resting (from 195°F to 200-203°F). You'll also see juices pooling on the cutting board when you slice it. Never skip resting—this is what keeps every bite juicy!
What's the best way to shred the pork for sandwiches?
Use two forks to pull the pork apart against the grain in the direction of the meat fibers. For extra tenderness, place the hot pork in a bowl and let it sit for 5 minutes before shredding—this makes it easier to separate. Avoid using knives, as they can make the meat tough. Store shredded pork in its own juices to maintain moisture.
Can I make this recipe in a smoker instead?
Smoke the pork at 225°F with a light wood like hickory or apple, and wrap it in butcher paper when it reaches 165°F internal temp. Continue cooking until 203°F. The bark will be even more pronounced, but expect a slightly longer cook time (5-6 hours). Use the same basting technique with butter and vinegar.