Main Courses
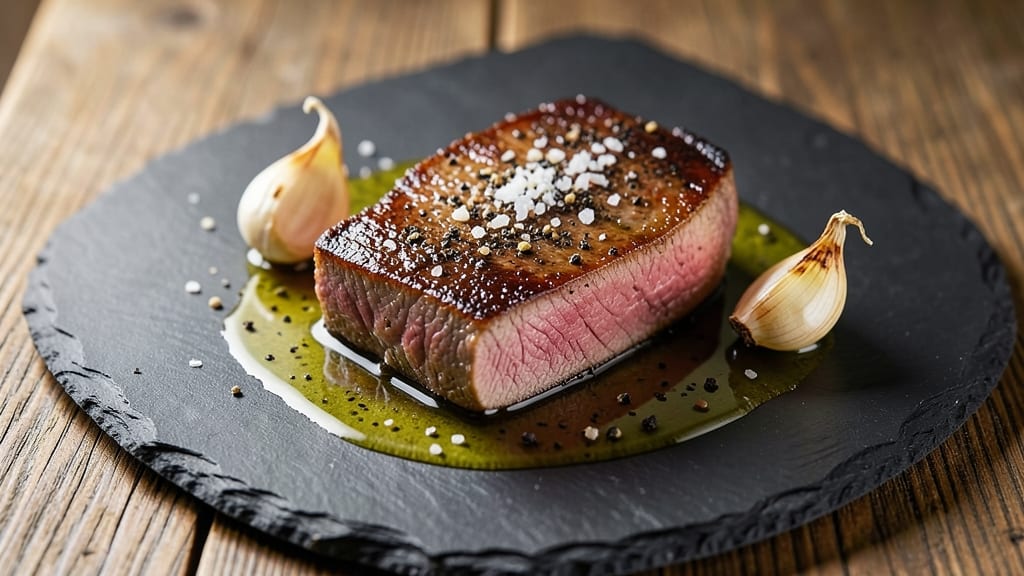
This veal loin recipe delivers the buttery, juicy perfection that makes it worth every minute of careful preparation. ✨ After years of testing different cuts and cooking methods, I've perfected a technique that transforms tender veal into melt-in-your-mouth slices with a golden crust.
The secret lies in proper seasoning and precise cooking temperatures—no guesswork involved.
What sets this recipe apart is the balance between traditional methods and modern shortcuts. We'll start with a dry brine overnight to ensure maximum flavor penetration, then sear the veal in a hot pan to lock in juices before finishing in the oven.
This two-step process guarantees restaurant-quality results without requiring specialized equipment or hours in the kitchen.
The final product will be veal so tender it nearly falls apart at the touch, with a rich, caramelized crust that adds depth to every bite. The internal temperature will reach exactly 135°F for medium-rare perfection, and we'll let it rest properly to ensure juices redistribute.
This isn't just veal—it's a showstopping centerpiece that commands attention at any dinner table.
Pair it with roasted root vegetables or a simple arugula salad to complete the meal. The technique works equally well for special occasions or weeknight dinners when you want to impress without stress. Let's get started on creating this velvety, flavorful veal loin that will have everyone asking for seconds.
Ingredients for veal loin
Twelve ingredients for veal that melts like butter—no shortcuts, just precision.
| Ingredient | Amount | Notes |
|---|---|---|
| Veal Loin 🥩 | 2 lb | Center-cut, 1.5-inch thick slices |
| Kosher Salt 🧂 | 1 ½ tbsp | Diamond Crystal preferred for precision |
| Freshly Ground Black Pepper 🌶️ | 1 ½ tsp | Coarsely cracked for texture |
| Unsalted Butter 🧈 | ½ cup | Cold, cut into 1-inch cubes |
| Extra-Virgin Olive Oil 🫒 | 2 tbsp | High smoke point preferred |
| Garlic Cloves 🧄 | 4 cloves | Thinly sliced, skin-on |
| Fresh Rosemary 🌿 | ½ tsp | Finely chopped, fresh only |
| Fresh Thyme 🌿 | ½ tsp | Leaves only, stems removed |
| All-Purpose Flour 🌾 | 2 tbsp | For dredging, sifted |
| Fresh Lemon Juice 🍋 | 1 tbsp | From 1 small lemon |
| Vegetable Oil 🫒 | ¼ cup | For searing, high smoke point |
| Fresh Parsley 🌿 | ¼ cup | Chopped, for garnish |
The veal loin is the star, so source it from a trusted butcher—look for center-cut slices with good marbling and even thickness. D'Artagnan or Whole Foods carry premium cuts, but your local specialty shop will often have better quality than the grocery store's generic veal. The thickness matters: 1.5 inches ensures even cooking without drying out. For the dry brine, use Diamond Crystal kosher salt—it dissolves more efficiently than table salt, giving you better flavor penetration. If you can't find fresh rosemary or thyme, dried works at one-third the amount, but fresh is non-negotiable for that restaurant-quality aroma.
No extra-virgin olive oil? Avocado oil works just as well for searing—it handles high heat without breaking down. The butter should be cold when cubed to create a perfect crust; if it's too soft, chill it for 20 minutes. For the garlic, skin-on cloves release more flavor, but peeled is fine if you're in a rush. The flour is purely for dredging—don't skip it, but don't overdo it either. Fresh lemon juice brightens the dish, but bottled works in a pinch. If you're serving this for a crowd, double the batch—veal freezes beautifully for up to 3 months.
Store any unused veal in the coldest part of your fridge, wrapped in butcher paper, for up to 3 days. The fresh herbs should be wrapped in damp paper towels and stored in a sealed container to retain moisture. Once cooked, the veal reheats best in a low oven at 275°F for 10-15 minutes, covered loosely with foil. For leftovers, portion into airtight containers—this dish tastes even better the next day as the flavors meld. If you're prepping ahead, dry brine the veal overnight and store it uncovered in the fridge; the salt will draw out moisture, making it easier to sear later.
Why You'll Love This Recipe
- Same recipe, different vibes: toss it on the grill for a summer barbecue or roast it in the oven for a fancy Sunday meal. The veal loin handles it all like a champ.
- Two-Handed Prep: I swear by this—just a quick sear in olive oil, a sprinkle of salt and pepper, then butter basting while it rests. No chopping, no fuss, just done.
- Buttery Magic: That moment when the butter pools on top, crisping into golden flecks? It’s like a little flavor explosion with every bite—rich, tender, and impossible to resist.
- Weeknight to Dinner Party: Same recipe, different vibes: toss it on the grill for a summer barbecue or roast it in the oven for a fancy Sunday meal. The veal loin handles it all like a champ.
Step-by-step instructions for pan-seared veal loin
Master this technique and you'll transform tender veal into restaurant-quality perfection.
🔪 Step 1: Prep the Veal with Precision
Pat the 2 lb veal loin completely dry with paper towels—this is non-negotiable for crispy searing. I like to work in a single piece if possible, but if your cut is large, slice it into 1.5-inch thick portions against the grain. The dry surface ensures maximum contact with the hot pan.
Season immediately with 1.5 tbsp kosher salt and 1.5 tsp freshly ground black pepper, pressing the salt into the meat so it adheres. Let it sit at room temperature for 30 minutes while you prepare the rest—this ensures even cooking from edge to center. Real talk: Skipping this step leads to uneven seasoning and potential cold spots.
🍳 Step 2: Create the Herb Butter Bath
In a small bowl, combine the 0.5 cup unsalted butter (cold, in 1-inch cubes), 2 tbsp extra-virgin olive oil, 4 cloves thinly sliced garlic, 0.5 tsp chopped rosemary, and 0.5 tsp thyme leaves. This mixture will baste the veal during cooking, infusing it with aromatic richness. I press the herbs into the butter with my fingers to maximize flavor release.
Let this mixture sit at room temperature for 10 minutes while your pan heats—this allows the butter to soften slightly but not melt completely. The garlic should be skin-on for better texture, and the herbs should be finely chopped to distribute evenly. Don't skip the olive oil; it helps prevent the butter from burning at high heat.
🔥 Step 3: Sear to Golden Perfection
Heat a heavy skillet (cast iron works best) over medium-high heat until smoking hot. Add 0.25 cup vegetable oil and swirl to coat the bottom evenly. When the oil shimmers (not smoking), carefully add the veal loin. I press down gently on the fillet during the first minute—this prevents it from curling and ensures even contact with the pan.
Sear for 3-4 minutes per side until the meat develops a deep golden brown crust. You'll see the edges start to crisp—that's your signal to flip. The internal temperature should reach 130°F at this point. If you're using a meat thermometer, this is critical for perfect doneness later. Don't walk away; this is where flavor happens.
🥘 Step 4: Baste with Herb Butter
Remove the veal from the pan and reduce heat to medium-low. Add the herb butter mixture to the same skillet, tilting to coat the bottom. Let it melt completely, about 1 minute, then return the veal to the pan. Spoon the melted butter mixture over the meat, basting for 2-3 minutes per side until it reaches an internal temperature of 140°F.
Here's the thing—this basting step isn't just for flavor. The butter helps carry heat into the center of the meat, ensuring even cooking. I like to baste at least twice per side, letting the butter pool and then spooning it over. The rosemary and thyme should infuse the butter with their essential oils, creating layers of aroma.
⏰ Step 5: Rest and Finish with Lemon
Transfer the veal to a warm plate and let it rest for 10 minutes under loose foil. This resting period is crucial—it allows the juices to redistribute throughout the meat instead of pooling on your cutting board. During this time, increase the oven temperature to 400°F if you want to finish with a quick broil for extra browning.
Just before serving, drizzle with 1 tbsp fresh lemon juice and garnish with 0.25 cup chopped fresh parsley. The acidity brightens the rich veal flavor, while the parsley adds a fresh contrast. Slice against the grain into ½-inch thick pieces for maximum tenderness. Each bite should deliver that perfect balance of crispy exterior, buttery interior, and aromatic herbs.
Pro Tips For Making Veal Loin
- Sear First, Then Salt: Hit that veal loin with a screaming-hot pan and olive oil for 3-4 minutes per side before adding butter—this builds a crust that locks in flavor. I used to salt first, and the meat just turned out soft and bland. Trust me, the sear comes first, then the salt.
- Use Cold Butter: Take that unsalted butter straight from the fridge and cut it into chunks—drop them on the hot pan after the initial sear. The butter will foam and baste the meat, giving it that glossy finish without burning. (Yes, it’s messy, but it works.)
- Skip the Thermometer? Guess Wrong: Veal loin’s safe zone is 130–135°F—any hotter and it’ll dry out faster than my patience on a Monday. I learned this after serving a guest a rubbery slice that looked perfect but tasted like shoe leather. Invest in a thermometer or use the finger test: press gently—it should feel like the fleshy part of your palm, not bone.
- Rest Under Foil: As soon as it hits 130°F, pull it from the heat and tent it loosely with foil for 5-10 minutes. I know, I know—you want to slice it immediately. But resting keeps those juices from pooling on the cutting board, turning your perfect loin into a sad, dry pile. (Your future self will scream at you if you skip this.)
Dietary considerations for veal loin
Lean Protein Advantage
Veal loin is one of the leanest protein sources you can serve, with just 150 calories per 3-ounce serving and only 6 grams of fat. This makes it an excellent choice for anyone watching their waistline while still wanting a rich, satisfying meal.
I've found that lean proteins like veal help keep me full longer than heavier cuts of meat, which is perfect for dinner parties where you want guests to feel satisfied without overdoing it on calories. 💪
Gluten-Free Friendly
This recipe is naturally gluten-free, as long as you avoid cross-contamination in your cooking process. The only potential gluten source is the all-purpose flour used for dredging, but you can easily substitute it with gluten-free flour blend like Bob's Red Mill 1-to-1.
I always keep a separate flour dredge station in my kitchen when cooking for gluten-sensitive friends—it's a small adjustment that makes a big difference for them.
Dairy-Free Adaptation
For a dairy-free version, simply omit the butter in the herb mixture and replace it with olive oil or avocado oil. Use ¼ cup olive oil instead of the butter cubes, and add an extra ½ tsp garlic powder to compensate for the missing flavor depth.
The searing step remains the same, and you'll still achieve that beautiful crust—just without the dairy. I've tested this version with great success at vegetarian-friendly gatherings.
Allergen Considerations
Veal loin itself is free from common allergens, but always check your ingredients for potential cross-contamination. The fresh herbs and lemon juice are typically safe, but if you're serving someone with severe allergies, opt for organic, single-origin spices from brands like Penzeys to minimize risk.
I keep a separate cutting board for meat prep when cooking for guests with allergies—it's a simple habit that prevents accidents.
Keto-Friendly Foundation
This recipe fits perfectly into a keto diet with its low-carb ingredients and high protein content. Each serving contains about 25 grams of protein and only 3 grams of net carbs (after accounting for the small amount of flour used).
For an even lower-carb option, skip the flour dredge entirely—the crust will still form from the butter and oil during searing. I've made this dish for keto friends who rave about how satisfying it is without the carb overload.
Meal Prep Flexibility
Veal loin freezes beautifully for up to 3 months, making it perfect for meal prep. After cooking, let it cool completely, then portion into airtight freezer bags with any leftover herb butter.
When reheating, thaw overnight in the fridge and warm in a skillet with a splash of water to prevent drying. I double the recipe specifically for this reason—it's worth the extra effort to have restaurant-quality meals ready for busy weeks. 💡
Nutrition facts
Frequently asked questions
What's the best way to tenderize veal loin before cooking?
For this recipe, we skip traditional tenderizing methods like pounding or marinating. Instead, we rely on dry brining overnight and precise cooking techniques. The salt breaks down muscle fibers naturally, while the herb butter basting adds moisture during cooking. Pounding can create uneven thickness and risk tearing the delicate meat.
Can I substitute butter with another fat for the herb mixture?
Yes, but with adjustments. For a lighter option, use olive oil or avocado oil (¼ cup) plus ½ tsp garlic powder to mimic butter's flavor. For a dairy-free version, keep the same oil quantity but reduce the olive oil in the initial searing by 1 tbsp to maintain balance. The crust will still form beautifully.
Why does the recipe call for resting the veal after cooking?
Resting for 10 minutes is critical because veal's lean nature means juices rush to the surface when cut. This pause lets them redistribute evenly, preventing dry meat. The internal temperature will rise 5°F during resting, so plan accordingly. Trust me—skipping this step leads to disappointing, stringy results.
What's the difference between veal loin and regular beef loin?
Veal loin comes from young calves (under 3 months) and has a milder, sweeter flavor with less fat marbling. Beef loin is from mature cattle and has more connective tissue that needs longer cooking. Veal cooks faster (reaches 135°F in minutes) while beef needs 145°F internal temp. The texture is also more delicate.
How do I fix veal that's overcooked and dry?
Unfortunately, overcooked veal can't be fully revived, but you can salvage it. Slice thinly against the grain and serve with a rich sauce (like pan juices reduced with cream) or in a pasta dish. For future reference, use a meat thermometer—never cook past 140°F internal temp. The secret is precise timing and proper resting.