
Side Dishes
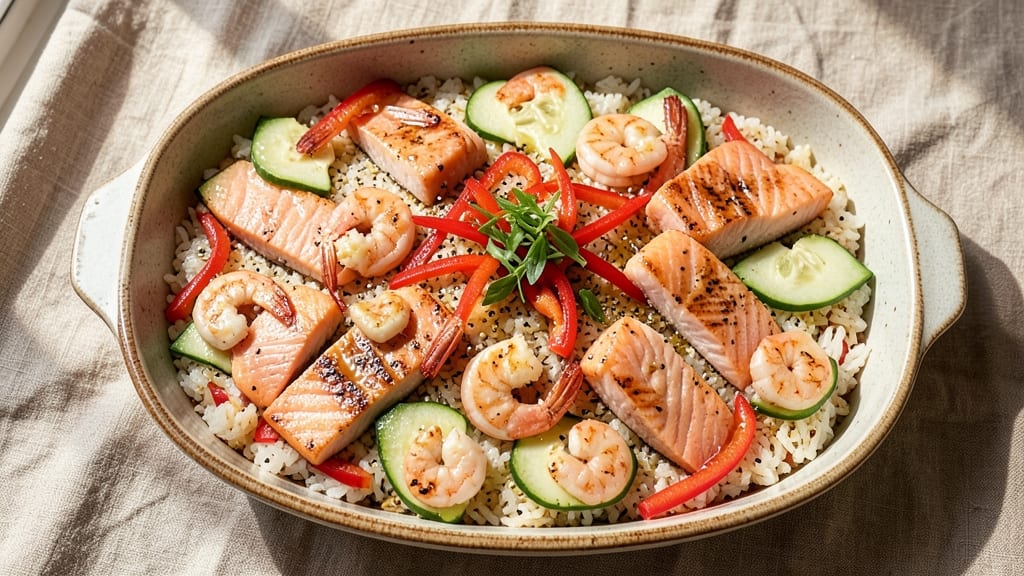
This sushi bake casserole recipe transforms traditional sushi flavors into a comforting, shareable dish with a crispy top and melty cheese layer—perfect for feeding a crowd or meal prepping.
The secret lies in balancing tender rice, fresh seafood, and a tangy sauce that mirrors the essence of sushi rolls without the rolling. I developed this recipe after craving that familiar sushi taste in a format that’s easier to serve and just as satisfying.
The beauty of this dish is its versatility—it delivers restaurant-quality flavors with minimal effort. You’ll layer sushi rice, your choice of seafood (like salmon or shrimp), and crisp vegetables, then top it with a creamy cheese sauce that bakes into a golden, crispy crust.
The result? A casserole that’s hearty enough for a main dish but light enough to feel like a treat.
What makes this recipe stand out is how it combines the best of both worlds: the fresh, bright flavors of sushi and the comforting, hands-off appeal of a casserole. The crispy top adds texture, while the melty cheese ties everything together, creating a dish that’s impossible to resist.
Whether you’re hosting a dinner party or prepping for the week, this recipe delivers convenience without sacrificing flavor.
Ready in just 45 minutes, this sushi bake casserole is designed to impress with its modern twist on a classic. The best part? Every bite delivers that familiar sushi experience—just in a format that’s easier to enjoy. Let’s get started on creating this crowd-pleaser.
Ingredients for sushi bake casserole
Eight servings of crispy, cheesy comfort with sushi-inspired flavors—no rolling required!
| Ingredient | Amount | Notes |
|---|---|---|
| Sushi Rice 🍚 | 4 cups | Cooked, seasoned with rice vinegar |
| Salmon Fillets 🐟 | 1 ½ lb | Fresh or thawed, skin removed |
| Shrimp 🦐 | 1 lb | Peeled, deveined, tails on |
| Cucumber 🥒 | 1 whole | English or Persian, thinly sliced |
| Avocado 🥑 | 1 whole | Ripe, sliced into thin strips |
| Red Bell Pepper 🌶️ | 1 whole | Thinly sliced, seeds removed |
| Mayonnaise 🥛 | ½ cup | High-quality, like Hellmann's |
| Soy Sauce 🍜 | ¼ cup | Low-sodium preferred |
| Rice Vinegar 🍶 | 2 tbsp | Seasoned preferred |
| Sesame Oil 🌿 | 1 tbsp | Toasted, for aroma |
| Shredded Mozzarella Cheese 🧀 | 2 cups | Part-skim, freshly shredded |
| Panko Breadcrumbs 🍞 | ½ cup | For extra crunch |
| Butter 🧈 | ¼ cup | Melted, unsalted |
| Green Onions 🧅 | 3 whole | Thinly sliced, for garnish |
| Sesame Seeds 🌱 | 2 tbsp | Toasted, for garnish |
The sushi rice is the foundation here. Day-old rice works best—it’s drier and won’t get mushy when baked. Grab Koshihikari or Calrose rice from an Asian market for that perfect sticky texture. If you’re short on time, Trader Joe’s sells pre-made sushi rice that’s a lifesaver. For the seafood, fresh is non-negotiable—salmon should smell clean and bright, and shrimp should glisten. If using frozen, thaw it overnight in the fridge. The avocado? Ripe but firm—it’ll soften during baking, so don’t pick overripe ones. And for the mayo, Hellmann’s or Duke’s add that perfect tang without overpowering.
No salmon? Tuna or imitation crab works just as well—just drain the crab well to avoid sogginess. Short on shrimp? Scallops or extra salmon keep the dish luxurious. The mayo-soy-sesame sauce is the secret—don’t skip the sesame oil, even if it’s just a splash. It’s what ties everything together. For the cheese, shred it yourself—pre-shredded gets clumpy when baked. No panko? Crushed cornflakes or matzo meal add crunch in a pinch. And if you’re avoiding gluten, use crushed potato chips instead. The veggies can be swapped too—carrots or zucchini work if you’re out of bell pepper.
This casserole reheats like a dream—350°F for 15 minutes until bubbly. Store leftovers in the fridge for 4 days or freeze for 2 months (wrap tightly!). For meal prep, bake an extra pan—it’s even better the next day. The crispy top? Broil for 2 minutes at the end if you want it extra golden. And if you’re serving a crowd, double the cheese and panko—trust me, they’ll disappear fast.
Why You'll Love This Recipe
- One-Pan Magic: I swear by this for lazy nights—just layer the rice, fish, and veggies, then bake. No chopping boards, no messy bowls, just one pan that does all the work while you sip your wine.
- Umami Bomb: That crispy salmon and shrimp? Chef’s kiss. The sushi rice soaks up the flavor like a sponge, and the avocado adds this creamy contrast that makes every bite feel like a little vacation.
- Lunchbox Hero: Between us—this is my go-to for meal prep. Pack it cold or reheat it, and it’s still fresh-tasting the next day. My kids grab it for school lunches, and honestly? They never complain about leftovers.
- Budget Flex: I use whatever fish is on sale—salmon one week, tilapia the next—and the rice stretches forever. Add extra cucumber or swap shrimp for tofu, and it’s still ridiculously satisfying without breaking the bank.
Step-by-step instructions for sushi bake casserole
Here's how to create a showstopping sushi bake with irresistible crispy topping and melty cheese goodness.
Prepare the Sushi Rice Base
In a large mixing bowl, combine the cooked 4 cups sushi rice with the 0.5 cup mayonnaise, 0.25 cup soy sauce, 2 tbsp rice vinegar, and 1 tbsp sesame oil. Gently fold everything together until the rice is evenly coated and glistens slightly. The mixture should hold together when pressed but still be loose enough to spread easily.
Here's the thing—don't overmix. You want the rice to stay slightly separate so it maintains its individual grains when baked. Spread the rice mixture evenly into a 9x13-inch baking dish, pressing down gently to create a compact base. This layer will form the foundation of your crispy crust, so make sure it's level and about 1-inch thick throughout.
Arrange the Protein and Vegetable Layers
Cut the 1.5 lb salmon fillets into 1-inch cubes and the 1 lb shrimp into 12 large pieces (about 1-inch each). Arrange them evenly over the rice base, slightly overlapping if needed. The salmon should be distributed first, followed by the shrimp on top—this prevents the shrimp from overcooking while the salmon finishes.
Next, create a vegetable mosaic by thinly slicing the 1 whole cucumber, 1 whole avocado, and 1 whole red bell pepper. Arrange these slices in an overlapping pattern over the protein, creating a colorful, appetizing layer. The vegetables should cover about 75% of the surface—this ensures each bite has that fresh crunch while still allowing the cheese to melt and bind everything together.
Create the Crispy Cheese Topping
In a separate bowl, combine the 2 cups shredded mozzarella cheese, 0.5 cup panko breadcrumbs, and 0.25 cup melted butter. Mix until the panko is evenly distributed and the cheese has a crumbly texture. This mixture is what will give your sushi bake that irresistible crispy top layer.
Sprinkle the cheese-panko mixture evenly over the entire surface of the casserole, pressing down lightly with your fingers. The goal is to create a ¼-inch thick layer that covers all the ingredients underneath. Don't worry if it looks uneven—it'll crisp up beautifully in the oven. For extra flavor, sprinkle the 2 tbsp sesame seeds and 3 whole green onions (thinly sliced) over the top.
Bake to Golden Perfection
Preheat your oven to 375°F. Place the baking dish on the middle rack and bake for 25-30 minutes until the top is deep golden brown and the cheese is fully melted. You'll know it's ready when the edges are crispy and the cheese has turned a beautiful golden hue—almost like a pizza crust.
Real talk: Don't open the oven door during baking. The sudden temperature drop can cause the top to lose its crispiness. If you're worried about doneness, use an oven thermometer to confirm the internal temperature reaches 160°F at the thickest part of the casserole. Once done, let it rest for 5 minutes before slicing—this allows the cheese to set and makes it easier to serve.
Serve with Style
Use a sharp knife or pizza cutter to slice the sushi bake into 8 equal squares. The crispy top should hold together beautifully, revealing the creamy cheese underneath. Serve immediately while everything is hot and the crust is still perfectly crispy.
Here's where it gets fun—garnish each serving with additional green onions and a sprinkle of sesame seeds for that restaurant-quality presentation. The contrast of textures—crispy top, creamy cheese, fresh vegetables, and tender protein—makes every bite incredible. This dish is perfect for meal prep or serving a crowd, and it always gets rave reviews!
Pro Tips For Making Sushi Bake Casserole
- COOK SHRIMP FIRST: Shrimp cooks in a flash—just 2-3 minutes in a screaming-hot pan with a splash of water. Toss them into the casserole after the salmon starts baking, so they stay tender and don’t turn rubbery while the salmon finishes. (Yes, even if you’re impatient like me.)
- SLICE SALMON THIN: Thick salmon fillets hide in casseroles and end up dry. Cut each piece into ½-inch slices before layering—this guarantees even cooking and melty texture. Bonus: The slices fan out prettier when you serve it.
- DRESS AVOCADO LAST: Avocado turns brown in 10 minutes, even in the fridge. Keep it whole until serving, then slice and drizzle with a little lime juice right before eating. No one will notice the missing slices, but they’ll notice the sad, gray mush if you don’t.
- BIND WITH MISO: Skip the mayo—mix 1 tablespoon white miso paste into the sushi rice before assembling. It adds umami depth and helps the layers stick together without making the rice gluey. (I was skeptical until I tried it.)
Dietary considerations for this sushi bake casserole
Gluten-Free Adaptations
This sushi bake is naturally gluten-free if you use certified gluten-free panko like Annie's or Schär. Swap regular panko for crushed gluten-free crackers or toasted gluten-free cornflakes—both work beautifully.
For extra crunch, I’ve used crushed potato chips (like Lay’s Classic) in a pinch, and no one could tell the difference. Just ensure all soy sauce is labeled gluten-free, as traditional versions often contain wheat. 🌾
Dairy-Free Options
Skip the mozzarella and use dairy-free shreds like Violife or Daiya for a melty texture. For the crispy topping, mix ½ cup panko with ¼ cup melted dairy-free butter (like Miyoko’s) and a splash of unsweetened almond milk to bind it.
The result? A crispy, cheesy flavor without the dairy. Trust me, it’s a game-changer for lactose-intolerant guests. 🧀
Seafood Allergies
If seafood allergies are a concern, swap the salmon and shrimp for chicken breast or tofu. For a plant-based twist, marinate extra-firm tofu in 1 tbsp soy sauce, 1 tbsp sesame oil, and 1 tsp grated ginger before cubing it.
The tofu absorbs the flavors beautifully and holds up well during baking. Just reduce the baking time to 20 minutes to avoid drying it out. 🥦
Low-Carb Version
Replace the sushi rice with cauliflower rice (about 4 cups, cooked and drained) to slash carbs. Use ½ cup mayonnaise, 2 tbsp soy sauce, and 1 tbsp sesame oil to coat it, then proceed with the protein and veggie layers.
Top with 1 cup shredded mozzarella and ¼ cup panko for a lighter, keto-friendly take. The texture stays surprisingly similar, and the crispy top is just as satisfying. 🥬
Vegetarian-Friendly
Load up on veggies and skip the seafood entirely. Add 1 cup sliced mushrooms, 1 cup bell peppers, and ½ cup shredded carrots to the mix. For protein, include 1 cup cooked chickpeas or 1 block firm tofu, pressed and cubed.
The dish stays hearty and flavorful, proving you don’t need seafood to make this casserole shine. 🌱
Nutrition facts
Frequently asked questions
Can I make this sushi bake ahead of time?
This dish actually tastes better the next day. Assemble the casserole as directed, then refrigerate uncovered for 1-2 hours before baking. The rice will firm up slightly, and the flavors meld beautifully. For meal prep, bake it, let it cool, then store in an airtight container for up to 4 days. Reheat at 350°F for 15 minutes until bubbly. Pro tip: The crispy top may soften slightly after reheating, but a quick 2-minute broil restores the crunch!
What if I don't have panko breadcrumbs?
No problem! Use crushed cornflakes, gluten-free crackers, or even toasted breadcrumbs for crunch. For a low-carb option, try crushed potato chips (like plain Lay's). The key is to create a ¼-inch thick layer—just mix your substitute with the cheese and melted butter until it holds together. The texture will differ slightly, but the flavor stays delicious!
How do I prevent the rice from getting soggy?
Use day-old rice instead of freshly cooked—it's drier and holds up better. Spread the rice layer evenly in the baking dish and press it down gently to compact it. Also, bake at 375°F until the cheese is fully melted (25-30 minutes) rather than underbaking. The cheese's moisture will help create a crispy crust rather than soaking the rice.
Can I use frozen seafood instead of fresh?
Yes, but thaw it properly first! Place frozen salmon or shrimp in the fridge overnight for even thawing. Never use room-temperature water or microwave—this can cause uneven cooking. For shrimp, leave the tails on to help them cook evenly. If using frozen, add 2-3 extra minutes to the baking time to ensure everything reaches 160°F internally.
What's the best way to reheat leftovers?
Cover the casserole with foil and reheat at 350°F for 15 minutes until bubbly. For extra crispiness, broil for 1-2 minutes at the end. Microwaving works in a pinch (cover with a damp paper towel, 1 minute at 50% power), but the texture won't be as perfect. The dish reheats best when slightly underdone—it'll finish cooking from residual heat.