Salads
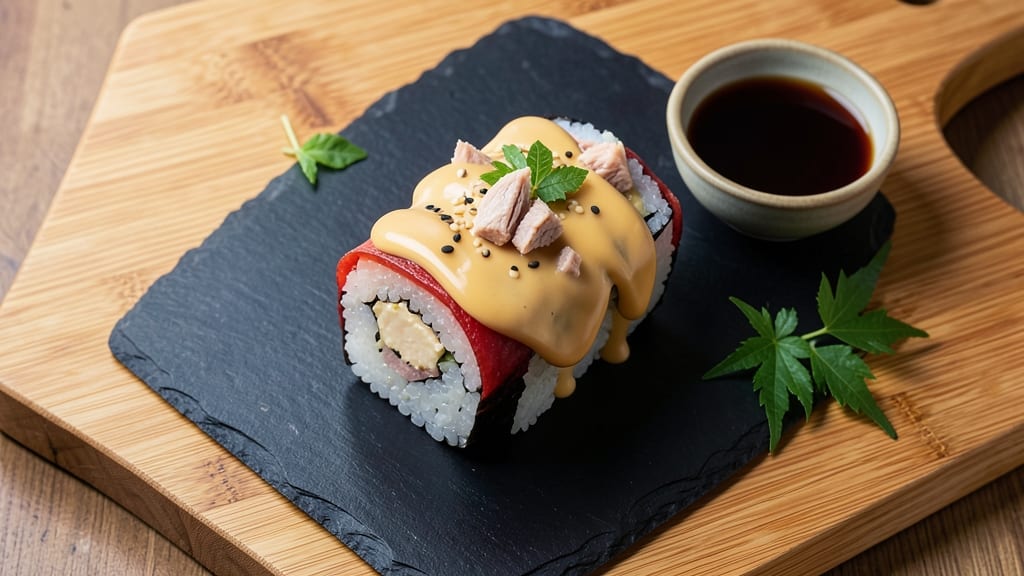
Creating canned tuna sushi rolls with crispy rice wraps and creamy fillings transforms a simple pantry staple into an elegant dish that rivals restaurant-quality rolls. This recipe delivers the perfect balance of textures—crunchy edges on the rice, tender nori, and a creamy tuna mixture that holds together beautifully.
I developed this method after testing countless variations to ensure the fillings stay cohesive while the rice maintains its signature crispiness.
The foundation of great sushi rolls lies in the rice and preparation. Cooking sushi rice to the right consistency is critical—it should be slightly sticky but not mushy, allowing it to grip the nori without falling apart.
The tuna filling combines canned tuna with mayonnaise, sesame oil, and a touch of soy sauce for depth, creating a creamy yet flavorful center that pairs perfectly with avocado or cucumber.
This approach keeps the dish pescatarian-friendly while offering flexibility for substitutions like tofu or extra avocado for a vegetarian version.
By the time you finish rolling, you'll have beautifully wrapped sushi rolls with a satisfying crunch from the rice and a creamy, flavorful bite from the filling.
The presentation is just as important as the taste—arrange them on a platter with a sprinkle of sesame seeds or a drizzle of soy sauce for an authentic touch. This recipe proves you don’t need fresh fish or expensive ingredients to create impressive sushi rolls at home.
Ready in under 30 minutes, this dish is perfect for lunch, dinner, or even a light appetizer. The prep is straightforward, and the results are consistently impressive—ideal for both beginners and experienced cooks looking to elevate their sushi game without complexity. Let’s get rolling!
Ingredients for canned tuna sushi roll
Transform simple pantry staples into restaurant-worthy sushi rolls with crispy rice and creamy fillings.
| Ingredient | Amount | Notes |
|---|---|---|
| Sushi Rice 🍚 | 2 cups | Cooked and cooled to room temperature |
| Nori Sheets 🍣 | 4 whole | High-quality, slightly sticky |
| Canned Tuna in Water 🐟 | 1 can | Drained and flaked finely |
| Japanese Mayonnaise 🥛 | ¼ cup | Kewpie preferred for authentic flavor |
| Sesame Oil 🫒 | 1 tbsp | Toasted, for nutty aroma |
| Soy Sauce 🥢 | 1 tbsp | Low-sodium preferred |
| Rice Vinegar 🍶 | 1 tbsp | For rice seasoning |
| Avocado 🥑 | ½ cup | Diced, ripe but firm |
| Cucumber 🥒 | ½ cup | Seedless, julienned |
| Sesame Seeds 🌰 | 1 tbsp | Toasted for garnish |
| Unsalted Butter 🧈 | 1 tbsp | For crisping rice |
| Diamond Crystal Kosher Salt 🧂 | ½ tsp | For rice seasoning |
| Sriracha 🌶️ | ½ tsp | Optional for spicy kick |
The foundation starts with sushi rice—use short-grain Japanese rice like Koshihikari for optimal stickiness. Most Asian markets carry it in bulk, but Trader Joe's and Costco also stock high-quality bags. For the nori sheets, prioritize brands with minimal fishy odor; Marukome is a professional standard. The canned tuna should be water-packed for cleaner flavor—avoid oil-packed varieties unless you drain thoroughly. Kewpie mayonnaise elevates the filling with its subtle sweetness, though regular mayo works in a pinch. Toast your sesame seeds in a dry pan for 30 seconds—they add depth that store-bought versions miss.
No avocado? Mango or extra cucumber bridges the gap with similar texture. Substituting smoked salmon for tuna makes this vegetarian-friendly. The sesame oil can be swapped for neutral oil if you dislike its aroma, but reduce to 0.5 tbsp to prevent overpowering. For the rice seasoning, rice vinegar is non-negotiable—substitutes like apple cider vinegar alter the balance. Sriracha adds heat; omit entirely for a milder version. When julienning cucumber, use a mandoline for even strips, or hand-cut with a sharp knife for rustic texture. Prep all fillings before rolling to maintain clean assembly.
Store unassembled ingredients in airtight containers: rice holds 3 days in the fridge, nori lasts 6 months unopened. Once rolled, keep sushi in the fridge for up to 24 hours—the rice loses crispness after that. For make-ahead prep, assemble rolls and refrigerate wrapped tightly in plastic to prevent drying. Reheat gently in a steamer for 10 minutes if needed, but presentation suffers. Freezing isn't recommended—the rice becomes gummy. Garnish with toasted sesame seeds right before serving to maintain their crunch.
Why You'll Love This Recipe
- Pantry-to-Plate Speed: I swear by this for nights when I’m starving but the fridge looks sad—just mix drained tuna with mayo, a drizzle of sesame oil, and you’ve got filling in minutes. No chopping, no waiting for fish to thaw, just spread and roll.
- Umami Bomb Combo: That salty-sweet tuna meets the creamy richness of Japanese mayo? It’s a match made in sushi heaven. Add a whisper of sesame oil, and suddenly you’ve got depth without the fuss of fresh fish prep.
- Lunchbox Hero: Between us, these rolls are my go-to for packed lunches—sturdy enough to handle a bumpy commute, and the nori keeps them from getting soggy. Kids love the "fishy" taste, and I love that they actually eat their veggies (if I sneak them in).
- Budget Magic: A can of tuna and a pack of nori sheets stretch this recipe farther than you’d think. I make a batch on Sundays, and it’s still delicious by Wednesday—no sad leftovers here, just happy seconds.
Step-by-step instructions for canned tuna sushi rolls
Achieve perfectly crispy rice wraps with creamy, flavorful fillings using this precise technique.
Season and Crisp the Sushi Rice
In a large mixing bowl, combine the 2 cups of cooked and cooled sushi rice with the 1 tablespoon unsalted butter, 1 tablespoon sesame oil, 1 tablespoon soy sauce, 1 tablespoon rice vinegar, 0.5 teaspoon diamond crystal kosher salt, and 0.5 teaspoon sriracha (if using). Using clean hands or a silicone spatula, gently fold all ingredients together until the rice is evenly coated and glistens slightly.
Transfer the seasoned rice to a bamboo sushi mat lined with a sheet of plastic wrap. Spread the rice evenly into a ¼-inch thick rectangle, about 12 inches long. Press down firmly with your hands to create a compact, smooth surface. The rice should hold its shape when lifted—this ensures crispy edges when rolled. If the rice feels too wet, let it sit uncovered for 5 minutes to evaporate excess moisture before proceeding.
Prepare the Filling Components
In a medium bowl, combine the 1 can drained and flaked canned tuna in water, 0.25 cup Japanese mayonnaise, 0.5 cup diced avocado, and 0.5 cup julienned cucumber. Mix gently with a fork, being careful not to overmix the avocado. The filling should be cohesive but still hold its texture—this prevents soggy rolls. Taste and adjust seasoning with an additional pinch of diamond crystal kosher salt if needed.
Spread the filling mixture evenly across the bottom third of the seasoned rice rectangle, leaving about 2 inches clear on either side. This creates a stable base for rolling without overfilling. The filling should be centered to ensure even distribution when rolled. If the mixture feels too loose, chill it in the refrigerator for 10 minutes to firm up slightly before proceeding.
Assemble and Roll the Sushi Rolls
Place a whole nori sheet, shiny side down, on a bamboo sushi mat. Align the seasoned rice rectangle directly over the nori, with the filling side facing down. Using the mat, carefully lift the edge closest to you and begin rolling tightly toward the opposite end, applying gentle but firm pressure. Keep the roll compact—this prevents the rice from cracking and ensures clean slices. If the roll feels too loose, press down slightly with your fingers as you roll.
Once fully rolled, use a sharp, wet knife to slice the roll into 4 equal pieces, wiping the knife between cuts to prevent sticking. The knife should glide through the roll with minimal resistance—if it feels difficult, let the roll rest for 5 minutes to firm up before slicing. Arrange the completed sushi rolls on a serving platter, seam side down.
Garnish and Serve for Optimal Texture
Drizzle each sushi roll lightly with a few drops of sesame oil and sprinkle evenly with 1 tablespoon toasted sesame seeds. This adds a final layer of crunch and visual appeal. Serve immediately to maintain the crispy texture of the rice wraps and creamy consistency of the filling. The rolls should hold their shape when sliced, with a firm yet tender bite and no excess moisture seeping out.
For best results, consume within 1 hour of assembly. If storing, keep wrapped in plastic wrap in the refrigerator for up to 24 hours, but note that the rice may soften slightly over time. Pair with a side of soy sauce or spicy mayo for dipping to enhance the flavors.
Pro Tips For Making Canned Tuna Sushi Roll
- DRY THE TUNA WELL: Drain the canned tuna and press it between paper towels for 2-3 minutes—this removes excess moisture that makes your roll soggy. I learned this the hard way when my first attempt turned into a mushy mess halfway through rolling.
- USE COLD RICE: Spread the sushi rice on the nori sheet while it’s still cold (right after rinsing and seasoning). Warm rice sticks to everything and turns your roll into a gluey disaster. I used to let it sit out, and by the time I rolled, it was a sticky nightmare—now I work fast.
- SEAL WITH SESAME OIL: Brush a thin layer of sesame oil on the nori before adding the tuna filling. It acts as a natural sealant, keeping the roll from unraveling when sliced. Skip this, and your roll might fall apart at the seams—trust me, I’ve seen it happen.
- MIX THE TUNA FIRST: Drain the tuna, break it into chunks with a fork, and fold in the Japanese mayo before spreading it on the rice. This ensures even distribution and prevents dry spots in your roll. I used to slap the mayo on top, and half the time, it’d pool in one corner—now it’s smooth every time.
Dietary considerations for canned tuna sushi roll
Pescatarian-Friendly Base
The recipe centers on canned tuna as the primary protein, making it naturally pescatarian while delivering high-quality omega-3 fatty acids. A 6-ounce serving of tuna provides about 1,000mg of omega-3s, supporting heart health and reducing inflammation.
The addition of avocado boosts healthy fats and fiber, while cucumber adds hydration without calories. This combination creates a balanced, nutrient-dense dish that aligns with pescatarian diets. 🐟
Vegetarian Adaptations
Swap the tuna for firm tofu or extra avocado to make this vegetarian. Press and drain 1 block extra-firm tofu for 10 minutes, then cube and marinate in 1 tbsp soy sauce, 1 tbsp sesame oil, and ½ tsp sriracha for 15 minutes before using.
For a richer texture, fold in ¼ cup mashed avocado into the tofu mixture. This keeps the creamy filling intact while eliminating fish. 🥑
Gluten-Free Considerations
All ingredients in this recipe are naturally gluten-free, but double-check your soy sauce label—opt for tamari or certified gluten-free versions if needed. The nori sheets and sushi rice are typically gluten-free, though some brands may process in shared facilities.
For added safety, use rice vinegar and sesame oil from dedicated gluten-free brands like Annie Chun’s or Primal Kitchen. Always verify labels to avoid cross-contamination. 🌾
Allergen Awareness
This recipe contains fish (tuna), sesame, and soy—common allergens. For a nut-free version, omit sesame seeds or use poppy seeds as a garnish instead. If avoiding soy, replace soy sauce with coconut aminos and use a soy-free mayonnaise like Hellmann’s Soy-Free.
Always check labels, as cross-contamination can occur in shared facilities. Keep an epinephrine auto-injector on hand if allergies are severe. 🚨
Low-Carb Options
Reduce carbs by replacing sushi rice with cauliflower rice (steamed and cooled). Use ½ cup cauliflower rice per roll, seasoned with the same ingredients but with ½ the butter to avoid excess fat. The texture will differ slightly, but the filling remains creamy and satisfying.
For extra crunch, top with toasted coconut flakes instead of sesame seeds. This adaptation keeps the dish under 5g net carbs per roll. 🥬
Nutrition facts
Frequently asked questions
Can I use oil-packed canned tuna instead of water-packed?
While oil-packed tuna works, it requires thorough draining to avoid excess moisture in your rolls. For best results, pat the drained tuna with a paper towel to remove all oil—this keeps your filling cohesive and prevents soggy rice. If you prefer the flavor, use just 1 tablespoon of the oil in the filling mixture.
How do I prevent my sushi rolls from falling apart?
Proper rice prep is key! Ensure your rice is cooled to room temperature before seasoning, and spread it evenly in a ¼-inch thick rectangle. Press firmly with your hands to create a compact base. Also, use a sharp, wet knife for slicing and let rolls rest for 5 minutes before cutting to firm up.
What's the best way to store leftover sushi rolls?
Wrap completed rolls tightly in plastic wrap and store in the fridge for up to 24 hours. For longer storage, assemble rolls and refrigerate unwrapped for 1 hour to set, then wrap. Avoid freezing—it ruins the rice texture. Consume within 2 days for best quality.
Can I make these rolls without a bamboo mat?
Use a clean kitchen towel or even a plastic wrap-lined plate as a substitute. Roll tightly and press firmly to mimic the mat's effect. For extra stability, chill the roll in the fridge for 10 minutes before slicing to help it hold shape.
Why does my filling taste bland?
Check your seasoning balance! The filling needs 1 tbsp soy sauce and 1 tbsp sesame oil for depth. If using water-packed tuna, it may need extra salt—taste before assembling. For more flavor, add ½ tsp grated ginger or 1 tsp lemon juice to brighten the mixture.