
Sauces & Condiments
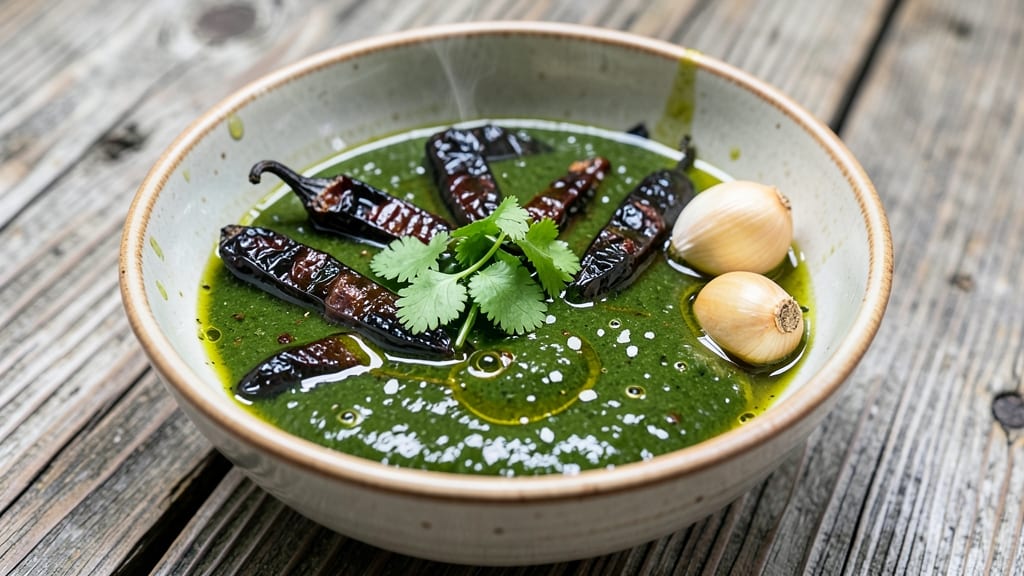
This New Mexico Hatch green chile sauce recipe delivers the deep, smoky flavor of roasted Hatch chiles without requiring a blender—just a food mill or fine-mesh strainer.
The secret lies in slow-roasting the chiles until their skins blacken and blister, unlocking layers of charred sweetness that define authentic New Mexican cuisine. I developed this method after struggling with chunky sauces that separated, and this version stays smooth while keeping that signature texture.
The process starts with high-heat roasting to concentrate the chiles' natural sugars and reduce moisture, creating a rich, velvety base. You'll combine the roasted chiles with simple ingredients—just broth, oil, garlic, and salt—then strain out the skins for a silky-smooth sauce.
This approach preserves the chiles' vibrant green color and complex flavor profile, avoiding the bitterness that can develop in over-blended versions.
What you end up with is a versatile, restaurant-quality sauce that's perfect for drizzling over enchiladas, tacos, or grilled meats, or as a dip for tortilla chips. The smoky depth and balanced heat make it a pantry staple that lasts for weeks in the refrigerator.
No specialized equipment is needed—just patience and a few key techniques to achieve professional results at home.
For those who prefer milder heat, simply reduce the number of chiles or remove the seeds before roasting. The sauce also freezes beautifully, making it ideal for meal prep. Let's create this foundational New Mexican flavor booster that will elevate every dish it touches.
Ingredients for new mexico hatch green chile sauce
Eight essential ingredients transform roasted Hatch chiles into velvety, smoky sauce without blending.
| Ingredient | Amount | Notes |
|---|---|---|
| Fresh Hatch Green Chiles 🌶️ | 1 ½ lb | Roasted until skins blacken, seeds removed |
| Chicken Broth 🍲 | 2 cups | Low-sodium preferred for balance |
| Extra-Virgin Olive Oil 🫒 | ¼ cup | High-quality, fruity variety |
| Garlic Cloves 🧄 | 4 cloves | Peeled, roughly chopped |
| Diamond Crystal Kosher Salt 🧂 | 1 tsp | Fine grain preferred |
| Fresh Lime Juice 🍋 | 1 tbsp | Freshly squeezed |
| Ground Cumin 🌿 | ½ tsp | Toasted for depth |
| Smoked Paprika 🌶️ | ½ tsp | For authentic smokiness |
Hatch chiles are the heart of this sauce, so prioritize fresh, vine-ripened varieties from New Mexico growers—Hatch Valley or Rio Grande brands deliver the most authentic flavor. Look for chiles with firm, glossy skins and minimal blemishes. Roast them until the skins blacken and blister, then peel under cold running water. Whole Foods or specialty Latin markets often carry pre-roasted chiles, but roasting yourself ensures optimal flavor development. For those without access to fresh Hatch chiles, Anaheim chiles can substitute, though they'll lack the same depth of smokiness.
No chicken broth? Vegetable broth or even water in a pinch works, though flavor will be less rich. Fresh garlic is non-negotiable here—pre-minced garlic lacks the aromatic punch. The olive oil should be extra-virgin and fruity, not the mild, refined variety. For a milder sauce, reduce smoked paprika to 0.25 tsp or omit entirely. The lime juice brightens the sauce, but if you prefer tangier results, add an extra 0.5 tbsp. Penzeys or local spice merchants offer the highest-quality smoked paprika for that signature New Mexican flavor.
This sauce thickens as it cools, so stir in a splash of water if too thick. Store in an airtight container in the refrigerator for up to 2 weeks, where flavors deepen over time. For longer storage, freeze in ice cube trays—perfect for single-use portions. Reheat gently on the stove, stirring frequently to prevent scorching. The sauce reheats beautifully and maintains its vibrant green hue, making it ideal for drizzling over dishes or using as a dip base.
Why You'll Love This Recipe
- No-Chop Needed: Honestly, the hardest part is picking out the chiles from the stem—no dicing, no mincing, just a quick char and peel. That crispy skin adds this smoky depth without extra work, and I’m all about shortcuts that don’t skimp on flavor.
- Smoky-Garlic Magic: The moment I blend those roasted chiles with olive oil and garlic? Instant wow. That bright, grassy heat from the Hatch chiles mellows into something rich and savory, like a hug for your taste buds—especially when the garlic starts to caramelize at the end.
- Weeknight to Potluck: I keep a jar of this in my fridge for everything: slathered on grilled cheese, drizzled over eggs, or tossed with rice and black beans. Between us, it’s my go-to for when I need to feed a crowd but don’t want to slave over a recipe—just heat and serve.
- Stretch Your Budget: A single batch of this sauce turns one chicken into three meals—roast it, shred it, and simmer it in the broth for extra richness. The chiles freeze perfectly, too, so I buy them fresh in season and stock up. Cheaper than takeout, way more satisfying.
Step-by-step instructions for New Mexico Hatch green chile sauce
This method delivers authentic New Mexico flavor without requiring a blender—just patience and precision.
Roast the Hatch Green Chiles Until Charred
Preheat your broiler to high and line a baking sheet with aluminum foil. Arrange the 1.5 lb fresh hatch green chiles in a single layer on the sheet, leaving space between each chile for even charring. Place the sheet on the middle rack of your oven, about 6 inches from the broiler element.
Broil the chiles for 10-15 minutes, turning occasionally with tongs, until their skins blacken completely and blister in several places. You'll see dark char marks and hear them sizzle—this develops the deep, smoky flavor characteristic of New Mexico chile sauce. Remove the chiles and transfer them to a bowl, covering with a clean kitchen towel to steam for 10 minutes. This steaming makes the skins easier to remove.
Peel and Dice the Roasted Chiles
After steaming, rub the chiles between your palms to remove the blackened skins. Open each chile and scrape out the seeds using your fingers or a small spoon—this controls the heat level while preserving the sauce's vibrant color. Chop the peeled chiles into ¼-inch dice, working quickly to prevent oxidation.
For a smoother sauce without blending, you can pulse the diced chiles in a food processor for 10-15 seconds, but I prefer the rustic texture that comes from careful dicing. The key is to work efficiently—once the chiles cool completely, their texture becomes grainier and less tender.
Sauté Aromatics in Olive Oil
Heat the 0.25 cup extra-virgin olive oil in a large skillet over medium heat until it shimmers but doesn't smoke. Add the 4 cloves roughly chopped garlic cloves and sauté for 1-2 minutes until fragrant and just beginning to turn golden. Be vigilant—garlic burns quickly and can turn bitter.
Immediately add the 0.5 tsp ground cumin and 0.5 tsp smoked paprika, stirring constantly for 30 seconds to toast the spices. This step builds the sauce's depth of flavor—don't rush it. The spices should release their aromas and create a fragrant cloud in the pan before you proceed.
Simmer the Sauce with Broth and Seasonings
Increase heat to medium-high and add the diced chiles to the skillet, stirring to combine with the spices. Pour in the 2 cups chicken broth and bring the mixture to a gentle boil. Once boiling, reduce heat to low and let it simmer uncovered for 15-20 minutes, stirring occasionally.
This simmering time allows the flavors to meld and the sauce to thicken naturally. You're looking for a consistency where the sauce coats the back of a spoon but isn't gluey. Taste the sauce and adjust seasoning with the 1 tsp diamond crystal kosher salt—New Mexico chile sauce should be balanced, with the heat from the chiles complemented by the saltiness.
Finish with Lime Juice and Rest
Remove the skillet from heat and stir in the 1 tbsp fresh lime juice. This bright acidity cuts through the richness of the olive oil and enhances the chile's natural sweetness. Let the sauce rest for 5 minutes off the heat—this allows the flavors to fully integrate and the sauce to reach its ideal consistency.
For serving, transfer the sauce to a clean jar or bowl. The sauce will continue to thicken slightly as it cools, so you can thin it with a splash of warm water if needed. This sauce pairs beautifully with grilled meats, roasted vegetables, or as a dip for tortilla chips—its smoky depth and bright acidity make it incredibly versatile.
Pro Tips For Making New Mexico Hatch Green Chile Sauce
- Roast Chiles Whole: I learned this the hard way—cutting Hatch chiles before roasting turns them bitter. Leave the stems on, char them whole over an open flame or under a broiler (about 10 minutes), then peel off the skins while they’re still hot. The flavor stays bright, and you avoid that sad, mushy texture from over-handling.
- Salt the Broth First: Diamond Crystal salt dissolves slower than table salt, so taste and season the chicken broth before adding chiles or garlic. A full teaspoon per cup guarantees depth—skipping this step means your sauce tastes flat, even if the chiles are perfect.
- Sear Garlic Low and Slow: After roasting chiles and blending, sauté minced garlic in olive oil on medium-low heat until just golden (3-4 minutes). High heat burns garlic fast, and you end up with bitter ashes instead of nutty aroma. Patience here makes the difference.
- Strain for Smoothness: Pureeing roasted chiles leaves behind fibrous bits that ruin texture. After blending, press the mixture through a fine-mesh sieve or cheesecloth to remove skins and seeds—yes, it’s extra work, but the result is silky, not chunky. (Save the solids for frying into crispy chile dust.)
Pro cooking tips for great new mexico hatch green chile sauce
Charring Perfection
The key to authentic Hatch green chile flavor is achieving even charring on all sides of the chiles. I use a cast-iron skillet placed directly on the broiler rack for maximum heat control—this gives me better temperature regulation than the oven broiler alone.
Rotate the chiles every 2-3 minutes with tongs to prevent burning while ensuring the skins blacken completely. Look for deep char marks and blistered skin—this indicates the Maillard reaction has developed the sauce's signature smoky depth. 🔥
Peeling Without Waste
After steaming, I find the easiest way to remove skins is by placing chiles in a ziplock bag, sealing it, and massaging them vigorously for 30 seconds. The skins will slide right off when you open the bag.
For seeds, I use a small spoon to scoop them out—this preserves the sauce's vibrant green color while controlling heat levels. Never skip peeling; unpeeled chiles will make your sauce bitter and grainy.
Spice Toasting Secrets
The difference between good and extraordinary chile sauce lies in properly toasting your spices. Heat your olive oil until it shimmers but doesn't smoke, then add cumin first—it has a lower burn temperature than smoked paprika.
Toast for 30 seconds until you smell that earthy, nutty aroma before adding paprika. I use Penzeys brand smoked paprika because its deeper, more complex flavor profile is unmatched. This step builds the sauce's foundation—don't skip it or rush it. 🌶️
Simmering Technique
Simmering too aggressively will make your sauce separate, so maintain a gentle bubble at the edges of the pan. I stir every 3-4 minutes to prevent sticking and ensure even heat distribution. The sauce should reduce by about 20%—this concentration intensifies the chile flavor.
If it reduces too quickly, add 1-2 tbsp water to maintain balance. Never cover the pan during simmering; this traps steam and dilutes the flavors.
Lime Juice Timing
Adding lime juice too early will cook off its bright acidity, so always stir it in off the heat during the final 5-minute rest. This timing preserves the citrus's freshness while allowing it to fully integrate with the smoky chile base.
For extra tang, I sometimes add ½ tsp lime zest along with the juice—it adds a beautiful green fleck to the sauce while enhancing the flavor profile. 🍋
Consistency Control
If your sauce thickens too much as it cools, thin it with 1 tbsp warm water at a time until you reach a pourable but coatable consistency. For extra smoothness without blending, I run the cooled sauce through a fine-mesh strainer lined with cheesecloth.
This removes any remaining skins while preserving the chile's natural texture. The ideal sauce should be velvety but not gluey, with visible chile flecks for authentic texture.
Nutrition facts
Frequently asked questions
Can I substitute Anaheim chiles for Hatch green chiles?
Anaheim chiles can work in a pinch, but they won't deliver the same depth of flavor. Hatch chiles have a sweeter, more complex profile due to their unique growing conditions in New Mexico's Hatch Valley. For best results, use 2-3 Anaheim chiles per 1.5 lb Hatch chiles and increase roasting time slightly to compensate for their milder heat.
How do I adjust the heat level in this sauce?
For milder heat, remove seeds and membranes before roasting. For extra spice, leave seeds in or add ¼ tsp cayenne pepper during simmering. Always taste as you go—New Mexico chile sauce should balance heat with smoky sweetness, not overpower with spice.
Can I make this sauce without a food processor?
Use a food mill or fine-mesh strainer to create a smooth texture. After simmering, let the sauce cool slightly, then press it through a strainer lined with cheesecloth. This removes skins while keeping the chile's natural body intact.
Why does my sauce look grainy after cooling?
Graininess usually means incomplete straining or over-cooked chiles. For next time, strain again through a fine-mesh sieve or blend briefly (10 seconds) for ultra-smooth results. Also ensure chiles are properly peeled—any remaining skins will create texture issues.
How long will this sauce keep in the fridge?
Properly stored in an airtight container, this sauce stays fresh for 2-3 weeks. The flavors actually improve as it ages! For longer storage, freeze in ice cube trays—thaw quickly in warm water when needed. The sauce reheats beautifully and maintains its vibrant color.