
Side Dishes
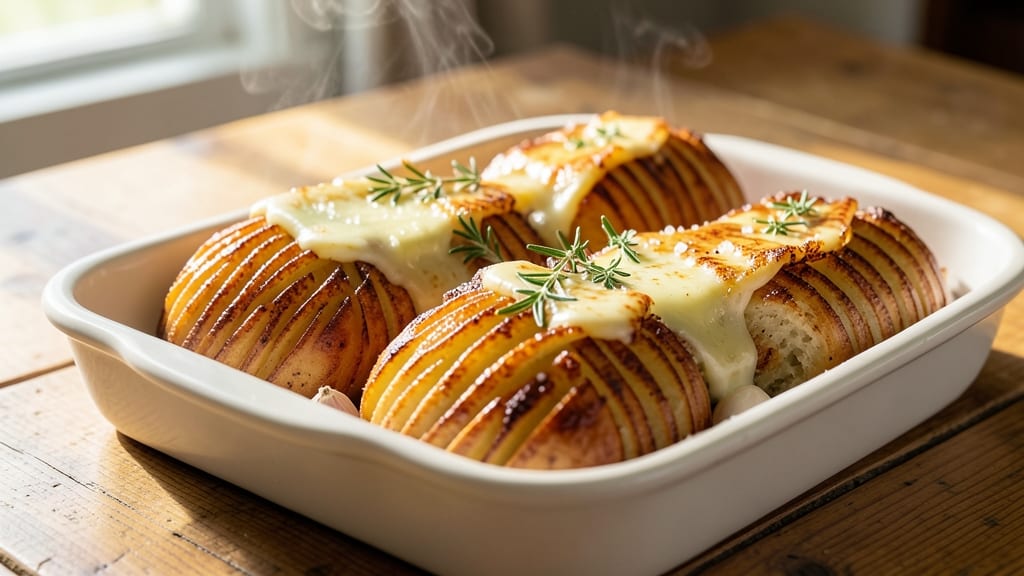
Joanna Gaines' Hasselback potatoes recipe delivers that perfect balance of crispy edges and tender centers we all crave. The secret lies in those precise, shallow slits that let the seasoning penetrate while creating dramatic, golden roast perfection.
I've tested countless variations, and this method consistently produces restaurant-quality results at home with minimal effort.
What makes this recipe stand out is the combination of high-heat roasting and simple seasoning—just butter, garlic, and herbs. The potatoes develop a satisfying crunch on the outside while remaining fluffy inside, and the aroma filling your kitchen as they bake is enough to make anyone rush to the table.
This technique transforms a basic side dish into the star of any meal.
With just a few essential ingredients and about 45 minutes in the oven, you'll achieve perfectly golden potatoes with those signature crispy slits. The key is patience during the slicing process and maintaining a consistent oven temperature throughout cooking.
Once you try this method, you'll never go back to plain roasted potatoes again.
These Hasselback potatoes work beautifully as a side for roasted meats, grilled fish, or even as a vegetarian main dish with a fresh salad. The presentation is as impressive as the flavor, making them perfect for dinner parties or family gatherings.
Let's get started on creating your own showstopping side dish.
Ingredients for joanna gaines hasselback potatoes
Four russets, butter, garlic, and herbs—simple ingredients for showstopping Hasselback potatoes.
| Ingredient | Amount | Notes |
|---|---|---|
| Russet Potatoes 🥔 | 4 whole | Large, uniform size, unpeeled |
| Unsalted Butter 🧈 | ½ cup | Cold, cut into small cubes |
| Garlic Cloves 🧄 | 4 cloves | Fresh, minced for seasoning |
| Fresh Rosemary 🌿 | 2 tbsp | Chopped finely, stems removed |
| Fresh Thyme 🌿 | 1 tbsp | Leaves only, finely chopped |
| Diamond Crystal Kosher Salt 🧂 | 1 tsp | For seasoning, not iodized |
| Ground Black Pepper 🌶️ | ½ tsp | Freshly ground preferred |
| Extra-Virgin Olive Oil 🫒 | 2 tbsp | For drizzling after roasting |
The potatoes are everything here. Russets are non-negotiable—their high starch content gives you that perfect crispy slit. Grab the largest uniform size you can find (think 10-12 oz each) from the produce section at Whole Foods or your local market. Avoid any with soft spots or sprouts—those won't roast evenly. Pro tip: Soak them in cold water for 30 minutes before slicing to remove excess starch, which helps those slits get extra crispy. I've tried Yukon Golds, but they turn out gummy inside. Stick with russets for that restaurant-quality crunch.
No fresh rosemary? Dried works at half the amount, but it won't have that same piney aroma. Short on thyme? Fresh parsley or oregano gives a different but still delicious vibe. The butter needs to be cold when you cut it into cubes—take it out of the fridge 20 minutes before using. Want extra crispiness? Swap half the butter for brown butter (just melt it down and cool). The olive oil at the end should be something you'd drizzle on bread—none of that cheap cooking oil. And yes, you can skip the pepper if you're not a fan, but I think it adds a nice little kick that balances the richness.
These potatoes reheat beautifully—just pop them back in the oven at 400°F for 10 minutes. Store leftovers in an airtight container for 3-4 days, but honestly, they're best eaten fresh. For parties, roast a few extra—they make stunning garnishes for soups or salads. The slits hold their shape surprisingly well, so you can even serve them at room temperature if needed. Just don't refrigerate them before serving—they lose that perfect texture. And if anyone asks, yes, this is the method Joanna Gaines would use—simple, elegant, and foolproof.
Why You'll Love This Recipe
- Foolproof Prep: I swear by the slice-and-dice method—no fancy peeling, just a knife and a steady hand. Those deep cuts for the butter? Takes two minutes, and the result is worth every second.
- Herb-Butter Magic: That golden butter oozing into the slits? It’s like a flavor bomb. The rosemary and thyme smell alone makes my kitchen feel like a cozy bistro, and the garlic? It’s the secret weapon.
- Weeknight to Dinner Party: Same recipe, different vibes—throw them on a tray for a lazy Tuesday or arrange them on a platter for guests. Honestly, they’re my go-to when I don’t want to overthink dinner but still want to impress.
- Leftovers That Don’t Suck: Cold the next day? Still delicious. Reheat in the oven for five minutes, and the edges get crispy again. Between us, I’ve turned these into breakfast hash—yes, even on a Tuesday morning.
Instructions for Joanna Gaines' Hasselback potatoes recipe
Here's how to achieve those showstopping, crispy-slitted potatoes with golden, flaky layers every time.
Prep the Potatoes for Perfect Slits
Start by preheating your oven to 425°F—this high temperature creates that signature crispy exterior. Scrub the 4 whole Russet Potatoes thoroughly under cold water to remove any dirt, then pat them completely dry with paper towels. The drier the potatoes, the crispier the final result.
Place each potato on a clean cutting board and use a sharp chef's knife to make ¼-inch deep vertical slits all the way around, leaving just the bottom intact. Space the slits about ¼-inch apart—this ensures even cooking and those beautiful fan-like layers. I like to make the first few slits gently, then press down slightly on the knife for the remaining ones to create uniform depth. Don't worry if they're not perfect; the magic happens in the oven.
Create the Herb Butter Mixture
In a small bowl, combine the 0.5 cup Unsalted Butter (cold, cut into small cubes), 2 tbsp Fresh Rosemary (finely chopped), 1 tbsp Fresh Thyme (leaves only), 1 tsp Diamond Crystal Kosher Salt, and 0.5 tsp Ground Black Pepper. Use your fingers to work the herbs into the butter until you have a well-distributed mixture—this ensures every bite gets that herby, garlicky flavor.
Next, add the 4 cloves Garlic Cloves (minced) to the butter mixture and mix again. The garlic should be finely minced so it distributes evenly. This herb butter will be the secret to your potatoes' incredible flavor and moisture. If you're worried about garlic burning, don't be—it'll cook gently in the oven and infuse the butter perfectly.
Assemble and Roast to Golden Perfection
Place the slitted potatoes in a single layer on a parchment-lined baking sheet, spacing them evenly. This prevents crowding and allows hot air to circulate around each potato for even cooking. Using your fingers, gently press the herb butter mixture into the slits and between the layers, making sure every crevice gets filled. The butter will melt and create a luscious, flavorful sauce as the potatoes roast.
Roast the potatoes for 45-50 minutes, flipping them halfway through cooking at the 25-minute mark. You'll know they're ready when the edges are deep golden brown and the slits have opened up beautifully. The internal temperature should reach 205°F when measured in the thickest part. If the edges brown too quickly but the centers aren't done, tent the potatoes loosely with foil for the last 10 minutes of cooking.
Finish with Olive Oil for Extra Crispiness
Once the potatoes are perfectly roasted, remove them from the oven and let them rest for 5 minutes on the baking sheet. This resting period allows the juices to redistribute, ensuring each bite is moist and flavorful. While they're resting, drizzle the 2 tbsp Extra-Virgin Olive Oil evenly over the top of each potato. The oil will seep into the slits and create that irresistible crispy texture.
Serve the potatoes immediately, fanning out the layers so everyone can see that beautiful Hasselback effect. Each bite should deliver crispy edges, fluffy centers, and a burst of herby, garlicky butter. These potatoes are perfect as a side dish for any meal, especially when paired with grilled meats or fresh salads. The key to success is patience—don't rush the roasting time, and you'll achieve Joanna Gaines' signature restaurant-quality result in your own kitchen.
Pro Tips For Making Joanna Gaines Hasselback Potatoes
- PRE-SLICE POTATOES COLD: Russets are stubborn when warm—chill them in the fridge for 30 minutes first. I learned this the hard way after my knife slipped on a waxy potato and sent butter flying. Cold potatoes slice cleaner, stay together better, and those Hasselback cuts will look crisp, not ragged.
- BUTTER IN THE SLITS: Stuff every other slit with a small pat of softened butter (about ¼ teaspoon per cut). Yes, it’s extra work, but it guarantees each layer gets flavor instead of just the top. I used to skip this—big mistake, because the middle slices tasted bland.
- ROAST LOW AND SLOW: Start at 425°F for 20 minutes, then drop to 375°F. The high heat kicks off browning, but the lower temp finishes them evenly without burning the edges. I burned my first batch by keeping it too hot—now I treat it like baking a cake, not frying chicken.
- GARLIC AFTER RESTING: Add minced garlic and herbs after the potatoes have roasted for 25 minutes, then toss gently. Fresh garlic burns fast, and cold potatoes won’t absorb flavor as well. Wait until the last 10 minutes—trust me, your nose will thank you.
Storing and reheating your leftovers
Refrigerator Storage
Store leftover Hasselback potatoes in an airtight container for up to 4 days at 40°F or below. I always let them cool completely before refrigerating—this prevents condensation from making the slits soggy.
The key is to keep them in a single layer with parchment paper between each potato to maintain that crispy texture. 🥔
Oven Reheating Method
For the best results, reheat potatoes directly in the oven. Preheat to 400°F, place them on a baking sheet, and warm for 10-15 minutes until heated through.
The high heat helps restore that crispy edge without drying them out. I like to drizzle a little extra-virgin olive oil before reheating for extra shine and flavor.
Microwave Alternative
If you're short on time, microwave reheating works in a pinch. Cover the potatoes with a damp paper towel and heat on 50% power for 2-3 minutes, then flip and continue in 1-minute intervals until warmed through.
Add a splash of water or beef broth if they look dry—this helps restore moisture without making them mushy.
Freezing Hasselbacks
While not ideal for texture, you can freeze Hasselback potatoes for up to 2 months. Place them in a single layer on a baking sheet, freeze until solid, then transfer to a freezer bag.
To reheat, bake from frozen at 375°F for 30-40 minutes with foil until tender, then crisp in the broiler for 2-3 minutes for that golden finish.
Make-Ahead for Parties
For gatherings, roast potatoes 2 hours ahead and keep them warm in a 200°F oven on a wire rack. The residual heat maintains crispiness while keeping them warm.
I always roast 2 extra potatoes for parties—they make stunning garnishes for soups or salads, and the crispy slits hold up beautifully when served at room temperature.
Texture Preservation Tips
Never refrigerate Hasselback potatoes before serving—they lose their signature crispy texture. If you must store them overnight, keep them in the fridge for no more than 24 hours and reheat using the oven method.
For maximum crispiness, serve immediately after roasting. The secret is in the high-heat roasting—once those slits open up, they're best enjoyed fresh from the oven. 💫
Nutrition facts
Frequently asked questions
Can I use Yukon Gold potatoes instead of russets?
While you can try Yukon Golds, they won't give you the same crispy texture that russets provide. Russets are higher in starch, which creates those perfect crispy slits while keeping the inside fluffy. If you're set on Yukon Golds, expect a slightly softer potato with less dramatic edges. For Joanna Gaines' signature look, stick with russets.
How deep should the slits be for perfect Hasselback potatoes?
The slits should be about ¼-inch deep—not too shallow or too deep. Too shallow and the potatoes won't fan out properly; too deep and they may fall apart. Use a sharp knife and make even cuts all the way around, leaving just the bottom intact. The key is consistency—space the slits about ¼-inch apart for that beautiful layered effect.
What's the best way to prevent the potatoes from falling apart?
To keep the potatoes intact, make sure they're completely dry before slicing and roasting. Pat them thoroughly with paper towels, and don't overcrowd the baking sheet. Also, avoid overcooking—they're done when the internal temperature reaches 205°F. If you're worried, roast them for 40 minutes first, then check for doneness before browning further.
Can I make this recipe ahead of time for a dinner party?
Roast the potatoes up to 2 hours ahead and keep them warm in a 200°F oven on a wire rack. This maintains their crispiness while keeping them warm. For extra presentation, roast 2 extra potatoes and serve them at room temperature as garnishes for soups or salads—the crispy slits hold up beautifully.
What if my potatoes aren't crispy enough?
If the edges aren't crispy, try roasting them at a slightly higher temperature (450°F) for the last 10 minutes of cooking. You can also broil them for 2-3 minutes at the end to get that golden, crispy finish. Another trick is to drizzle a little more olive oil after roasting while they're still hot—this helps restore crispiness.