
Sauces & Condiments
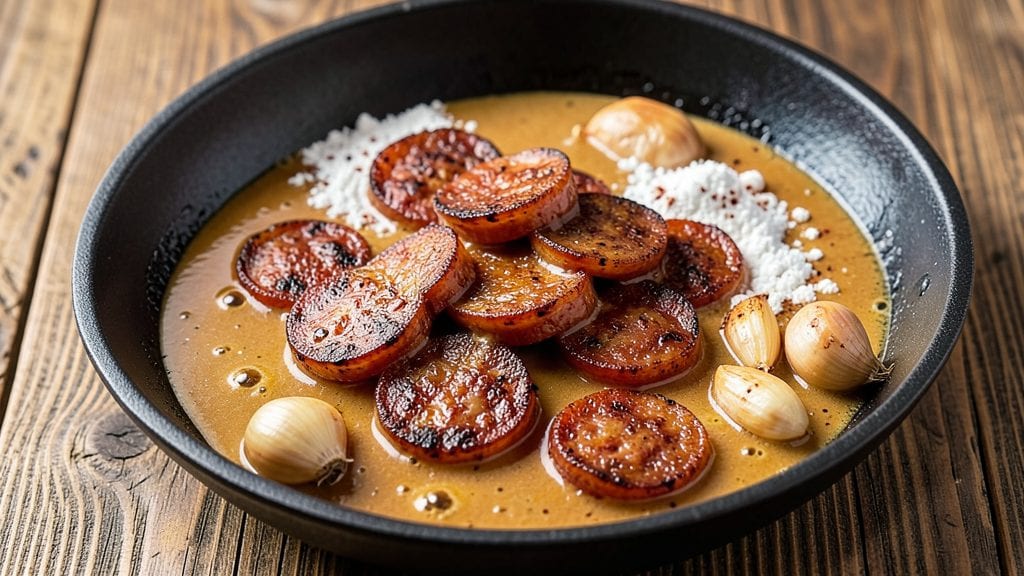
Transforming simple ingredients into a rich, smoky chorizo gravy that elevates every dish is a technique I perfected after years of experimenting with Spanish and Italian flavors.
The secret lies in rendering the chorizo properly to unlock its deep, spiced richness while building a velvety sauce that clings perfectly to pasta or potatoes. Standing on a step stool in my grandmother’s Sicilian kitchen, I first learned how fat and spices could turn humble ingredients into something extraordinary.
This chorizo gravy recipe relies on just five core ingredients—chorizo, flour, broth, garlic, and a pinch of smoked paprika—to create a sauce that’s bold yet balanced. The process is straightforward: brown the chorizo until crispy, then bloom the flour to thicken the broth into a luscious, smoky-spiced base.
What sets this apart is the slow simmer that develops layers of flavor without overpowering the dish.
Imagine drizzling this gravy over creamy polenta, twirling it through al dente pasta, or spooning it alongside crispy roasted potatoes. The result is a sauce that’s deeply aromatic, with just the right kick of heat and earthy chorizo flavor.
It’s the kind of recipe that turns a simple weeknight meal into something memorable—without requiring hours in the kitchen.
Perfect for feeding a crowd or meal prepping for the week, this gravy keeps well in the refrigerator for up to five days, making it a go-to for busy nights. The technique is foolproof, and the flavor only improves with time—just like Nonna’s lessons always do.
Ingredients for chorizo gravy
Five core ingredients transform into a deeply aromatic, smoky-spiced chorizo gravy perfect for pasta and potatoes.
| Ingredient | Amount | Notes |
|---|---|---|
| Spanish Chorizo 🥓 | ¾ lb | High-quality, cured Spanish chorizo preferred |
| All-Purpose Flour 🌾 | ¼ cup | Fine-milled for smooth sauce texture |
| Beef Broth 🍲 | 2 cups | Homemade or high-quality store-bought |
| Garlic Cloves 🧄 | 3 cloves | Fresh, peeled, and finely minced |
| Smoked Paprika 🌶️ | ½ tsp | High-quality Spanish smoked paprika |
| Extra-Virgin Olive Oil 🫒 | 1 tbsp | For rendering chorizo and finishing |
| Diamond Crystal Kosher Salt 🧂 | ½ tsp | Adjust to taste after simmering |
| Freshly Ground Black Pepper 🌶️ | ¼ tsp | For balancing heat levels |
The quality of chorizo is non-negotiable here—Spanish chorizo with visible fat and vibrant color delivers the deepest flavor. La Querencia or El Teide brands are excellent choices, though any high-quality cured chorizo will work. Render the fat slowly over medium heat to preserve its richness; rushing this step results in a bitter sauce. The flour should be fine-milled all-purpose for a velvety texture, and Bob's Red Mill is a reliable brand for consistent results. Smoked paprika from Penzeys adds an authentic depth that store-brand versions often lack—it's worth the investment for this recipe.
No Spanish chorizo? Mexican chorizo or Italian salami can substitute, though the flavor profile will shift slightly. The flour can be swapped for cornstarch at half the quantity if you prefer a glossier finish, but all-purpose creates the best roux. Fresh garlic is essential—pre-minced garlic from jars lacks the aromatic punch. For the broth, homemade is ideal, but Swanson or Pacific Foods brands offer reliable quality. If you're avoiding gluten, cornmeal or arrowroot powder can replace flour, though texture will differ. The olive oil should be extra-virgin with fruity notes—California Olive Ranch is a consistent performer.
This gravy develops richer flavors with time—reheat gently over low heat, stirring occasionally to prevent skin formation. Store in an airtight container in the refrigerator for up to five days, though the flavor peaks after 24 hours as the spices meld. For longer storage, freeze in ice cube trays for single-serving portions that reheat perfectly. The sauce thickens as it cools, so always reheat with 1-2 tablespoons of warm water or broth to restore its velvety consistency.
Why You'll Love This Recipe
- Pan in, Done: I swear by this recipe when I’m too tired to measure. Just brown the chorizo, toss in the flour, and pour the broth—no peeling garlic even required. The only real step is stirring, and honestly, that’s the easy part.
- Smoky Depth Magic: That Spanish chorizo? It’s the star—crumbled, sizzled, and packed with paprika warmth. The flour thickens it just enough to coat everything, but the broth keeps it rich and silky, like a hug in a bowl.
- Leftovers That Beg: This gravy turns bland roasted veggies into a meal or drizzled over eggs into a full breakfast. I make a big batch Sunday night because it’s the kind of thing that tastes even better reheated—no one ever complains when I send it home in a jar.
- Budget Booster: A single chorizo sausage and a bag of flour stretch to feed four (or more if you’re generous). The beef broth adds depth without breaking the bank, and the garlic? One clove goes a long way. My wallet and my family thank me every time.
Step-by-step instructions for chorizo gravy
This method delivers a rich, velvety gravy with deep chorizo flavor and perfect texture every time.
Render the Chorizo and Build Flavor
Heat the 1 tablespoon extra-virgin olive oil in a medium saucepan over medium-low heat. Add the 0.75 lb Spanish chorizo, sliced into ¼-inch rounds, and cook undisturbed for 5 minutes until the edges begin to brown and the fat starts to render. This initial searing develops the rich, smoky foundation of your gravy.
After 5 minutes, gently stir the chorizo and continue cooking for another 3-4 minutes until the fat has rendered out and the chorizo pieces are deeply browned but not crispy. This rendered fat will become the emulsifying agent for your gravy, creating that silky, luxurious texture. Remove the chorizo with a slotted spoon and set aside, leaving the rendered fat in the pan—this is where all the magic happens.
Create the Roux for Thickening
Reduce the heat to low and add the 0.25 cup all-purpose flour to the rendered fat in the pan. Whisk continuously with a wooden spoon for 2-3 minutes until the mixture forms a smooth, nutty-colored roux with no raw flour taste. This step is critical—cooking the flour transforms it into a thickening agent that will give your gravy its velvety consistency.
Watch the color closely: it should turn a golden brown, similar to toasted breadcrumbs. If it darkens too quickly, reduce the heat slightly. The roux should coat the back of a spoon smoothly—this indicates proper development. Once achieved, immediately pour in the 2 cups beef broth while whisking vigorously to prevent lumps from forming.
Simmer and Develop Depth of Flavor
Return the chorizo pieces to the pan and add the 3 minced garlic cloves, 0.5 teaspoon smoked paprika, 0.5 teaspoon diamond crystal kosher salt, and 0.25 teaspoon freshly ground black pepper. Stir well to combine all ingredients with the roux and broth. Bring the mixture to a gentle simmer over medium-low heat and let it cook uncovered for 10-12 minutes, stirring occasionally.
During this time, the flavors will meld together beautifully. You'll notice the gravy gradually thickening as the roux fully incorporates. The smoked paprika will infuse its earthy notes, while the garlic adds a subtle sweetness that balances the chorizo's richness. Taste the gravy after 8 minutes—if it needs more salt or pepper, adjust now, as the flavors will continue developing.
Finish and Perfect the Texture
Once the gravy has thickened to your desired consistency—it should coat the back of a spoon smoothly but still flow easily—remove it from heat. The gravy should be velvety, with the chorizo pieces evenly distributed throughout. If it's too thick, whisk in 1-2 tablespoons of hot beef broth to reach the perfect pouring consistency.
For an extra layer of flavor, stir in an additional ½ teaspoon of smoked paprika and let the gravy sit off heat for 2-3 minutes to allow the spices to bloom fully. The final product should have a deep, smoky aroma with visible chorizo pieces suspended in the rich, glossy sauce. Serve immediately over pasta, roasted potatoes, or crusty bread while still warm.
Pro Tips For Making Chorizo Gravy
- Slice Chorizo Thin: The thicker the slices, the longer they take to render fat and flavor—cut those links into ¼-inch pieces before cooking. I used to leave them in big chunks, and the gravy always tasted underdeveloped by the time the chorizo was done.
- Bloom the Flour Slowly: Add the flour to the hot pan gradually while stirring constantly—dumping it all at once makes a clump that burns before it browns. Think "snowfall," not "avalanche," especially with chorizo’s fat content.
- Skip the Boiling Broth: Cold or room-temperature broth prevents lumps and keeps the gravy from curdling when it hits the heat. I learned this the hard way after adding simmering broth straight to the roux—disaster.
- Toast the Paprika First: Bloom the smoked paprika in the dry pan for 30 seconds before adding liquid—this deepens its flavor and prevents it from dissolving into the broth too soon. Sounds weird, but it works: the gravy tastes richer.
Essential equipment for perfect results
Essential Pan
A heavy-bottomed saucepan is non-negotiable for this recipe—I swear by my All-Clad 3-quart stainless steel pan. The even heat distribution prevents hot spots that can burn your roux or create lumps.
If you're on a budget, a Lodge 3-quart cast iron works beautifully too, though it requires slightly lower heat to avoid scorching. The key is medium-low heat throughout the process to develop flavors gradually without rushing the cooking.
Whisk for Smoothness
Invest in a high-quality whisk—I use my OXO Good Grips balloon whisk—to achieve that silky texture. The rounded wires cut through the roux and broth more efficiently than flat whisks, preventing lumps during the thickening process.
If you don’t have one, a wooden spoon works in a pinch, but you’ll need to stir more vigorously. The goal is a smooth, lump-free sauce that coats the back of a spoon.
Slotted Spoon
A slotted spoon (like my Mercer Culinary Genius one) is perfect for removing the chorizo pieces during the rendering stage. It lets you drain excess fat while keeping the flavorful bits in the pan.
This step is crucial—leaving the fat in the pan is what creates that rich, emulsified texture in the final gravy. A regular spoon won’t give you the same control, and you risk overcrowding the pan, which can steam instead of brown the chorizo.
Measuring Spoons
Precision matters with spices and salt in this recipe. My West Bend 10-piece stainless steel set ensures accurate measurements for the smoked paprika and kosher salt. A pinch of too much salt can overpower the delicate balance of flavors, while too little leaves the gravy flat.
I recommend diamond crystal kosher salt—it dissolves easily and tastes cleaner than table salt. For the smoked paprika, use a spice scoop (like the one from Penzeys) to avoid clumping.
Wooden Spoon
After the whisk, my trusty Oakwood spoon (a gift from Nonna) becomes my go-to for stirring the gravy during the simmering phase. Wood won’t scratch your pan like metal utensils, and it’s gentle on the roux.
Plus, it’s heat-resistant, so you can stir directly over the flame without worry. If you don’t have one, a silicone spatula is a great alternative—just avoid plastic, as it can melt under high heat.
Thermometer (Optional)
While not mandatory, a kitchen thermometer (like the Thermoworks ThermoPop) helps ensure your gravy reaches the perfect consistency. Aim for a gentle simmer at 185–195°F—this range prevents the sauce from boiling too vigorously, which can break the emulsion and make it grainy.
If you’re new to roux-based sauces, this tool gives you confidence in hitting the ideal texture every time. 🌡️
Nutrition facts
Frequently asked questions
Can I make this chorizo gravy with Mexican chorizo instead of Spanish?
Yes, but expect a different flavor profile! Mexican chorizo is spicier and often contains vinegar, which will add tanginess to your gravy. For a more authentic Spanish-style result, stick with cured Spanish chorizo. If using Mexican chorizo, reduce the smoked paprika to ¼ teaspoon and add ½ teaspoon of cumin to complement the flavors.
How do I fix a gravy that's too thick or too thin?
For gravy that's too thick, whisk in 1-2 tablespoons of warm beef broth at a time until it reaches a smooth, pourable consistency. If it's too thin, simmer uncovered for 2-3 additional minutes to reduce the liquid. For a quick fix, mix ½ teaspoon cornstarch with 1 tablespoon cold water, stir into the gravy, and cook for 1 minute until thickened.
What's the best way to store leftovers?
Store gravy in an airtight container in the refrigerator for up to 5 days. The flavors actually improve with time! For longer storage, freeze in ice cube trays or small containers—thaw overnight in the fridge and reheat gently over low heat, stirring occasionally to restore smoothness. Never microwave directly from frozen, as it can create a skin.
Can I make this gravy ahead of time for a dinner party?
This gravy tastes even better when made a day ahead. The flavors meld beautifully, and it reheats perfectly. For serving, keep it warm in a slow cooker on low heat or reheat in a saucepan over medium-low heat, stirring frequently. If it thickens too much during reheating, thin with a splash of warm broth. Serve with crusty bread or roasted vegetables for an impressive centerpiece.
Why does my gravy look oily or separated?
This usually happens if the roux was cooked too quickly or the heat was too high, causing the fat to separate. To fix it, whisk in 1 tablespoon of cold water and simmer gently for 2 minutes—this helps re-emulsify the sauce. For prevention, always cook the roux over low heat and whisk constantly. The key is patience: a properly made roux should coat the back of a spoon smoothly without being greasy.