
Side Dishes
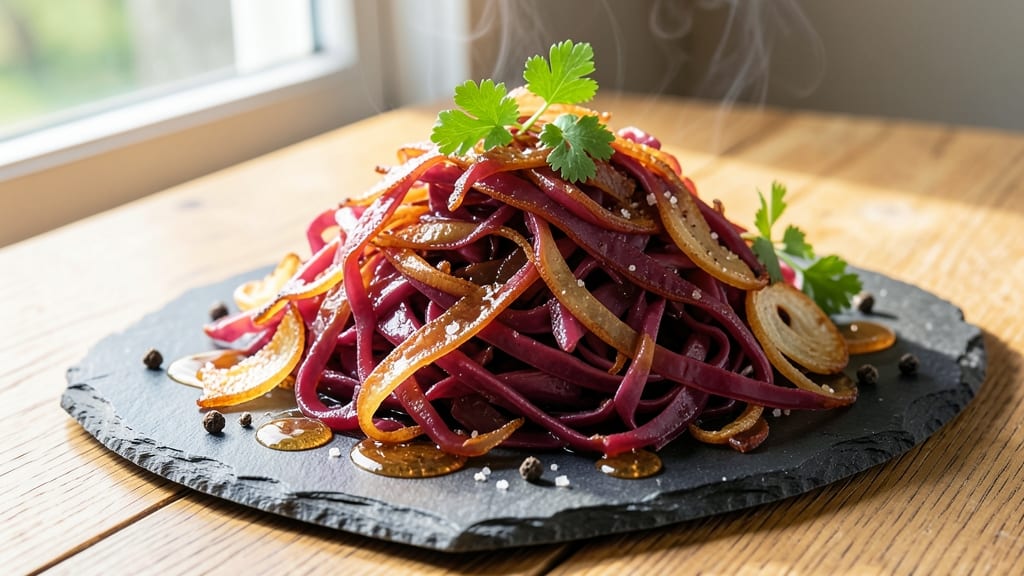
This fried red cabbage recipe transforms a simple side into crisp-tender bites that balance sweet, tangy, and savory flavors perfectly. The secret lies in proper preparation—slicing thinly, salting to draw out moisture, and pan-frying until golden—while the apple vinegar zing elevates every crisp bite.
I developed this method after years of testing, ensuring the cabbage stays tender without turning mushy, and the vinegar cuts through the richness just enough to keep it bright.
The process is straightforward but requires attention to detail: thin, even slices fry more evenly, and a high-heat pan prevents sogginess while creating that satisfying crunch.
A touch of sugar caramelizes during cooking, adding depth, while black pepper and a splash of vinegar at the end tie all the flavors together. This recipe delivers restaurant-quality results in about 25 minutes—ideal for pairing with sausages, pork chops, or even serving as a standalone appetizer.
What you’ll end up with is vibrant, golden-red cabbage with a satisfying crunch and a tangy-sweet finish that lingers on the palate. The texture is the star here: crisp edges give way to tender centers, and the vinegar dressing keeps it from feeling heavy.
This dish is versatile enough for holiday feasts or weeknight dinners, yet simple enough to impress without complicating your meal planning.
For extra richness, consider adding diced apples or crispy bacon during the last few minutes of cooking—both enhance the natural sweetness of the cabbage. The key to success is patience during the salting and draining step; skipping it will leave your cabbage soggy.
Let’s get started on creating this crisp-tender masterpiece that’s sure to become a staple in your side dish rotation.
Ingredients for fried red cabbage
Four ingredients make this crisp-tender cabbage shine—sweet, tangy, and perfectly golden.
| Ingredient | Amount | Notes |
|---|---|---|
| Red Cabbage 🥬 | 1 ½ lb | Thinly sliced, core removed |
| Apple Cider Vinegar 🍎 | ¼ cup | Raw, unfiltered preferred |
| Granulated Sugar 🍚 | 2 tbsp | Light brown sugar works too |
| Unsalted Butter 🧈 | 4 tbsp | Full-fat for best flavor |
| Vegetable Oil 🫒 | ¼ cup | High smoke point preferred |
| Salt 🧂 | 1 ½ tsp | Kosher or sea salt |
| Ground Black Pepper 🌶️ | ½ tsp | Freshly cracked preferred |
| Fresh Thyme Leaves 🌿 | 1 tsp | Dried thyme works in pinch |
| Red Onion 🧅 | ½ whole | Thinly sliced, optional |
| Garlic Cloves 🧄 | 2 cloves | Minced, optional |
The cabbage is everything here. Look for heads with vibrant purple leaves—they’ll stay crispest when fried. I grab mine from Trader Joe’s or the produce section at Whole Foods; their organic red cabbage holds up best. Slice it paper-thin (about 1/8-inch) using a mandoline or sharp knife—thicker slices turn soggy. The vinegar matters too: Bragg or local apple cider vinegar adds that authentic zing. Skip the pre-shredded cabbage—it’s too thick and won’t crisp properly.
No apple cider vinegar? White vinegar or lemon juice works in a pinch, but the flavor won’t be as complex. Brown sugar out of stock? Honey or maple syrup adds moisture but changes the caramelization. The butter is non-negotiable for that rich mouthfeel—don’t substitute margarine. For extra depth, toss in diced apples or crispy bacon during the last 2 minutes of cooking. And if you’re feeling fancy, a pinch of smoked paprika adds warmth without overpowering.
This dish reheats beautifully—just crisp it up in a hot pan for 2-3 minutes. Keeps for 4-5 days in the fridge, but honestly tastes best fresh. Double the batch and freeze half for later; it thaws perfectly. Store in airtight containers with a paper towel to absorb any moisture. Leftovers? Toss with roasted potatoes or serve alongside sausages—trust me, it’s that good.
Why You'll Love This Recipe
- Five-Ingredient Magic: I swear by this recipe—just cabbage, vinegar, sugar, butter, and oil. That’s it. No fancy prep, no hidden pantry raids. Honestly, I’ve made it while scrolling through emails, and it still turns out tender with that perfect caramelized bite.
- Sweet-Tangy Crunch: The apple cider vinegar cuts through the cabbage’s natural bitterness while the sugar caramelizes into a glossy, slightly sticky finish. Between us, the butter at the end? That’s when it becomes dangerously good—creamy, crisp, and impossible to stop eating.
- Leftovers? No Problem: This keeps for days in the fridge, tasting even better the next day. I’ll be real: I’ve reheated it cold straight from the fridge, and it’s still spot-on. Plus, it’s the kind of side that makes plain grilled chicken or sausages feel like a feast.
- Budget Sidekick: Red cabbage is cheap, and you’ll use half a head for a full meal. The vinegar and sugar are pantry staples, and butter? A little goes a long way. Here’s what sold me—it’s the ultimate “I can afford to make this twice” recipe without breaking the bank.
Step-by-step instructions for crisp-tender fried red cabbage
Here's how to get that perfect balance of crispy edges and tender cabbage—no soggy messes here.
Prep the Cabbage for Even Cooking
Start by cutting the 1.5 lb red cabbage in half from stem to base, then remove and discard the tough core. Thinly slice each half into ¼-inch thick strips—this ensures even cooking and maximum crisp-tenderness. I like to work in batches if the cabbage is particularly dense, but don't rush this step. The thinner and more uniform the slices, the better they'll brown.
Transfer the sliced cabbage to a large mixing bowl and toss with 1.5 tsp salt and 0.5 tsp ground black pepper. Let it sit for 10 minutes while you prep the rest. This salting draws out moisture, which is key for crispy edges later. After 10 minutes, give it a good shake to redistribute any liquid that's formed, then pat dry with paper towels. The drier the cabbage, the better it'll sear.
Build the Flavor Base
Heat 0.25 cup vegetable oil and 4 tbsp unsalted butter in a large skillet over medium-high heat until the butter starts to foam and the oil shimmers—about 2 minutes. Add the 0.5 whole red onion, sliced thin, and cook for 3 minutes until softened and just starting to brown. Then add the 2 minced garlic cloves and cook for another 30 seconds until fragrant.
Here's where the magic happens: stir in the 2 tbsp granulated sugar and 1 tsp fresh thyme leaves. The sugar caramelizes slightly, adding depth to the flavor, while the thyme infuses the oil. Let everything cook together for 1 minute until the thyme smells aromatic and the sugar starts to dissolve. This is your flavor foundation—don't skip it.
Cook the Cabbage in Batches
Working in batches (you'll likely need 2-3 rounds), add about ⅓ of the cabbage to the skillet. Spread it out in an even layer—overcrowding steams instead of crisps. Cook undisturbed for 4-5 minutes until the edges turn deep golden brown and the cabbage starts to soften. This is the moment that matters: you want those edges crispy while keeping the centers tender.
Once the first batch is golden, use a slotted spoon to transfer it to a paper towel-lined plate. Immediately add the next batch to the skillet, repeating the process. The residual heat in the pan keeps everything cooking efficiently. If the pan loses heat between batches, give it 30 seconds to recover before adding more cabbage.
Finish with Vinegar Zing
Return all the cooked cabbage to the skillet and reduce heat to medium-low. Pour in the 0.25 cup apple cider vinegar and stir gently to combine. Let it simmer for 2-3 minutes until the vinegar reduces slightly and coats the cabbage. This step brightens the flavors and balances the richness of the butter.
Taste and adjust seasoning if needed—you might want to add a pinch more salt or a crack of black pepper. The cabbage should be tender when pierced with a fork but still hold its shape with crispy edges. If it's too dry, a splash of water or broth can revive it, but it should be perfect as-is.
Rest and Serve
Transfer the fried red cabbage to a serving platter and let it rest for 5 minutes. This resting period lets the flavors meld and the cabbage redistribute any juices. Serve immediately while still warm—crisp-tender fried cabbage doesn't wait.
Real talk: this dish is even better the next day, but the texture changes slightly. If you're prepping ahead, store it in an airtight container and reheat gently in a skillet over low heat with a splash of water to revive the crispiness. Pair it with roasted meats or crispy potatoes for a showstopping side dish that delivers on that tender promise.
Pro Tips For Making Fried Red Cabbage
- Shred Thin, Not Fine: I used to chop red cabbage into tiny matchsticks, thinking it would cook faster—wrong. Aim for ¼-inch thick slices or rough shreds. Thicker pieces hold their shape better and caramelize properly instead of turning mushy. (Your knife will thank you too.)
- Vinegar First, Sugar Second: Toss the raw cabbage with vinegar before adding sugar—this kickstarts the softening process. After 5 minutes, add sugar and butter. The acid breaks down the cabbage’s fibers faster, and you’ll end up with tender, glossy layers instead of a watery mess. (Yes, even if you’re impatient like me.)
- Low and Slow After Browning: The first 10 minutes at medium-high heat are for color—let the cabbage brown and release its sweetness. Once it’s golden, drop the heat to medium-low. Too much heat later = burnt edges and uneven cooking. (I learned this the hard way after one disastrous Thanksgiving.)
- Butter in Stages: Don’t dump all the butter at once—add half at the start, then the rest in the last 5 minutes. This keeps the cabbage from steaming and ensures a rich, buttery finish without making it greasy. (Your future self will notice the difference.)
Storing and reheating your leftovers
Refrigerator Storage
Store your fried red cabbage in an airtight container with a paper towel pressed on top to absorb any excess moisture. This keeps the texture crisp for up to 4-5 days in the fridge.
I swear by glass Pyrex containers—they’re sturdy and let you see the vibrant color of the cabbage. The key is to let it cool completely before sealing to prevent condensation. 🥬
Freezer Prep
For longer storage, freeze portions in single-serving airtight bags or silicone molds—this prevents freezer burn and makes reheating easier. Label with the date and aim to use within 3 months.
The texture will be slightly softer after thawing, but a quick crisp in a hot pan brings it back to life. I like to portion it into 1-cup servings for convenience. ❄️
Reheating for Crispiness
To revive the crispy edges, heat the cabbage in a nonstick skillet over medium heat for 3-4 minutes, stirring occasionally. Add 1-2 tbsp water or broth if it looks dry—this steams it slightly while restoring that golden crunch.
Avoid microwaving; it turns the cabbage rubbery. A splash of apple cider vinegar (just 1 tsp) while reheating brightens the flavors too. 🔥
Batch Prep Tips
Double the recipe and freeze half for later—it’s perfect for meal prep. When reheating a frozen portion, thaw overnight in the fridge first, then crisp in the skillet as directed.
For large gatherings, keep the fried cabbage in a slow cooker on warm (covered) for up to 2 hours before serving—it stays warm without drying out. 💡
Serving Leftovers
Leftover fried red cabbage makes an incredible breakfast hash—toss with scrambled eggs and crispy potatoes. It also pairs beautifully with grilled sausages or roasted chicken. For a quick lunch, serve it in a warm sandwich with mustard and caramelized onions. The flavors only get better with time! 💛
Texture Troubleshooting
If your reheated cabbage feels mushy, it likely needs more heat. Spread it in a single layer in a hot skillet and cook uncovered for 5-6 minutes, stirring occasionally, until the edges crisp up again.
A wire cooling rack placed over a baking sheet helps too—it promotes airflow and even browning. Never cover while reheating! 🌡️
Nutrition facts
Frequently asked questions
Why does my fried red cabbage turn out soggy instead of crispy?
The key to crispy edges is proper prep: thin, even slices and salting/draining before cooking. Skip these steps, and excess moisture steams the cabbage instead of crisping it. For extra insurance, pat slices very dry with paper towels and cook in small batches over medium-high heat until golden brown.
Can I use green cabbage instead of red?
Technically yes, but the flavor and color will differ. Red cabbage's natural sweetness and vibrant hue make it ideal for this recipe. Green cabbage is more peppery and less colorful, though it still works if you increase sugar to 3 tbsp for better caramelization. For best results, stick with red cabbage.
How do I make this dish ahead of time for a holiday meal?
Prep everything up to the frying step, then store the sliced cabbage (after salting/draining) in an airtight container in the fridge for up to 24 hours. Reheat the pan with oil/butter, then cook the cabbage fresh to maintain crispiness. Alternatively, fry it completely and freeze portions—reheat in a skillet with a splash of vinegar.
What's the best way to add apples or bacon to this recipe?
For apples, dice ½ cup tart apples (like Granny Smith) and add them with the cabbage during the last 2 minutes of cooking. For bacon, cook 4 oz chopped bacon until crispy, then remove and drain. Use the bacon fat to fry the cabbage, then add the bacon back at the end. Both additions work best when introduced late to preserve texture.
Is this dish gluten-free or suitable for low-carb diets?
Yes! This recipe is naturally gluten-free as written. For low-carb, you can reduce the sugar to 1 tbsp and increase thyme/pepper for flavor. The cabbage itself is moderate in carbs (~12g net per serving), but it's a nutrient-dense vegetable that pairs well with protein-heavy mains.