
Side Dishes
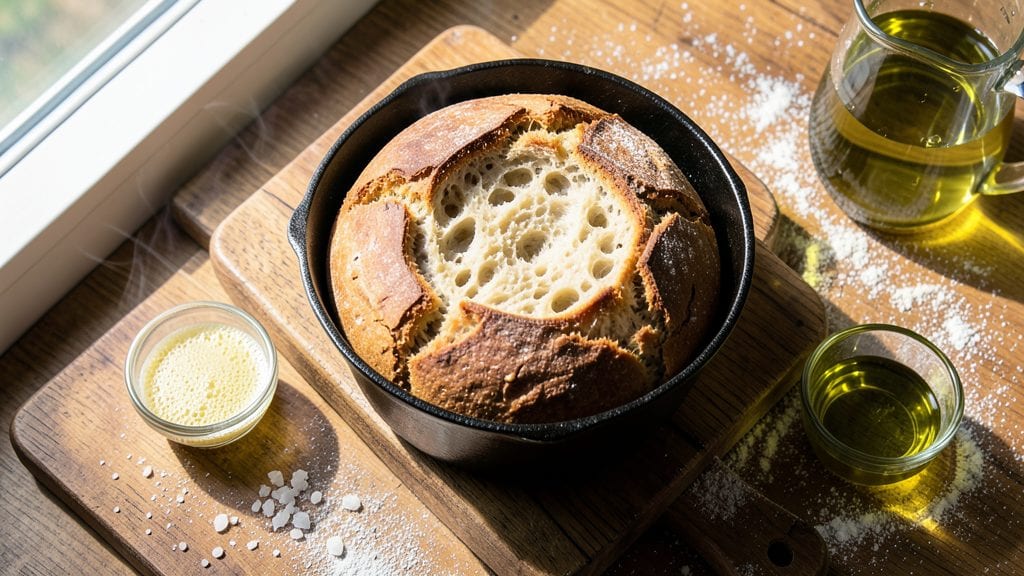
This farmhouse bread recipe delivers the perfect balance of a crisp, golden crust and tender, airy crumb—just like the bread you’d find in a rustic French bakery. The secret lies in precise dough handling, proper proofing, and baking in a Dutch oven to trap steam and create that iconic texture.
I’ve perfected this method over years of trial and error, and it consistently yields a loaf with an irresistible crunch and soft interior.
The process begins with a simple dough of flour, water, yeast, and salt, but the magic happens in the proofing and shaping. Letting the dough rise slowly develops flavor, while shaping it into a classic batard or boule form ensures an even bake.
The Dutch oven creates a steamy environment, allowing the crust to develop that beautiful blistered texture while keeping the inside light and fluffy. Every step is designed to bring out the best in this timeless classic.
What you’ll end up with is a loaf that’s crisp on the outside and soft on the inside, with a rustic, artisanal look that’s perfect for serving with soups, stews, or simply slathered with butter.
The aroma alone will make your kitchen smell like a countryside bakery, and the taste is pure comfort. This recipe is foolproof, even for beginners, and yields a loaf that rivals anything you’d find in a specialty bakery.
Whether you’re baking for a family dinner or treating yourself to homemade bread, this method ensures consistent results every time. The key is patience—letting the dough rise properly and baking it at the right temperature.
Once you master this, you’ll never buy store-bought bread again. Let’s get started on creating your perfect loaf.
Ingredients for farmhouse bread
Six simple ingredients transform into golden, crusty farmhouse bread with a tender crumb inside.
| Ingredient | Amount | Notes |
|---|---|---|
| All-Purpose Flour 🌾 | 5 cups | Plus 1 tbsp for dusting |
| Active Dry Yeast 🍞 | ¼ tsp | Or 1 packet instant yeast |
| Granulated Sugar 🍬 | ½ tsp | Feeds the yeast (don't skip) |
| Salt 🧂 | 2 tsp | Kosher or sea salt |
| Extra-Virgin Olive Oil 🫒 | 1 ½ tbsp | High-quality, fruity kind |
| Warm Water 💧 | 1 ½ cups | 105-110°F for yeast activation |
| Cornmeal 🌽 | ¼ cup | For dusting parchment paper |
| Coarse Sea Salt 🧂 | 1 tbsp | For sprinkling on top |
| Dutch Oven 🔥 | 1 whole | 5-7 quart size preferred |
The flour is non-negotiable—King Arthur or Caputo Tipo 00 if you want bakery-level results, but all-purpose works perfectly fine for home bakers. Yeast is the heart of this recipe, so check the expiration date—old yeast won't activate properly. I always buy mine at Whole Foods or Trader Joe's where it's fresh. The olive oil should have a vibrant green hue and a peppery finish—California Olive Ranch is my go-to. For the water, use warm but not hot—yeast dies in boiling water. If you're unsure about the temperature, just dip your pinky finger in—it should feel warm but not uncomfortable.
No Dutch oven? Any heavy oven-safe pot with a lid works in a pinch, but it won't trap steam as well. Running out of cornmeal? Semolina or rice flour are great substitutes. The coarse sea salt is for that signature crunch on top—Maldon is my favorite, but any flaky salt will do. If you're baking in a humid climate, you might need to brush the loaf with milk or egg wash before baking for extra browning. And if your kitchen is dry, place a tray of boiling water in the oven when you bake for extra steam. The sugar might seem like a small amount, but it's crucial for activating the yeast—don't skip it!
This dough is a beast—it needs time. Once mixed, let it rise for 1-2 hours until doubled, then shape and let it rest another 30 minutes before final proofing. The final proof should take 1-2 hours at room temperature. For storage, wrap the cooled loaf in a clean kitchen towel and keep it at room temperature for 2-3 days. It reheats beautifully—just wrap it in foil and warm in a 350°F oven for 10 minutes. Freeze slices for up to 3 months by wrapping them individually in plastic wrap.
Why You'll Love This Recipe
- Pantry Staples Only: I swear by this recipe because it’s the kind of bread I can make when my fridge is bare. Just flour, yeast, sugar, salt, and olive oil—no fancy ingredients, no last-minute grocery runs. The yeast does all the work, and honestly? That’s my kind of magic.
- Crusty Yet Tender: The olive oil in the dough gives it that golden, crackly crust you’d pay extra for at a bakery, but the inside stays soft and airy. Between us, that’s the kind of texture I’ll fight my partner over—no contest.
- Weeknight Hero: I bake a loaf on Sundays, and it lasts me all week. Toast it for breakfast, use it for sandwiches, or tear it into chunks for soup—it’s the ultimate sidekick. (Yes, even on a Tuesday night.)
- Budget-Friendly Baking: A single batch costs me pennies but feels like a restaurant-worthy loaf. The yeast stretches the dough perfectly, and the olive oil adds richness without breaking the bank. My wallet and my taste buds thank me.
Step-by-step instructions for farmhouse bread recipe
This rustic beauty delivers that perfect farmhouse charm with a crisp crust and light, airy crumb.
Activate the Yeast for Maximum Rise
In a small bowl, combine the 1.5 cups warm water (between 105-110°F—test by sprinkling a pinch of the 5 cups all-purpose flour in; it should dissolve instantly), 0.5 tsp granulated sugar, and 0.25 tsp active dry yeast. Let it sit for 5-10 minutes until frothy. This step is crucial—if it doesn't bubble, your bread won't rise properly.
Here's the thing—yeast needs warmth to wake up. If your kitchen is chilly, place the bowl on top of your oven with the light on (not the heat) for a few minutes to encourage activity. Once you see bubbles and a foamy top, you're ready to proceed. This means your yeast is alive and ready to make that bread rise beautifully.
Mix the Dough Until Just Combined
In a large bowl, whisk together the 5 cups all-purpose flour, 2 tsp salt, and 1.5 tbsp extra-virgin olive oil. Make a well in the center and pour in the yeast mixture. Using a wooden spoon, stir until a shaggy dough forms—about 2 minutes. This initial mix should be sticky but manageable.
Now for the fun part: turn the dough onto a lightly floured surface and knead for 5-7 minutes until smooth and elastic. You'll know it's ready when it springs back slowly when poked. Don't over-knead, though—this can make the bread tough. If it's too sticky, wet your hands slightly as you work. The goal is a dough that's firm enough to handle but still soft enough to stretch.
Let the Dough Rise Until Nearly Doubled
Lightly coat a large bowl with extra-virgin olive oil, place the dough inside, and cover with a damp kitchen towel. Let it rise in a warm spot for 1-2 hours until it's nearly doubled in size. You'll see it puff up and develop small bubbles on the surface—this is the magic of yeast at work, creating that light, airy texture we love.
I like to place my bowl on top of the turned-off oven with a pan of hot water underneath to create a warm, humid environment. This helps the dough rise faster and more evenly. Poke the dough gently—if it springs back slowly, it's ready. If not, give it another 30 minutes. Patience here ensures that perfect crumb structure.
Shape and Proof for That Rustic Look
Turn the dough onto a floured surface and gently shape it into a round loaf. Don't worry about perfection—rustic bread should look artisanal, not pristine. Place it seam-side up in the dutch oven, which should be preheated for 30 minutes at 450°F. Dust the top with 0.25 cup cornmeal and sprinkle with 1 tbsp coarse sea salt. This step adds that beautiful crust and enhances flavor.
Let the dough proof for another 30-45 minutes in the hot oven. You'll see it rise dramatically—this is where that beautiful, open crumb forms. The salt on top will create steam during baking, contributing to that crispy crust. Don't skip this step; it's what gives farmhouse bread its signature texture and flavor.
Bake to Golden Perfection
Bake the bread, covered, for 30 minutes at 450°F. Then remove the lid and bake for another 15-20 minutes until the crust is deep golden brown and sounds hollow when tapped on the bottom. This two-stage baking creates that perfect combination of a crisp exterior and soft interior.
Let the bread cool on a wire rack for at least 1 hour before slicing—this prevents a gummy texture. The aroma filling your kitchen will be worth the wait. Each slice should have that beautiful open crumb and a crisp crust that's perfect for dipping in olive oil or butter. This is the moment you've been waiting for—your homemade farmhouse bread, ready to be enjoyed.
Pro Tips For Making Farmhouse Bread
- Bloom the Yeast First: Skip mixing yeast directly into flour—it’s the surest way to end up with flat, sad bread. Instead, dissolve the yeast in warm water (about 110°F) with a pinch of sugar, then wait 5-10 minutes until it’s bubbly and frothy before adding flour. I learned this the hard way after making dough that barely rose—yeast needs a drink, not a dry hug.
- Knead Until Silky: Farmhouse bread’s chewiness comes from gluten development, but most home cooks under-knead. Aim for a windowpane test: stretch a small piece of dough—if it’s thin enough to see light through without tearing, you’re golden. My grandmother’s trick? Use a stand mixer with a dough hook for 6-8 minutes on medium-high. Over-kneading is easier to fix than under-kneading.
- Salt the Water: Dumping salt directly into flour creates clumps that disrupt gluten. Instead, dissolve the salt in the water first—it’ll distribute evenly and boost flavor. I was skeptical until I tried it; the crust got deeper color and the crumb stayed tender longer. (Yes, even if you’re impatient like me.)
- Steam the First 10 Minutes: That crust you’re dreaming of? It starts with steam. Place a metal bowl of boiling water on the oven rack below your baking stone or tray, then bake the bread. The steam mimics a professional oven and prevents a dry, cracked top. I skip this when I’m lazy, but the difference in texture is noticeable—like the gap between store-bought and homemade.
Creative variations of these flavors
Herbed Garlic Twist
Infuse your dough with 2 tbsp finely chopped fresh rosemary and 1 tbsp minced garlic during the kneading stage. These herbs add a fragrant depth that pairs perfectly with soups or roasted vegetables.
For extra richness, fold in 1 tbsp grated Parmesan cheese into the dough before shaping. The result? A bread that tastes like it came straight from a Tuscan countryside bakery. 🌿
Seeded Whole Grain
Swap 1 cup of the all-purpose flour for whole wheat flour and add 2 tbsp pumpkin seeds, 2 tbsp sunflower seeds, and 1 tbsp sesame seeds to the dough. The seeds add a satisfying crunch and boost fiber content.
Toast the seeds in a dry pan for 2-3 minutes before mixing them in to enhance their nutty flavors. This version works beautifully as a heartier option for sandwiches. 🌾
Honey Oat Sweetness
Replace the granulated sugar with 2 tbsp honey and add ½ cup rolled oats to the dough for a subtly sweet, nutty loaf. The honey feeds the yeast while adding natural sweetness, and the oats create a delightful texture contrast.
Brush the baked loaf with an extra 1 tbsp honey mixed with 1 tsp water for a sticky, caramelized finish. Perfect for breakfast or as a dessert bread. 🍯
Savory Cheese Loaf
Add 1 cup shredded Gruyère cheese to the dough during the final kneading stage. The cheese melts slightly during baking, creating pockets of gooey goodness. For a sharper flavor, use Pecorino Romano instead.
This version is ideal for pairing with charcuterie boards or hearty stews. Sprinkle with extra coarse sea salt before baking for a salty-savory kick. 🧀
Olive & Herb Focus
Fold ½ cup chopped Kalamata olives and 1 tbsp dried oregano into the dough for a Mediterranean-inspired twist. The olives add briny bursts, while the oregano enhances their flavor.
Shape the dough into a free-form loaf and score deeply before baking for dramatic presentation. This bread shines when served with grilled meats or Mediterranean-style salads. 🫒
Spiced Pumpkin Bread
For a seasonal variation, replace ½ cup water with ½ cup pumpkin puree and add 1 tsp pumpkin pie spice and 1 tbsp brown sugar to the dough. The pumpkin adds natural sweetness and moisture, while the spices create warm, autumnal notes.
This version is perfect for fall gatherings and pairs wonderfully with butter or apple butter. 🎃
Nutrition facts
Frequently asked questions
Can I make farmhouse bread without a Dutch oven?
Use any heavy oven-safe pot with a lid (like a cast-iron skillet) or even a baking stone. Preheat the pot for 30 minutes at 450°F to mimic the Dutch oven's steam-trapping effect. The crust won't be quite as dramatic, but you'll still get a great loaf. For extra steam, place a tray of boiling water in the oven during baking.
Why did my bread turn out dense instead of light and airy?
Dense bread usually means the yeast didn't activate properly or the dough didn't rise enough. Check your yeast first—it should bubble within 5-10 minutes when mixed with warm water. Also, ensure your kitchen is warm (at least 75°F) and give the dough plenty of time to rise (at least 1-2 hours for the first rise, plus 30-45 minutes for final proofing). Over-kneading can also make bread tough.
How do I store farmhouse bread to keep it fresh?
Let the bread cool completely, then wrap it in a clean kitchen towel or beeswax wrap instead of plastic. Store at room temperature for 2-3 days—this keeps the crust crisp. For longer storage, slice and freeze individual portions in airtight bags for up to 3 months. To revive, toast slices in a dry pan for 1-2 minutes per side.
Can I add seeds or herbs to the dough?
Yes! Mix in 2 tbsp seeds (like pumpkin or sunflower) or 1 tbsp chopped herbs (rosemary, thyme) during kneading. For extra flavor, toast seeds in a dry pan for 2-3 minutes first. Just be mindful not to overdo it—too many additions can make the dough too dense. Herbs like garlic or rosemary pair beautifully with soups, while seeds add crunch to sandwiches.
What's the best way to reheat sliced farmhouse bread?
Wrap slices in foil and warm in a 350°F oven for 5-7 minutes until crispy again. For a quicker fix, toast slices in a dry skillet over medium heat for 1-2 minutes per side. Avoid the microwave—it makes bread gummy. Pro tip: Brush warm slices with melted butter or olive oil for extra flavor.