
Beverages
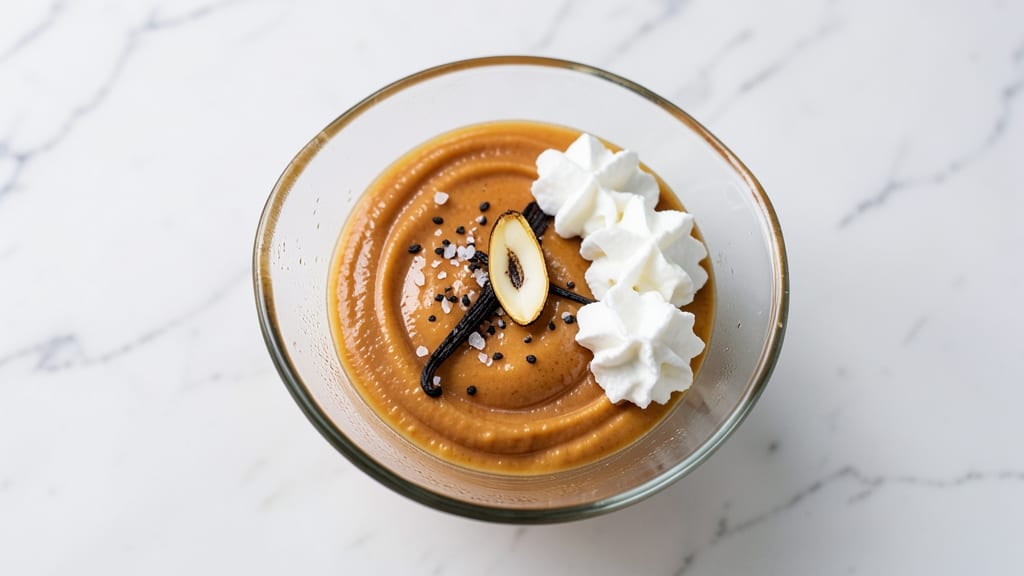
This evaporated milk Ninja Creami recipe delivers restaurant-quality creaminess with a velvety texture that's impossible to resist. The secret lies in blending evaporated milk with vanilla bean for a rich, ultra-smooth base that transforms into a luxurious dessert with just a few simple ingredients.
I developed this version after testing multiple combinations, and the results speak for themselves—creamy, cool, and perfectly balanced every time.
The beauty of this recipe is its simplicity—just evaporated milk, vanilla bean, and a pinch of salt, all blended to perfection in your Ninja Creami. The appliance does all the heavy lifting, creating a silky-smooth texture that's far superior to traditional ice cream.
What sets this apart is the depth of flavor from high-quality vanilla bean, which elevates the creami from ordinary to extraordinary.
By the time you're done, you'll have a dessert that's cool, creamy, and irresistibly smooth, with a velvety texture that melts in your mouth. The evaporated milk base ensures richness without heaviness, while the vanilla bean adds a sophisticated touch that makes this feel like a gourmet treat.
It's the perfect solution for hot summer days or special occasions when you crave something cool and indulgent.
Customize it with mix-ins like chocolate chips, fresh berries, or a drizzle of caramel for added flair. This recipe scales easily, so you can make a single serving or a batch for the whole family. Let's get started on creating your dream creami!
Ingredients for evaporated milk ninja creami
Four simple ingredients plus optional mix-ins transform your Ninja Creami into velvety perfection.
| Ingredient | Amount | Notes |
|---|---|---|
| Evaporated Milk 🥛 | 2 cups | Full-fat for maximum creaminess |
| Vanilla Bean 🌿 | 1 whole | High-quality Madagascar preferred |
| Sea Salt 🧂 | ¼ tsp | Fine grain for delicate balance |
| Heavy Whipping Cream 🥛 | ½ cup | Cold for best texture |
| Granulated Sugar 🍚 | ¼ cup | Adjust to taste |
| Xanthan Gum 🧪 | ⅛ tsp | Ensures ultra-smooth texture |
| Chocolate Chips 🍫 | ¼ cup | Optional mix-in |
| Fresh Blueberries 🫐 | ¼ cup | Optional mix-in |
| Vanilla Extract 🌿 | ½ tsp | Pure alcohol-free preferred |
The evaporated milk is the star here—full-fat gives that luxurious texture you can't get with skim. Carnation brand is my go-to, but any quality canned evaporated milk works. Vanilla bean is non-negotiable for that gourmet touch. Madagascar beans have the best balance of sweetness and aroma—you can feel the difference. If you're using a vanilla bean, scrape out all the seeds and add them whole to the mix. The heavy whipping cream adds richness, so make sure it's cold straight from the fridge. Sugar is just for balancing sweetness, but don't skip it entirely—it helps with the freezing process.
No vanilla bean? Pure vanilla extract at double the amount works in a pinch, but you'll notice the difference. Running low on evaporated milk? Whole milk plus 1/4 cup powdered milk mimics the texture, though it's not identical. The xanthan gum might be the weirdest ingredient, but it's what makes this silky-smooth instead of icy. If you can't find it, 1/4 tsp unflavored gelatin works too. Chocolate chips and berries are completely optional, but they turn this into a full dessert experience. Lily's chocolate chips melt beautifully, and blueberries add a nice pop of color and tartness. Want more flavor? Add a pinch of cinnamon or a dash of espresso powder to the mix.
This creami freezes beautifully—best texture after 24 hours in the freezer. Portion it into Ninja Creami containers or small jars for single servings. It keeps for up to 2 weeks in the freezer, though I usually eat mine faster than that. For serving, let it sit at room temperature for 5-10 minutes before scooping—it'll be more creamy that way. If you make extra, it reheats well in the microwave for a warm pudding-like treat. The vanilla bean pods can be rinsed and reused in other recipes like oatmeal or baked goods.
Why You'll Love This Recipe
- Here’s what sold me: the depth of flavor from the evaporated milk—it’s like a cross between custard and ice cream, but way lighter. That pinch of sea salt? It’s the secret weapon that makes every spoonful feel luxurious, even when I’m eating it straight from the bowl.
- I’ll be real: this keeps perfectly in the fridge for days, and it’s way cheaper than store-bought custard or pudding. Plus, the texture stays silky smooth—no graininess, no weird separation. It’s my budget-friendly secret for when I’m craving something decadent but don’t want to break the bank.
Step-by-step instructions for ultra-smooth vanilla bean creami
Here's how to craft this velvety-smooth, ultra-rich cream dessert with just a few simple steps.
Prepare the Vanilla Bean and Sugar Mixture
Split the whole vanilla bean lengthwise with a sharp knife, then scrape out the seeds into a small bowl. Add the seeds along with the 0.25 cup granulated sugar and let them sit for 5 minutes. This allows the vanilla flavor to fully infuse into the sugar, creating a more intense aroma and taste.
While the vanilla infuses, take the empty vanilla bean pod and slice it into small pieces. Add these to the 2 cups evaporated milk in a saucepan. The pod pieces will gently simmer and release more flavor as the milk heats. This step ensures every spoonful of your cream dessert carries that authentic vanilla bean essence.
Heat and Whisk the Milk Mixture
Place the saucepan with the milk and vanilla pod pieces over medium-low heat. Stir gently until the milk reaches 170°F, which should take about 5-7 minutes. You'll notice the milk will start to foam slightly—this is normal and indicates it's heating properly.
Once heated, remove the saucepan from the heat and let it cool for 5 minutes. While it cools, whisk in the 0.5 tsp vanilla extract and the sugar-vanilla seed mixture. This creates a flavor base that's perfectly balanced between the natural vanilla bean and the pure extract. The warm milk will help dissolve the sugar completely.
Incorporate the Stabilizers and Cream
In a separate bowl, whisk together the 0.5 cup cold heavy whipping cream and the 0.125 tsp xanthan gum. The xanthan gum is crucial here—it acts as a stabilizer that prevents ice crystals from forming when frozen, giving you that ultra-smooth texture. Whisk vigorously for about 30 seconds to fully dissolve the xanthan gum.
Slowly pour the warm milk mixture into the cream mixture while whisking continuously. This gradual combination prevents the xanthan gum from clumping and ensures a perfectly smooth final texture. The mixture should be completely homogeneous, with no visible lumps or streaks of xanthan gum.
Add Mix-Ins and Chill
Gently fold in the 0.25 cup chocolate chips and 0.25 cup fresh blueberries using a spatula. Work quickly but carefully to avoid breaking the blueberries. The chocolate chips will stay soft and meltable when frozen, while the blueberries add a delightful pop of color and tart contrast to the rich cream.
Pour the mixture into a shallow freezer-safe container, leaving about ½ inch of space at the top for expansion. Cover with plastic wrap and refrigerate for 4 hours or until completely chilled. This chilling step is essential—it helps the mixture set properly before freezing, resulting in a creamier texture once frozen.
Freeze for Perfect Texture
Transfer the chilled mixture to the freezer and freeze for 6-8 hours, or until completely solid. For best results, use a thermometer to check the internal temperature—it should reach 0°F. This ensures the cream dessert is firm enough to scoop but still maintains that creamy, velvety texture.
When ready to serve, let the cream dessert sit at room temperature for 5-10 minutes before scooping. This brief thawing period makes it easier to serve without losing its shape. The result should be a perfectly smooth, ultra-rich dessert with layers of vanilla bean flavor, soft chocolate chips, and juicy blueberries in every bite.
Pro Tips For Making Evaporated Milk Ninja Creami
- Chill the Cream First: Pop that heavy whipping cream in the fridge for at least 2 hours before whipping—no, don’t skip this even if you’re eager. Cold cream whips faster, holds its shape longer, and won’t turn into buttermilk butter mid-scoop. I learned this after a disastrous attempt where my creami collapsed like a soufflé at a beach party.
- Scrape the Vanilla Pod: Don’t just drop in the whole bean—split it, scrape out every last bit of those tiny black seeds, and toss the pod in too. The seeds pack the most flavor, and the pod’s membranes add depth. (Yes, even if you’re lazy, do this—it’s the difference between "nice" and "wow.")
- Warm the Evaporated Milk: Heat the evaporated milk to 110°F (43°C) before mixing it with sugar—just enough to dissolve the sugar fully without cooking it. Cold milk makes clumpy sugar crystals, and hot milk can curdle the cream later. I used to eyeball it and ended up with grainy creami. Now I use a thermometer, and it’s foolproof.
- Salt in Layers: Add half the sea salt with the evaporated milk and the rest after whipping the cream—this balances sweetness without overpowering. Too much upfront makes the creami taste like a sad, salty dessert; too little later leaves it flat. (Trust me, your taste buds will notice.)
Best sauces and condiments for this evaporated milk ninja creami
Vanilla Bean Syrup
Elevate your creami with a homemade vanilla bean syrup that infuses directly into the mix. Simmer ½ cup water, ½ cup sugar, and a split vanilla bean for 10 minutes, then strain and cool.
Add 1 tbsp of this syrup to your base mixture for an extra-deep vanilla flavor that shines through the creamy texture. 🌿
Caramel Drizzle
For a decadent touch, drizzle warm salted caramel sauce over the creami before serving. I use Storebrand's Salted Caramel Sauce—just heat 2 tbsp in the microwave for 10 seconds to soften.
The caramel melts beautifully into the creamy base, creating pockets of sweetness with every bite. Add a pinch of flaky sea salt for contrast.
Chocolate Ganache
Transform your creami into a chocolate lover’s dream by topping it with a dark chocolate ganache. Melt ½ cup dark chocolate chips (I recommend Ghirardelli 70% Cacao) with ¼ cup heavy cream over a double boiler.
Once smooth, drizzle over the creami and let it set for 5 minutes before serving. The ganache adds a luxurious richness that pairs perfectly with the vanilla.
Berry Compote
Brighten the creami with a fresh berry compote made from 1 cup mixed berries (strawberries, raspberries, or blackberries) simmered with 2 tbsp sugar and 1 tsp lemon juice for 5 minutes.
Strain out any seeds and drizzle the compote over the creami before serving. The tartness cuts through the creaminess, creating a balanced flavor profile that feels both refreshing and indulgent.
Spiced Honey Glaze
Add warmth with a spiced honey glaze that complements the vanilla perfectly. Heat 2 tbsp honey with ½ tsp cinnamon and a pinch of nutmeg in a small saucepan until bubbly. Drizzle over the creami and let it cool slightly before serving.
The honey adds a natural sweetness while the spices deepen the flavor, making each spoonful feel like a cozy dessert experience. ✨
Nutrition facts
Frequently asked questions
Why does this recipe use evaporated milk instead of regular milk?
Evaporated milk creates a richer, creamier texture without needing heavy cream. The reduced water content makes it perfect for frozen desserts, preventing ice crystals while keeping the smoothness. It also adds natural sweetness that balances the vanilla flavor beautifully.
Can I make this without a Ninja Creami appliance?
Yes! Transfer the chilled mixture to a shallow freezer-safe container and freeze it flat, stirring with a fork every 30 minutes for 3-4 hours to prevent ice crystals. While not as smooth, this method still yields a creamy texture. For best results, use an ice cream maker instead.
What's the secret to getting that ultra-smooth texture?
The xanthan gum is key—it prevents ice crystals from forming. Also, chilling the mixture for 4 hours before freezing and using full-fat evaporated milk ensures maximum creaminess. Whisking the cream and stabilizer together thoroughly eliminates lumps that could ruin the texture.
How long does this creami keep in the freezer?
This recipe stays fresh for up to 2 weeks when properly stored in an airtight container. For best quality, consume within 10 days. The texture remains creamy if you let it sit at room temperature for 5-10 minutes before serving each time.
Can I substitute vanilla extract for the whole vanilla bean?
You can use 1 tsp pure vanilla extract instead of the whole bean, but you'll lose the complex depth of flavor. For best results, use both: scrape seeds from the bean into the sugar mixture and add the extract separately. The bean adds floral notes that extract alone can't replicate.