Appetizers
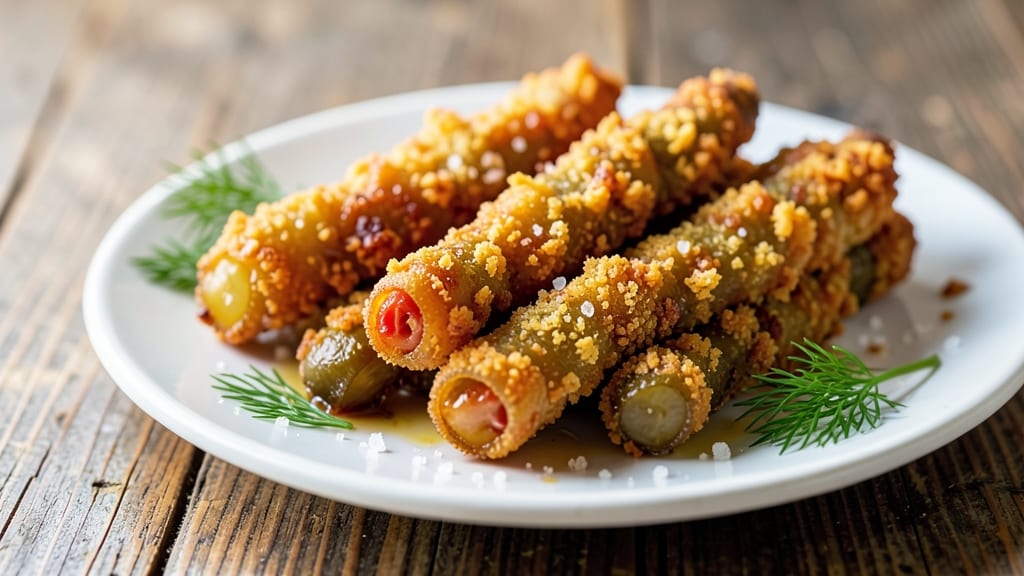
This copycat Texas Roadhouse fried pickles recipe delivers that same addictive crispy cornmeal crunch and tangy vinegar bite—without the restaurant price tag. The secret lies in the precise cornmeal batter and high-heat frying technique that creates that signature golden crust.
I've perfected this recipe after testing multiple variations, ensuring every bite matches the original's texture and flavor profile.
This copycat version maintains the restaurant's signature elements: a crispy cornmeal crust that shatters with each bite, tender pickles that stay juicy inside, and that essential vinegar kick that makes them impossible to resist.
The process requires just 30 minutes of active time but delivers restaurant-quality results that will have your guests asking for seconds.
What makes this recipe work is the combination of a light cornmeal batter and proper oil temperature—too hot and they burn, too cool and they absorb too much oil.
When done right, you'll have golden-brown pickles with a crunch that's both satisfying and addictive, paired perfectly with their signature tangy dipping sauce.
The best part? These fried pickles make an excellent appetizer for game day gatherings, barbecues, or as a snack when paired with ranch or blue cheese dressing. Once you try this copycat version, you'll never order the same way again.
Ingredients for copycat texas roadhouse fried pickles
Grab these twelve ingredients for Texas Roadhouse-style fried pickles that deliver crispy cornmeal perfection.
| Ingredient | Amount | Notes |
|---|---|---|
| Dill Pickle Spears 🥒 | 1 ½ lb | Fresh, 1-inch spears preferred |
| All-Purpose Flour 🌾 | ½ cup | For light batter consistency |
| Cornmeal 🌽 | ½ cup | Fine-ground for smooth texture |
| Yellow Corn Flour 🌽 | ¼ cup | For extra crunch |
| Baking Powder 🌶️ | 1 tbsp | For crispiness |
| Salt 🧂 | 1 tsp | Diamond Crystal preferred |
| Black Pepper 🌶️ | ½ tsp | Freshly ground for flavor |
| Vegetable Oil 🫒 | 3 cups | High smoke point preferred |
| White Vinegar 💧 | ¼ cup | For tangy dipping sauce |
| Granulated Sugar 🍚 | 2 tbsp | For balanced flavor |
| Water 💧 | ¼ cup | For dipping sauce |
| Butter 🧈 | 2 tbsp | Unsalted, for richness |
The pickles are non-negotiable—fresh dill spears from the grocery store's refrigerated section are your best bet, but Trader Joe's or Whole Foods carry the ideal 1-inch spears. If you can't find them, cut larger spears into 1-inch pieces yourself. For the cornmeal, Bob's Red Mill is my go-to brand—it's fine enough to create that signature smooth crust. The baking powder is key here; it's what gives those pickles their signature crunch. Skip the pre-mixed cornmeal batter at the store—it's got weird additives that ruin the texture. And trust me, vegetable oil is your best friend for frying—it stays stable at high heat and doesn't impart flavor.
No cornmeal? Substitute extra corn flour—it's what the restaurant probably uses, honestly. Running out of white vinegar? Apple cider vinegar works too, though it'll have a slightly sweeter note. The dipping sauce is simple but essential—don't skip the sugar, even if you're not sweet on sweet. It balances the tang. For the oil, canola or peanut oil are solid backups, but they burn faster at high heat. And if you're feeling fancy, add a dash of smoked paprika to the batter for a Texas Roadhouse twist. The pickles should be completely dry before frying—pat them with a paper towel if they're damp. Wet pickles = soggy crust.
These stay crispy for about 20 minutes after frying if you keep them warm in a 200°F oven. For longer storage, fry a batch and freeze them on a baking sheet first—once frozen solid, transfer to a bag. They'll keep for up to 3 months in the freezer. Reheat in a skillet with a little oil for that fresh-out-of-the-fryer crunch. The dipping sauce? Make it fresh—it keeps for 5 days in the fridge, but honestly, it's better the first day. Double the recipe and save half for next time—trust me, you'll want seconds.
Why You'll Love This Recipe
- No-Fuss Breading: I dump the flour, cornmeal, and yellow corn flour right on a plate—no measuring cups, no sifting. The baking powder gives that light, airy crunch without extra effort, and honestly? My kids can help mix it while I fry.
- Crispy-Creamy Magic: That double-dip in the flour mix seals the deal—crunchy outside, tangy pickle inside every time. The cornmeal adds a buttery texture that’s ridiculously addictive, and the dill spears stay plump even after frying.
- Game for Any Gathering: Serve them as a snack with wings, a side with burgers, or even a full meal with ranch. My husband’s coworkers begged for the recipe after our Super Bowl party—(yes, even on a Tuesday night).
- Budget-Friendly Leftovers: A single batch feeds four as an appetizer or six as a side, and they reheat perfectly in the air fryer. I’ve had these last three days in my fridge—still crispy, still crave-worthy, and way cheaper than takeout.
Step-by-step instructions for crispy cornmeal-crusted fried pickles
Here's how to nail that iconic Texas Roadhouse crunch—golden, shatteringly crisp, and perfectly tangy every time.
Prepare the Pickle Spears
Pat the 1.5 lb dill pickle spears completely dry with paper towels—this is non-negotiable for crispy results. You want them bone-dry, with no moisture clinging to the surface. If you skip this, your batter will steam instead of crisp, and you'll end up with soggy spears. Arrange them on a wire rack set over a baking sheet to air-dry for 10 minutes while you prep the batter.
While they dry, trim any uneven ends with kitchen shears to ensure even cooking. The spears should be uniform in size—about 1 inch in length. This prevents some pieces from overcooking while others stay underdone. Trust me, the extra minute of prep now saves you from uneven texture later.
Make the Crispy Cornmeal Batter
In a medium bowl, whisk together the 0.5 cup all-purpose flour, 0.5 cup cornmeal, 0.25 cup yellow corn flour, 1 tbsp baking powder, 1 tsp salt, and 0.5 tsp black pepper. This dry blend is what creates that signature Texas Roadhouse crunch—don't skip the cornmeal or yellow corn flour, as they're key for that extra texture. Sift the mixture lightly to break up any lumps, but don't overmix or you'll develop gluten and lose that crispy quality.
In a separate small bowl, melt the 2 tbsp butter over low heat until just liquid, then stir in the 0.25 cup white vinegar and 2 tbsp granulated sugar. Let this cool slightly—it should be warm to the touch but not hot. Pour this liquid mixture into the dry ingredients and stir gently with a silicone spatula until just combined. The batter should be thick but pourable, like heavy cream. If it's too thick, add 1 tablespoon water at a time until it reaches the right consistency. This batter needs to coat the pickles completely but not drip off.
Fry the Pickles to Golden Perfection
Fill a deep skillet or Dutch oven with 3 cups vegetable oil and heat over medium-high heat until the oil reaches 350°F. Use a deep-fry thermometer to monitor this—oil that's too cool will make greasy pickles, and oil that's too hot will burn the exterior before the interior cooks. Once the oil is ready, carefully dip each pickle spear into the batter, letting any excess drip off before gently lowering it into the oil.
Fry the pickles in batches to avoid overcrowding—you want them to sizzle gently, not steam. Cook for 2-3 minutes per batch until they're a deep, golden brown color. They should float to the surface and maintain their shape without falling apart. If they release easily from the oil and the batter is uniformly crisp, they're done. Remove them with a slotted spoon and drain on a wire rack or paper towels. The residual heat will finish cooking them slightly, so don't rush this step. Real talk: undercooked pickles are the fastest way to ruin this recipe.
Prepare the Vinegar-Kissed Dipping Sauce
While the pickles fry, make the dipping sauce by combining the 0.25 cup water, 2 tbsp granulated sugar, and 0.25 cup white vinegar in a small saucepan. Bring to a gentle simmer over medium heat and cook for 3-4 minutes until slightly thickened and syrupy. Taste and adjust the sweetness or tang to your preference—Texas Roadhouse leans toward a balanced, slightly sweet, and tangy flavor. Let the sauce cool slightly before serving, as it'll thicken further as it sits.
Here's the thing—this sauce isn't just for dipping. Drizzle it lightly over the fried pickles before serving to enhance their flavor and keep them moist. The acidity cuts through the richness of the fried batter, creating that perfect contrast. Serve the pickles immediately while they're still shatteringly crisp—waiting even 5 minutes will make them soften noticeably.
Serve and Enjoy the Crunch
Transfer the fried pickles to a serving platter and drizzle with the warm vinegar-kissed sauce. Sprinkle with an extra pinch of black pepper for a finishing touch. The pickles should be golden brown all over, with a crisp exterior that shatters when you bite into them and a tangy, slightly sweet interior. If any spears aren't perfectly crisp, return them to the oven at 350°F for 1-2 minutes to refresh the crunch.
Serve immediately with the dipping sauce on the side for extra tang. These pickles are best enjoyed fresh out of the fryer—think of them like onion rings. They're perfect as an appetizer, a bar snack, or even a side for burgers. The key to this copycat recipe is paying attention to the oil temperature and frying in small batches. Don't skip the drying step, and for heaven's sake, don't overcrowd the fryer. Your taste buds will thank you.
Pro Tips For Making Copycat Texas Roadhouse Fried Pickles
- PAT THE PICKLES DRY: I learned this the hard way—wet pickles = soggy batter. Grab paper towels and blot each spear thoroughly before dredging. The extra 30 seconds now means a crisp, golden crust later, not a greasy mess.
- USE A SPLIT-BATCH METHOD: Texas Roadhouse serves these in waves, and for good reason. Fry half the pickles first, drain on a rack (not paper towels—steam matters), then fry the second batch. The crust stays crispier longer, and you won’t end up with a pile of limp, oil-logged pickles.
- SIFT THE DRY MIX: Lumpy cornmeal and baking powder ruin texture. Sift the flour, cornmeal, and yellow corn flour together before adding baking powder—this ensures even distribution. I skip this, and the batter clumps like wet sand.
- KEEP OIL AT 350°F: Too hot, and the outside burns before the inside cooks; too cool, and the batter turns greasy. A deep-fry thermometer is worth it—adjust heat between batches if needed. (Yes, even if your stove’s dial says "medium-high.")
Essential equipment for copycat texas roadhouse fried pickles
Deep Fryer Essentials
For perfect Texas Roadhouse-style fried pickles, you need a deep fryer or heavy-duty Dutch oven with at least 3-quart capacity. I recommend a Cuisinart Deep Fryer for its temperature control and safety features—it maintains 350°F consistently, which is critical for that signature crisp.
If using a skillet, a cast iron Dutch oven (like Lodge) distributes heat evenly and handles high heat without warping. Never use nonstick—it can't handle the heat needed for proper frying. 🔥
Thermometer Must-Have
A deep-fry thermometer is non-negotiable for this recipe. The ThermoWorks Thermapen One is my go-to because it reads temperatures instantly and has a backlit display for easy monitoring. Oil that's too cool makes greasy pickles, while oil that's too hot burns the exterior before the interior cooks.
Aim for 350°F—any lower and your batter won't crisp properly. If you don't have a thermometer, use the cold water test: drop a small amount of oil into cold water—if it sizzles vigorously, it's ready.
Breading Station Setup
Set up a three-station breading system for efficiency: one bowl for the dry batter mix, another for the wet batter, and a third for excess batter drainage. Use silicone spatulas (like OXO Good Grips) to coat the pickles evenly without tearing the batter.
A wire cooling rack placed over a baking sheet is essential for draining fried pickles—it prevents sogginess and keeps them crisp. Pro tip: chill the wet batter in the fridge for 10 minutes before dipping to prevent the pickles from absorbing too much oil. ❄️
Oil Selection Guide
Use vegetable oil (like Crisco) or peanut oil for their high smoke points and neutral flavor. Avoid olive oil—it burns at 350°F and imparts a bitter taste. For a healthier twist, use avocado oil (like Bertolli), which has a higher smoke point and heart-healthy fats.
Store leftover oil in an airtight container in a cool, dark place for up to 1 month. Never reuse oil for multiple batches of fried foods—it breaks down and affects flavor and texture.
Safety Gear
Frying is serious business, so equip yourself with heat-resistant gloves (like Oven Mitts by Weck) and safety goggles to protect against oil splatters. Keep a fire extinguisher (Class B for grease fires) within reach, and never leave the fryer unattended.
I also recommend a splash guard for your deep fryer to contain any oil splatter. If a grease fire starts, smother it with a metal lid—never throw water on it. Safety first, flavor second! 💡
Optional Upgrades
For a restaurant-quality touch, invest in a commercial-grade fryer basket (like Presto) to hold the pickles steady during frying. A cornmeal sifter ensures a smooth, lump-free batter. If you're frying frequently, a fryer stand elevates the oil level for easier monitoring.
For serving, a slotted serving spoon keeps pickles warm while draining excess oil. These upgrades aren't mandatory, but they make the process smoother and more professional. Trust me, they're worth it for repeat batches! 🌟
Nutrition facts
Frequently asked questions
Can I use regular pickles instead of dill spears?
While you can use regular dill pickles, the texture and presentation won't be the same. Texas Roadhouse-style fried pickles rely on those 1-inch spears for even cooking and that signature crispy exterior. If you can't find spears, cut larger dill pickles into 1-inch pieces yourself—just make sure they're uniform in size for consistent frying.
How do I keep the fried pickles crispy when serving?
Serve them immediately after frying while they're still piping hot—crispiness drops fast! For a crowd, keep them warm in a 200°F oven for up to 20 minutes on a wire rack (not a plate). If they lose crunch, pop them back in the oven for 1-2 minutes to refresh. Never cover them—they'll sweat and turn soggy.
What's the best way to reheat leftover fried pickles?
For maximum crispiness, reheat in a skillet with 1/4 inch of oil over medium heat for 1-2 minutes per side until golden again. Avoid the microwave—it makes them rubbery. For oven reheating, bake at 400°F for 3-4 minutes on a wire rack. Store leftovers in an airtight container for up to 3 days (though they're best fresh!).
Can I make this recipe gluten-free?
Yes! Swap the all-purpose flour for a 1:1 gluten-free flour blend (like Bob's Red Mill) and use a gluten-free cornmeal substitute. The texture will be slightly different but still crispy. For extra crunch, add 1/4 cup crushed cornflakes to the batter. Just be sure to dry the pickles thoroughly—gluten-free batters absorb more moisture.
Why did my fried pickles turn out greasy instead of crispy?
Greasy pickles usually mean one of three things: oil wasn't hot enough (350°F** is critical), pickles weren't dry before frying, or you overcrowded the fryer. Double-check your oil temperature with a thermometer, pat pickles completely dry, and fry in small batches. Also, don't reuse oil—fresh oil is essential for that signature crisp.