
Main Courses
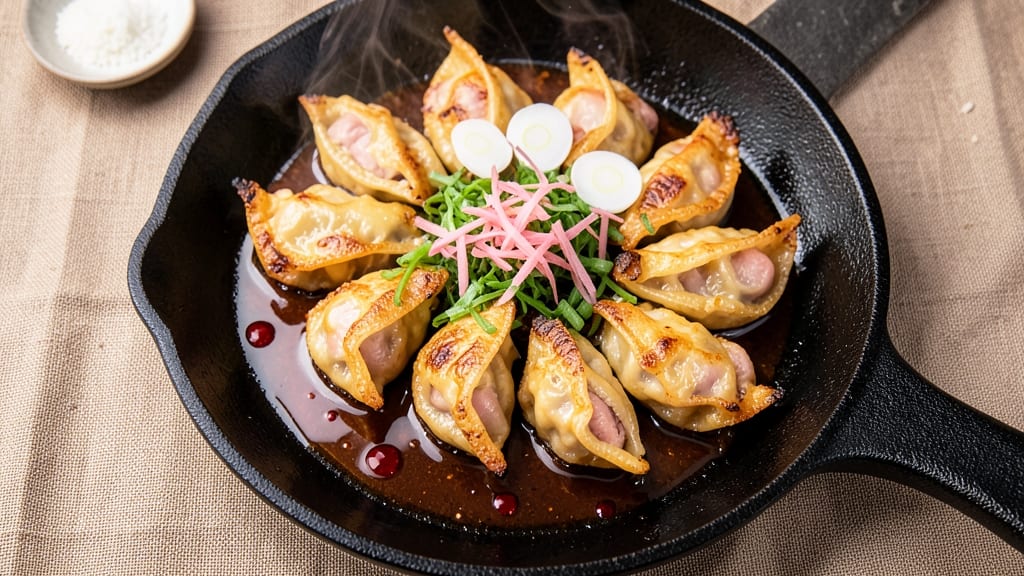
This Chinese pot stickers recipe delivers the perfect balance of crispy edges and juicy pork filling that makes every bite irresistible. The secret lies in a delicate dumpling wrapper that achieves that signature golden-brown crust while staying tender inside—a technique I've perfected over countless batches.
What makes these stand out is how the filling stays succulent even after pan-frying, thanks to a precise cooking method that seals in moisture.
The process begins with making the dough from scratch, which might sound intimidating but becomes second nature after one try. We'll use a simple combination of flour, water, and oil that develops into a smooth, pliable wrapper capable of holding the flavorful filling without tearing.
The pork filling is where the magic happens—ground pork, ginger, garlic, and scallions create a savory blend that's both aromatic and satisfying.
Pan-frying transforms these pot stickers into crispy, golden bites with a juicy center that practically melts in your mouth. The high heat creates that coveted caramelized bottom while keeping the filling tender, and a quick steam finish ensures they're fully cooked through.
Served with a tangy dipping sauce, these pot stickers become a complete meal that's perfect for appetizers or a satisfying main course.
Whether you're making them for a family gathering or a weeknight dinner, this recipe scales beautifully while maintaining that restaurant-quality texture and flavor. The technique is straightforward once you understand the key steps, and the results are always impressive.
Let's get started on creating these crispy, juicy bites that everyone will love.
Ingredients for chinese pot stickers
Fourteen ingredients for golden, juicy pot stickers that taste like your favorite takeout.
| Ingredient | Amount | Notes |
|---|---|---|
| All-Purpose Flour 🌾 | 2 cups | For dough, sifted for smooth texture |
| Water 💧 | ¾ cup | Room temperature preferred |
| Vegetable Oil 🫒 | ½ tbsp | Light, neutral oil for dough |
| Ground Pork 🥩 | 1 lb | Freshly ground, lean but not dry |
| Fresh Ginger 🌿 | 1 ½ tbsp | Finely grated, aromatic |
| Garlic Cloves 🧄 | 4 cloves | Minced, fresh preferred |
| Scallions 🧅 | 3 whole | Thinly sliced, white and green parts |
| Soy Sauce 🍶 | 2 tbsp | Light or regular, not low-sodium |
| Sesame Oil 🫒 | 1 tsp | Toasted, for aroma |
| Salt 🧂 | ½ tsp | Kosher or sea salt |
| Vegetable Oil 🫒 | 2 cups | For pan-frying, high smoke point |
| Cornstarch 🌾 | 1 tbsp | For dusting wrappers |
The dough is where the magic happens. King Arthur or Gold Medal flour gives the best texture—high protein keeps it sturdy but pliable. Room-temperature water is key (cold water makes tough wrappers), and vegetable oil adds that signature crispiness. I usually grab flour from Whole Foods or the bulk bins at Trader Joe's—both have great quality. For the pork filling, freshly ground pork from the butcher counter makes all the difference (no pre-ground from packages). Look for pork with some fat—about 15-20%—for juiciness. If you can't find fresh, high-quality ground pork from the supermarket works too, just pat it dry before mixing.
No fresh ginger? Ground ginger at half the amount works in a pinch, but it lacks that bright punch. Scallions can be swapped for green onions or regular onions at double the amount, but scallions give the best mild sweetness. Short on sesame oil? Toasted sesame seeds sprinkled on top at the end add a similar nutty aroma. The soy sauce matters—Kikkoman or Lee Kum Kee are reliable, but avoid low-sodium versions (they lack depth). For extra crispiness, dust the wrappers with cornstarch instead of flour—it gives a lighter, crispier crust. And if you're making a big batch, freeze the wrappers between parchment paper to keep them from drying out.
Dough keeps for 3 days wrapped in plastic in the fridge, but it's best used fresh. The filling can be prepped 1 day ahead and stored in the fridge, covered tightly. For the wrappers, freeze extras on a tray first (so they don't stick), then transfer to a bag. They'll keep for up to 3 months frozen. Once cooked, pot stickers reheat best in a skillet—just add a splash of water and cover for 2 minutes. Leftovers keep for 2 days in the fridge, but honestly, they're best fresh off the pan.
Why You'll Love This Recipe
- No-Waste Pantry Staples: I swear by this recipe because it uses what I already have: flour, pork, and ginger. No fancy ingredients or last-minute grocery runs—just pull what’s in your cupboard and go.
- Crispy-Creamy Magic: That first bite? The wrapper’s golden crunch gives way to juicy pork and silky filling—like a tiny, handheld hug of flavor. Honestly, the balance of textures is what keeps me coming back.
- Freezer-Friendly Flex: Make a double batch, freeze half, and thank me later. Pan-fry fresh or steam from frozen—no thawing required. My kids’ school lunches never go to waste this way.
- Budget Dinner Hero: Ground pork stretches far, and a bag of flour lasts forever. For under $10, I feed four with leftovers that taste just as good reheated. (Yes, even on a Tuesday night.)
Step-by-step instructions for Chinese pot stickers
Here's how to make these crispy, juicy bites with perfect texture every time.
Make the Dough and Filling
In a large bowl, combine the 2 cups all-purpose flour and 0.5 tsp salt. Add the 0.5 tbsp vegetable oil and mix until crumbly. Gradually pour in the 0.75 cup water while stirring with chopsticks until a shaggy dough forms. Knead for 5-7 minutes until smooth and elastic. Wrap in plastic and let rest for 30 minutes—this relaxes the gluten for easier rolling.
While the dough rests, prep the filling. In a bowl, mix the 1 lb ground pork, 2 tbsp soy sauce, 1.5 tbsp grated fresh ginger, 4 minced garlic cloves, 3 sliced scallions, and 1 tsp sesame oil. Use your hands to work the mixture until sticky but not dry—this ensures juicy filling that won't leak during cooking.
Roll and Assemble the Stickers
Divide the rested dough into 16 equal balls (about 1.5 oz each). Roll each into a 3-inch circle using a rolling pin, keeping the edges slightly thicker than the center. Place 1 tsp filling in the center of each circle and fold in half to form a half-moon. Press the edges firmly with your fingers to seal completely—no gaps or leaks!
For extra crispiness, dust your work surface with 1 tbsp cornstarch before rolling. This prevents sticking and adds a delicate crunch. Keep assembled stickers covered while you prep the pan to maintain their shape.
Pan-Fry to Golden Perfection
Heat 2 cups vegetable oil in a 14-inch skillet over medium-high heat until it reaches 350°F (use a thermometer). Test with a wooden chopstick—bubbles should form immediately around it. Carefully add 4-5 stickers at a time, spacing them evenly. Fry for 2-3 minutes per side until deep golden brown and crispy—you'll hear a satisfying sizzle.
Drain on a wire rack or paper towels. The oil should remain hot but not smoking—if it does, reduce heat slightly. For extra-crispy results, I like to add a splash of water to the pan after draining, then fry again for 30 seconds to crisp the bottoms further.
Serve Immediately
Transfer the hot stickers to a plate and serve with soy-vinegar dipping sauce (mix 2 tbsp soy sauce with 1 tsp sesame oil and a pinch of sugar). The contrast of crispy wrappers and juicy pork filling makes every bite irresistible. Eat while piping hot—they lose crispness as they cool.
Here's the thing—these stickers are best fresh. If making ahead, freeze uncooked ones on a tray, then transfer to a bag. Pan-fry from frozen, adding 1 extra minute per side. The secret to juicy filling? Don't overwork the pork mixture—just combine until sticky, then assemble quickly before the dough dries out.
Pro Tips For Making Chinese Pot Stickers
- CHILL THE WRAPPERS: After sealing your pot stickers, pop them in the freezer for 15 minutes before cooking—this prevents them from puffing up too fast and keeps the filling in place. I learned this the hard way when my first batch exploded like overinflated balloons.
- GRATE GINGER FINE: Use a microplane or fine grater for the ginger—no big chunks or you’ll taste them in every bite. After burning my tongue on a giant piece, I now aim for a texture so fine it almost dissolves into the pork.
- DON’T OVERCROWD THE PAN: Cook in batches with space between stickers—rushing leads to soggy bottoms and uneven browning. My first attempt looked like a greasy disaster because I stuffed the pan like a sardine can.
- SEAL THE EDGES TIGHT: Press the wrapper edges firmly with your fingers or a fork to trap steam—this guarantees a crispy, golden crust instead of a floppy mess. Sounds tedious, but it’s the thing that actually changes the outcome.
Best sauces and condiments for this chinese pot stickers
Classic Soy-Vinegar Sauce
This tangy, savory sauce is the perfect match for pot stickers. Mix 2 tbsp soy sauce (I use Kikkoman), 1 tbsp rice vinegar, 1 tsp sesame oil, and a pinch of sugar in a small bowl.
The vinegar brightens the richness of the pork filling while the sesame oil adds a nutty aroma. Serve warm for the best flavor release—just heat gently for 10 seconds in the microwave. 💛
Spicy Chili Oil Dip
For heat lovers, blend 2 tbsp soy sauce, 1 tbsp chili crisp (like Lao Gan Ma), 1 tsp sesame oil, and ½ tsp sugar into a vibrant red sauce. The chili crisp adds smoky depth with a kick that cuts through the pork's richness.
Keep a small bowl on the table so guests can adjust their spice level. I like to add a splash of Shaoxing wine for extra complexity. 🌶️
Sweet and Sour Glaze
This sauce transforms pot stickers into a sweet-savory delight. Simmer 3 tbsp ketchup, 1 tbsp soy sauce, 1 tbsp rice vinegar, 1 tsp sugar, and ½ tsp grated ginger over low heat for 3 minutes until thickened.
Drizzle over finished stickers or use as a dipping sauce. The acidity balances the pork's fat, while the sugar caramelizes slightly for a glossy finish. 🍯
Creamy Garlic Sauce
For a richer option, whisk together 2 tbsp Greek yogurt (or soy yogurt for vegan), 1 tbsp soy sauce, 1 minced garlic clove, ½ tsp sesame oil, and a pinch of salt.
This sauce adds a cool contrast to the crispy stickers and pairs beautifully with the pork's savory notes. Garnish with extra scallions for freshness. 🥄
Black Vinegar Dip
A traditional Chinese favorite, this sauce adds depth with its umami-rich flavor. Mix 2 tbsp black vinegar (like Chinkiang vinegar), 1 tbsp soy sauce, ½ tsp sugar, and a pinch of white pepper.
The vinegar's dark color and tangy-sweet profile elevate the stickers' texture. I like to add a few drops of chili oil for a subtle kick. 🍶
Pro Tip: Sauce Pairing
Serve multiple sauces at once for variety—set out small bowls so guests can mix and match. I often pair the soy-vinegar sauce with the spicy chili dip for contrast. For a complete meal, add a side of steamed bok choy or cucumber salad to balance the richness.
The key is keeping sauces at room temperature—they taste best when not chilled. ✨
Nutrition facts
Frequently asked questions
Can I make the dough without a food processor?
The dough only requires mixing by hand with chopsticks or a fork until shaggy, then kneading for 5-7 minutes by hand. Just work it on a lightly floured surface until smooth and elastic. The key is patience—keep kneading until it springs back when poked.
How do I prevent the filling from leaking during cooking?
Seal the edges tightly by pressing firmly with your fingers, leaving no gaps. Use 1 tsp filling per sticker and avoid overfilling. For extra security, press the edges with a fork or your thumb. Also, keep the dough slightly thicker at the edges—this helps contain the filling better.
Can I use chicken or shrimp instead of pork?
Yes! For chicken, use 1 lb ground chicken thigh (leaner breast dries out) and add 1 tsp cornstarch to the filling to absorb moisture. For shrimp, finely chop 1 lb peeled shrimp and mix with 1 tbsp soy sauce before combining with other ingredients. Both work well but may need 1 extra minute of cooking time.
Why did my pot stickers turn out soggy instead of crispy?
Soggy stickers usually mean the oil wasn't hot enough or they were overcrowded in the pan. Heat the oil to 350°F and fry 4-5 at a time with space between them. Also, ensure your dough rested 30 minutes before rolling—this makes it more pliable and less likely to absorb excess oil.
How do I reheat leftover pot stickers?
Reheat in a dry skillet over medium heat for 1-2 minutes per side until crispy again. For extra crunch, add a splash of water to the pan first. Microwaving works in a pinch but makes them rubbery—always use a pan for best results. Store leftovers in an airtight container for up to 2 days.