Desserts
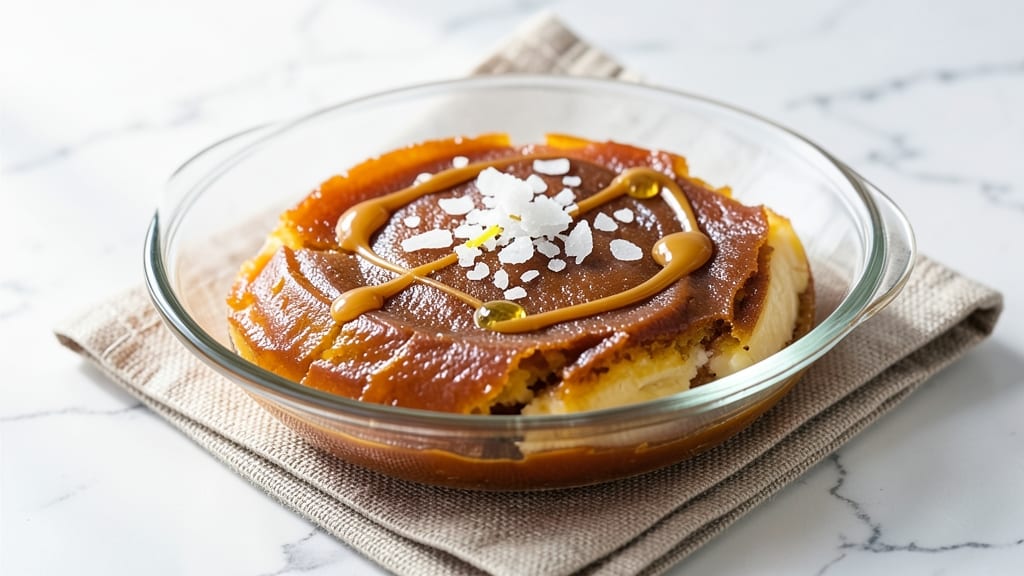
This butter candy recipe delivers the perfect balance of crispy caramel layers and buttery crunch that’s hard to resist. The process involves careful melting of butter and sugar, precise boiling, and skillful shaping to create those signature flaky sheets.
I’ve perfected this traditional technique over years of testing, ensuring every batch turns out with that ideal texture and shine.
What makes this recipe special is the attention to detail during the boiling stage—where the mixture reaches the right temperature before adding flavorings like vanilla or lemon.
The key to achieving that crispy yet tender texture lies in pulling the candy just as it begins to thicken, then rolling it thin for maximum crunch. Safety is critical, so I’ll walk you through handling the hot sugar mixture with confidence.
By the end, you’ll have delicate, golden sheets of butter candy that shatter with every bite, offering a buttery-sweet experience. These crispy layers are perfect for gift-giving, decorating desserts, or enjoying as a nostalgic treat.
The process might seem intimidating at first, but with these instructions, you’ll master it in no time.
Once you’ve shaped the candy, cooling it properly ensures it holds its crispy structure without sticking. Store it in an airtight container to preserve that buttery crunch for weeks. Whether you’re making it for a special occasion or just indulging in a classic, this recipe delivers professional-quality results every time.
Ingredients for butter candy
Four crispy layers and a buttery crunch—just these nine ingredients transform into nostalgic sheets.
| Ingredient | Amount | Notes |
|---|---|---|
| Unsalted Butter 🧈 | 2 cups | Cold, cubed for even melting |
| Granulated Sugar 🍚 | 4 cups | White or light brown |
| Corn Syrup 🥄 | ½ cup | Light or golden variety |
| Vanilla Extract 🌸 | 1 tbsp | Pure, high-quality vanilla |
| Lemon Juice 🍋 | 1 tbsp | Freshly squeezed |
| Fine Sea Salt 🧂 | ½ tsp | For finishing |
| Light Cornstarch 🌾 | 1 tbsp | For dusting |
| Granulated White Sugar 🍚 | 1 cup | For rolling sheets |
| Heavy Cream 🥛 | ¼ cup | Optional for brushing |
The butter is non-negotiable here—use unsalted for perfect flavor control. Land O’Lakes or Plugrá are my go-tos, but any good-quality brand works. The sugar? Domino or C&H are reliable, but if you’ve got a light brown sugar option, it adds subtle caramel notes. Corn syrup is the secret to that glossy finish—Karo is the brand I always grab. Fresh lemon juice brightens the flavor, but if you’re using bottled, go for ReaLemon over generic brands. And trust me on the vanilla—pure extract, not imitation—it makes all the difference.
No corn syrup? Honey or maple syrup can work, but reduce to 3 tbsp—they’re sweeter. Short on butter? Shortening like Crisco mimics the texture, though it lacks flavor. Want extra crunch? Add 1 tbsp powdered sugar to the rolling sugar. The candy thermometer is critical—if you don’t have one, watch for the mixture to thicken to 260°F (soft-ball stage). And if you’re nervous about handling hot sugar, pre-mix your cornstarch and sugar for rolling—it’ll save you from sticky fingers.
This candy stays crispy for 2-3 weeks if stored in an airtight container with parchment between layers. For extra crunch, brush with heavy cream before stacking. Break it into pieces for gift-giving—cellophane bags with ribbon make it look professional. Leftovers? Freeze for up to 3 months—just let them sit at room temp for 10 minutes before eating to restore that perfect shatter.
Why You'll Love This Recipe
- Pantry Magic: I swear, this recipe only needs five things—stuff you already own. No fancy gadgets, no last-minute grocery runs. Just butter, sugar, and a splash of corn syrup to keep it smooth.
- Sweet & Tangy Magic: That lemon juice twist? It’s the secret weapon—bright, buttery, and just sweet enough to make your taste buds do a happy dance. The vanilla ties it all together like a cozy hug.
- Party or Snack: Break it into shards for a fancy dessert table or melt it into chocolate for a gourmet twist. Honestly, it’s just as good as a quick after-school treat or a last-minute gift for the teacher.
- Zero Waste, All Win: Make a big batch—it keeps for weeks in an airtight container. And since it’s mostly sugar and butter, it’s cheap enough to make twice if you’re feeling reckless. (Yes, even on a Tuesday.)
Instructions for crispy caramel layers with buttery crunch
Here's how to create that perfect balance of crispy caramel layers and buttery crunch.
Prepare Your Workspace and Equipment
Line a 9x13-inch baking sheet with parchment paper, leaving an overhang on all sides for easy handling. Lightly dust the parchment with the 1 tablespoon light cornstarch—this prevents sticking and creates that signature crispy texture. I like to use a fine-mesh sieve for even distribution.
Cut the 2 cups unsalted butter into ½-inch cubes and place them in the freezer while you prepare everything else. Cold butter melts more evenly and creates those beautiful, distinct caramel layers. Have a candy thermometer ready—this is your secret weapon for precise temperature control.
Cook the Caramel Base
In a heavy-bottomed saucepan, combine the 4 cups granulated sugar and 0.5 cup corn syrup. Place over medium-high heat and bring to a boil without stirring. Once boiling, insert the candy thermometer and cook until the mixture reaches 300°F—this is the hard-crack stage where the caramel will form those signature crispy layers.
As soon as it hits 300°F, immediately remove from heat and let it rest for 2 minutes. This resting period is crucial—it allows the sugar to stabilize and prevents crystallization. Then, carefully add the 1 tablespoon vanilla extract and 1 tablespoon lemon juice, stirring gently to combine.
Incorporate the Butter and Spread
Working quickly, add the 2 cups cold butter cubes to the caramel mixture. Stir constantly with a silicone spatula until the butter melts completely and the mixture becomes smooth and glossy. This should take about 3-4 minutes—if it starts to thicken too much, you can add 1-2 teaspoons of hot water to help it flow.
Pour the caramel mixture onto the prepared baking sheet, spreading it evenly into a ¼-inch thick layer using an offset spatula. Tap the pan gently on the counter to release any air bubbles. Let it cool completely at room temperature for 1 hour—this ensures clean slices with crispy edges.
Create the Crispy Layers and Finish
Once the caramel is completely set, sprinkle the 1 cup granulated white sugar evenly over the top. Use a fine-mesh sieve for the best distribution. Let it sit for 10 minutes to allow the sugar to lightly caramelize on top.
Carefully invert the parchment-covered pan onto a cutting board. Using a sharp knife, cut into 1-inch squares or your preferred shape. For extra crispiness, brush the top with 0.25 cup heavy cream and sprinkle with 0.5 teaspoon fine sea salt just before serving. The cream adds a silky contrast to the crispy texture, while the salt enhances all the sweetness.
Store and Serve for Maximum Crunch
Store the butter candy in an airtight container at room temperature for up to 1 week. For best texture, let it sit at room temperature for 30 minutes before serving—this allows the layers to crisp up again after any potential softening from storage.
Serve immediately after cutting for that perfect balance of crispy caramel layers and buttery crunch. Each piece should have a glossy sheen with distinct layers that crackle when you bite into it. If the candy starts to soften, simply place it back in the pan and warm it gently in the oven for 2-3 minutes at 250°F to restore the crispness.
Pro Tips For Making Butter Candy
- Use a Candy Thermometer: Butter candy is all about precision—no guessing. The moment the mixture hits 238-240°F (114-116°C), it’s ready to pull. I learned this the hard way by eyeballing it and ending up with either sticky goo or brittle shards. A cheap thermometer attached to the side of the pot saves you from both disasters.
- Whisk Butter First: Before adding sugar, melt the butter and whisk it until it’s completely smooth—no lumps, no graininess. Cold butter bits in your candy will make it clump when you pull it, and nobody wants to eat gluey strands. Takes 30 seconds now, saves 10 minutes of frustration later.
- Skip the Overmixing: Once the sugar dissolves, stop stirring. The longer you whisk after the mixture comes to a boil, the darker and more caramelized it gets—fast. You want a pale golden color, not burnt syrup. Let the heat do the work after the sugar’s dissolved.
- Work Fast After Pulling: The second you pull the candy off the heat, act immediately. If you let it sit too long, it’ll start crystallizing before you can shape it. Have your vanilla and lemon juice measured, your bowl ready, and your hands greased—no stopping once it’s off the stove.
Make-ahead tips for this recipe
Prep Ahead for Crispy Layers
Melt the butter and sugar mixture the night before, then store it in a heatproof container in the fridge. When ready to finish, reheat the mixture gently in a saucepan over low heat until it reaches 260°F—this ensures it’s ready for spreading without losing its glossy finish.
I always reheat it in 10-minute increments while stirring constantly to avoid burning. 💡
Rolling Sugar Prep
Mix your 1 cup granulated sugar with 1 tablespoon cornstarch in a bowl before rolling—this prevents clumping and ensures an even, crispy coating. Store this mixture in a small airtight container with a lid for up to 2 weeks.
I like to keep it in a Mason jar for easy shaking onto the candy. This step saves time and frustration during the final shaping stage.
Cutting and Stacking
Cut the candy into your desired shapes 1 day in advance and store the pieces in an airtight container with parchment paper between layers. This prevents sticking and maintains that perfect crispness.
For gift-giving, wrap individual pieces in cellophane bags with a ribbon tie—they’ll stay fresh for 2 weeks this way. 🎁
Freezing for Long-Term Storage
For storage beyond 2 weeks, freeze the butter candy in an airtight container with layers separated by parchment. It keeps its texture for up to 3 months. When ready to enjoy, let it thaw at room temperature for 30 minutes before serving.
I always test one piece first—if it’s too soft, pop it in the oven at 250°F for 2 minutes to restore the crunch.
Reheating Crispy Layers
If your butter candy loses its crispness, don’t worry! Place the pieces on a baking sheet and warm in the oven at 250°F for 2-3 minutes. This gentle heat reactivates the caramelization without melting the butter.
For a quick fix, you can also microwave individual pieces for 5-10 seconds—just watch closely to avoid overcooking. 🔥
Gift-Wrapping Tips
Use parchment-lined boxes or small tins to package butter candy for gifts. Add a handwritten note and a silk ribbon for a touch of elegance. I often include a small card with instructions for reheating if needed—this makes it feel extra special.
For a rustic look, wrap pieces in brown kraft paper with twine and a sprig of rosemary for a festive touch.
Nutrition facts
Frequently asked questions
Why does my butter candy turn out sticky instead of crispy?
The most common cause is not reaching the proper 300°F temperature or cooling too quickly. Let the mixture rest at 300°F for 2 minutes before adding butter, and spread it in a thin, even layer on the parchment. The sugar needs time to caramelize properly for that signature crunch.
Can I make butter candy without corn syrup?
Yes, but the texture will differ slightly. Substitute with 3 tablespoons honey or maple syrup per ½ cup corn syrup, but reduce the heat slightly to prevent burning. The candy will be less glossy but still delicious. For extra crispiness, brush the finished sheets with heavy cream before storing.
How do I prevent butter candy from sticking to the parchment?
Lightly dust the parchment with 1 tablespoon cornstarch before pouring the mixture, and use a fine-mesh sieve for even distribution. Chill the candy in the pan for 10 minutes before cutting—this helps it set firmer. If it still sticks, invert the parchment onto a cutting board and let it cool completely before attempting to remove it.
What’s the best way to flavor butter candy?
Classic flavors like vanilla, lemon, or almond extract work beautifully. For a twist, try ½ teaspoon cinnamon or orange zest> mixed into the butter before spreading. Just be mindful of the temperature—adding flavorings too early can cause crystallization. Always stir gently after removing from heat.
How do I store butter candy for maximum freshness?
Keep it in an airtight container at room temperature for up to 2 weeks, with parchment paper between layers to prevent sticking. For longer storage, freeze for 3 months—thaw at room temperature for 30 minutes before serving. If it softens, restore crispness by warming at 250°F for 2-3 minutes.