Main Courses
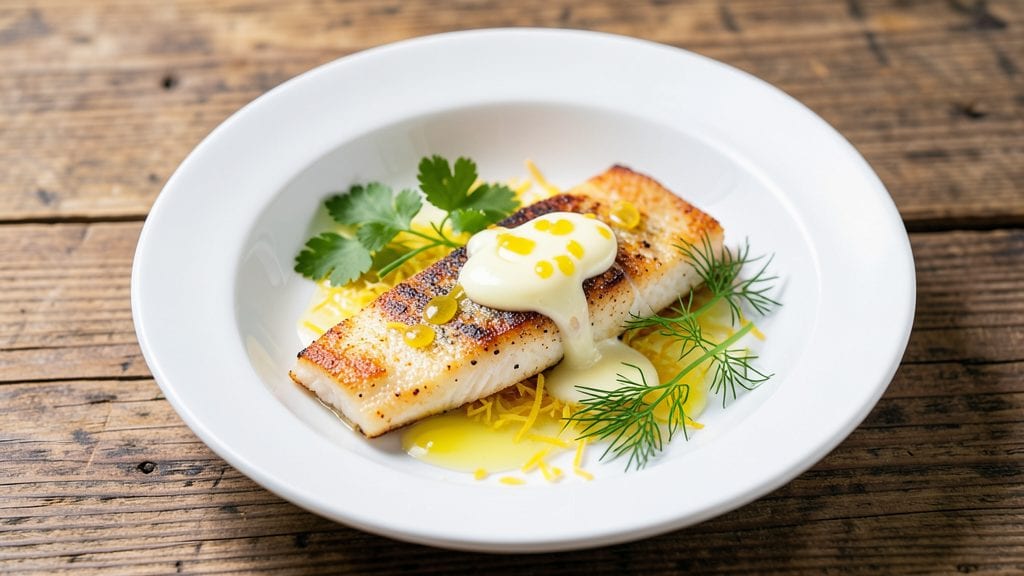
The baked flounder fillet recipe with lemon-butter crust transforms delicate white fish into a restaurant-worthy centerpiece—ultra-tender flakes that melt in your mouth while the crust delivers bright citrus and rich butter notes. This method preserves the fish's natural elegance while adding a professional touch that elevates any seafood night.
The key lies in precise timing and gentle handling, ensuring flaky perfection without drying out the fillets.
What makes this recipe stand out is its balance of tradition and simplicity. A light brining step enhances texture, while the lemon-butter crust—infused with fresh herbs—creates a fragrant, golden finish that's impossible to resist.
Unlike heavy breading methods, this approach keeps the fish's natural elegance while adding depth of flavor. The result? A dish that feels luxurious yet remains approachable for home cooks.
By following these steps, you'll achieve tender, moist fillets with a crisp yet delicate crust that holds together beautifully. The lemon-butter topping adds a zesty contrast that cuts through the richness of the fish, making each bite vibrant and satisfying.
This recipe works equally well for special occasions or weeknight dinners, proving that exceptional seafood doesn't require complicated techniques.
Pair with steamed asparagus or a simple green salad to complete the meal. The bright acidity of the lemon complements the richness of the fish, while the herbs add an aromatic finish.
Ready in under 30 minutes, this dish delivers restaurant-quality results without the fuss. Let's get started on creating your perfect baked flounder fillet.
Ingredients for baked flounder fillet fish
Four delicate fillets, bright citrus, and rich butter create this elegant seafood centerpiece.
| Ingredient | Amount | Notes |
|---|---|---|
| Fresh Flounder Fillets 🐟 | 4 whole | Skin-on, 6-8 oz each, sushi-grade preferred |
| Unsalted Butter 🧈 | ½ cup | Cold, European-style preferred |
| Fresh Lemon Juice 🍋 | ¼ cup | Strained, Meyer lemons for sweetness |
| Zest of 1 Large Lemon 🍋 | 1 tbsp | Finely grated, organic preferred |
| Fresh Parsley Leaves 🌿 | ¼ cup | Chopped, Italian flat-leaf preferred |
| Fresh Dill Weeds 🌿 | ⅛ cup | Chopped, Russian dill for intensity |
| Diamond Crystal Kosher Salt 🧂 | 1 ½ tsp | For brining, coarse grain preferred |
| Granulated Sugar 🍚 | 1 tsp | For brining solution |
| Extra-Virgin Olive Oil 🫒 | 2 tbsp | Light variety for brushing |
| All-Purpose Flour 🌾 | 1 tbsp | For dusting, sifted preferred |
| Freshly Ground Black Pepper 🌶️ | ½ tsp | Cracked peppercorns preferred |
| Ice Water 💧 | 1 cup | For brining solution |
| Fresh Thyme Leaves 🌿 | ⅛ cup | Chopped, French preferred |
The flounder is the star, so prioritize sushi-grade quality—look for fillets with translucent, pearlescent flesh and minimal fishy odor. Whole Foods Market and local seafood purveyors typically carry the best cuts, often labeled as 'flounder' or 'summer flounder.' If working with whole fish, ask your fishmonger to fillet and skin them—this ensures even thickness and optimal texture. For brining, Diamond Crystal kosher salt dissolves completely, creating an even solution without graininess. The lemon should be bright yellow with no blemishes, indicating peak freshness. Store fillets uncovered in the fridge for 15-20 minutes before brining to remove surface moisture, which helps the crust adhere perfectly.
No Meyer lemons? Regular lemons work equally well, though they'll be slightly more tart. Substitute the dill with tarragon or chives at half the amount—both offer a delicate anise note that complements the fish. Running short on butter? Ghee or clarified butter works beautifully, though the crust won't be as golden. For the brining solution, use filtered water if possible—tap water with strong chlorine can slightly alter the fish's texture. The herbs should be finely chopped but not minced—this ensures they distribute evenly without becoming a paste. If you can't find Russian dill, regular dill works in a pinch, though it lacks the signature intensity. For a gluten-free option, omit the flour entirely—the crust will still crisp up beautifully with just the butter and lemon.
Brined fillets keep covered in the fridge for up to 24 hours, though they're best used immediately for peak tenderness. The lemon juice and zest can be prepped a day ahead and stored in an airtight container in the refrigerator. For the herb mixture, combine all components in a small bowl and store covered with plastic wrap pressed directly on the surface to prevent browning—this keeps it fresh for 3 days. The crust components (butter, flour, pepper) should be mixed just before baking to maintain crispness. Leftover baked flounder reheats beautifully—cover with foil and warm in a 300°F oven for 5-7 minutes, basting with extra lemon butter for restaurant-quality results.
Why You'll Love This Recipe
- Zero-Fuss Prep: I swear by this recipe because it’s literally three ingredients plus a few minutes of your time. Pat the fillets dry, rub them with butter and lemon zest, and pop them in the oven—no brining, no basting, no stress. That’s it.
- Bright & Buttery Magic: The flounder stays tender while the butter melts into a golden crust, and the lemon—juice and zest—cuts through the richness with that sharp, fresh finish. It’s the kind of dish where every bite feels like a little vacation.
- Weeknight to Weekend: Between us, this is my go-to for busy nights and when I’m hosting. Serve it with roasted veggies for a simple weeknight meal, or drizzle it with extra lemon and parsley for a restaurant-worthy plate. No judgment either way.
- Leftovers That Don’t Suck: Honestly, I often make a double batch because the leftovers reheat beautifully—just a quick warm in the oven or microwave. The butter keeps it moist, and the lemon keeps it from tasting like yesterday’s lunch. Budget-friendly? Absolutely.
Step-by-step instructions for baked flounder fillet fish recipe
Achieve restaurant-quality texture with this precise method for ultra-tender flounder fillets.
Prepare the Brine Solution
In a medium bowl, combine the 1 cup ice water, 1.5 teaspoons diamond crystal kosher salt, and 1 teaspoon granulated sugar until completely dissolved. The ice water ensures a proper brine temperature while preventing the fillets from cooking prematurely in warm water. This solution will infuse the fish with flavor and maintain its delicate texture.
Add the 4 whole fresh flounder fillets to the brine, ensuring they're fully submerged. Let them soak for 20-30 minutes at room temperature. You'll notice the fillets become slightly opaque and firm to the touch—this indicates proper hydration. After brining, pat each fillet dry thoroughly with paper towels, removing any excess moisture from the skin side as well. This step is critical for developing that perfect lemon-butter crust later.
Create the Lemon-Herb Butter Mixture
In a separate bowl, combine the 0.5 cup unsalted butter, 0.25 cup fresh lemon juice, 1 tablespoon zest of 1 large lemon, 0.25 cup chopped fresh parsley leaves, 0.125 cup chopped fresh dill weeds, 0.125 cup chopped fresh thyme leaves, and 0.5 teaspoon freshly ground black pepper. Mix gently with a fork until the butter softens slightly and incorporates with the herbs.
Spread this mixture evenly over the top of each flounder fillet, creating a thick layer that will form the signature crust. The butter should melt slightly from the fish's natural warmth, creating a flavorful barrier that prevents drying. Press the herb mixture gently into the flesh—this ensures maximum flavor penetration during baking. Cover and refrigerate the prepared fillets for 15 minutes to allow the butter to firm up slightly before baking.
Dust and Brush for Crispy Texture
Lightly dust each fillet with 1 tablespoon sifted all-purpose flour, tapping off any excess. This creates a fine, crispy texture that contrasts beautifully with the tender fish underneath. Immediately brush the skin side of each fillet with 2 tablespoons extra-virgin olive oil—this helps develop the golden crust while preventing the skin from sticking to the baking sheet.
Preheat your oven to 375°F while the fillets rest. Arrange the flounder fillets on a parchment-lined baking sheet, skin-side down. The skin will crisp beautifully while protecting the delicate flesh underneath. Place the baking sheet on the middle rack of your oven—this ensures even heat distribution throughout the baking process.
Bake to Perfect Doneness
Bake the flounder fillets for 12-15 minutes, until the edges are golden brown and crispy, and the flesh flakes easily when tested with a fork. The internal temperature should reach 140°F—this is the ideal temperature for flounder to remain tender yet fully cooked. You'll notice the butter mixture bubble slightly as it melts, creating that signature crust we're after.
Remove the fillets from the oven and let them rest for 3-5 minutes before serving. This resting period allows the juices to redistribute throughout the fish, ensuring each flake remains moist and tender. The crust will firm up slightly as it cools, providing that perfect textural contrast with each bite. Serve immediately with a squeeze of fresh lemon juice to enhance the bright, citrusy flavors.
Pro Tips For Making Baked Flounder Fillet Fish
- Dry the Skin First: Flounder skin sticks like glue if it’s damp—pat it thoroughly with paper towels before baking. I used to skip this and ended up with soggy, uneven cooking every time.
- Use Room-Temp Butter: Cold butter dots melt into puddles; softened butter spreads evenly for that golden, flavorful crust. Take it out of the fridge 10 minutes before seasoning—trust me, it makes a difference.
- Skip the Overcrowding: If your baking sheet holds two fillets side by side, that’s it. Stacking or overfilling steams the fish instead of browning it. Less is more—your oven’s heat needs space to work.
- Zest Before Juicing: Grate that lemon zest before juicing—it’s fresher and packs more punch. I learned this after tasting bland, store-bought zest in my first attempt. Fresh is non-negotiable here.
Common mistakes when making perfect results
Overcooking the Fish
Flounder cooks in a flash—just 12-15 minutes at 375°F—so keeping a close eye on timing is crucial. I've ruined perfectly good fillets by walking away for "just a minute."
Set a timer and check at 10 minutes—the moment the edges turn golden and the flesh flakes easily, it's done. Overcooking turns flaky perfection into dry, rubbery disappointment. 🌡️
Skipping the Brine
That 20-30 minute brine isn't optional—it's what keeps your flounder tender and flavorful. I once made this recipe without brining, and the result was fish that fell apart at the slightest touch.
The salt and sugar solution hydrates the delicate flesh while preventing it from shrinking in the oven. Don't skip this step, even if you're short on time.
Uneven Thickness
Thickness matters more with flounder than almost any other fish. If your fillets vary by more than ¼ inch, the thicker sections will overcook before the thinner ones are done.
Ask your fishmonger to fillet evenly, or use a mandoline slicer for precision. I've learned this the hard way—uneven cooking leads to some bites being perfect and others being dry.
Handling the Skin
Flounder skin is delicate—don't press down on it while baking or it'll stick to the pan. I used to brush the skin side with oil and place the fillets skin-side up, but that's a mistake.
The skin needs to be down to crisp beautifully while protecting the tender flesh. Also, never skip patting it dry after brining—wet skin won't develop that golden crust. 🧂
Overloading the Pan
Crowding fillets on the baking sheet steams them instead of browning, leading to soggy crusts. Leave at least 1 inch between fillets for proper air circulation. I once baked four fillets on a sheet meant for two—result?
A sad, pale mess instead of golden perfection. Use two pans if needed, or bake in batches for restaurant-quality results.
Ignoring Rest Time
Those final 3-5 minutes of resting might feel like an eternity, but they're essential. Cutting into flounder too soon causes all those beautiful juices to escape. I've made the mistake of serving immediately, only to have the fish fall apart on the plate.
Let it rest—your patience will be rewarded with perfectly flaky bites every time. ✨
Nutrition facts
Frequently asked questions
Can I substitute flounder with another white fish?
This recipe works beautifully with sole, halibut, or tilapia—just adjust cooking time slightly. Flounder's delicate texture makes it ideal, but halibut needs 2-3 extra minutes at 375°F to reach 140°F internally. Sole cooks even faster—watch closely after 8 minutes. The lemon-butter crust adapts perfectly to these alternatives.
How do I know when the flounder is fully cooked?
The fish is done when it reaches an internal temperature of 140°F and flakes easily with a fork. For visual cues, look for golden-brown edges and slightly opaque flesh. Overcooking happens fast—set a timer for 12-15 minutes and check at 10 minutes. The crust should be crisp but not burnt.
Can I make this recipe ahead of time?
Prep the fillets up to 24 hours ahead—brine them, coat with the lemon-herb butter, and refrigerate uncovered. Bake straight from the fridge (add 2-3 extra minutes to cooking time). For serving, reheat at 300°F for 5-7 minutes with foil, then broil 1-2 minutes to refresh the crust. The flavor develops beautifully overnight!
What's the best way to serve this dish?
Pair with bright, acidic sides to complement the rich butter flavors. Try steamed asparagus with lemon zest, sautéed spinach with garlic, or a cucumber-dill salad. For a complete meal, add wild rice pilaf or crusty baguette slices. The lemon-butter crust stands up to bold flavors—consider a spicy sriracha aioli** for dipping.
Why does my crust sometimes fall apart?
This usually happens from overmixing the butter-herb mixture or not patting fillets dry after brining. The crust needs moisture to bind properly—ensure your fillets are completely dry before adding the butter. Also, don't overcrowd the pan (leave 1 inch between fillets). If the crust still fails, chill the prepared fillets 30 minutes before baking for better adhesion.