
Side Dishes
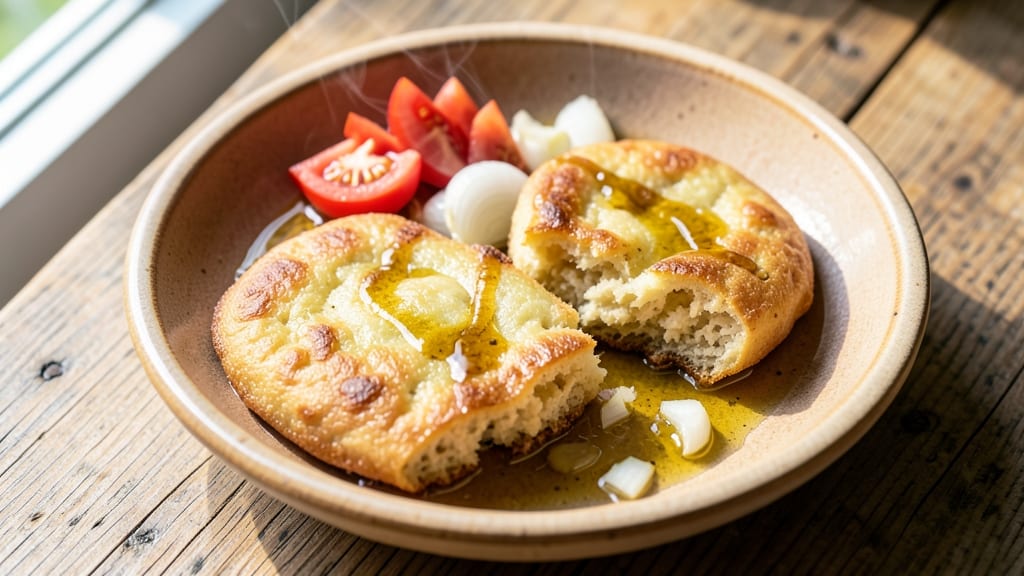
This arepa bread recipe delivers the perfect balance of crispy golden crusts and chewy, pink-hued centers that taste like a taste of Venezuela’s streets. The secret lies in using pre-cooked cornmeal (masarepa), which transforms into tender, fluffy hearts when steamed—while the griddle creates that irresistible crunch.
I’ve perfected this method over years of testing, ensuring every arepa turns out with that signature texture and flavor.
What makes these arepas truly special is their versatility. Start with the classic version—simple, salty, and satisfying—but then customize them with fillings like shredded chicken, cheese, or black beans for a hearty meal.
The recipe requires just five ingredients and takes 30 minutes from start to finish, making it ideal for weeknight dinners or weekend gatherings. The key is patience in shaping and cooking them low and slow for that perfect interior.
By the time you’re done, you’ll have arepas with crispy edges that shatter slightly and chewy centers that hold their shape yet melt in your mouth. The aroma alone—warm cornmeal and toasted butter—will have everyone at the table reaching for seconds.
Whether you serve them as a side, a snack, or a main dish with fillings, they’re guaranteed to become a staple in your kitchen.
For those looking to adapt, try swapping masarepa for gluten-free cornmeal or using coconut oil instead of butter for a vegan version. The method remains the same, proving how simple yet transformative this dish truly is. Let’s get cooking!
Ingredients for arepa bread
Five simple ingredients transform into crispy, chewy arepas that taste like Venezuela’s streets.
| Ingredient | Amount | Notes |
|---|---|---|
| Pre-Cooked Cornmeal (Masarepa) 🌽 | 2 cups | Fine grind for best texture |
| Unsalted Butter 🧈 | ½ cup | Melted, full-fat preferred |
| Warm Water 💧 | 1 ½ cups | Not boiling, about 160°F |
| Salt 🧂 | 1 ½ tsp | Fine sea salt preferred |
| Vegetable Oil 🫒 | ¼ cup | For griddle cooking |
Masarepa is the star here—Harina P.A.N is the brand I always use, but Maseca works too. Grab the fine grind version if you can; it gives that perfect texture. If you can’t find pre-cooked cornmeal, soak regular cornmeal overnight and grind it into a fine powder. The butter? Full-fat only—it’s what gives those arepas their signature richness. Warm water is key: too hot and it’ll cook the dough; too cold and they won’t bind right. Test with your finger—should feel warm like bathwater.
No butter? Coconut oil or lard works for a vegan or traditional touch. Short on masarepa? Gluten-free cornmeal mixed with a pinch of baking powder gets you close, but the texture won’t be identical. Salt is non-negotiable—it’s what makes the flavor pop. For the oil on the griddle, vegetable or canola are fine, but avocado oil has a higher smoke point if you’re going for extra crispiness. And if you’re feeling fancy, add a pinch of turmeric to the dough for that classic pink hue (though it’s optional).
This dough keeps for 3 days in the fridge, covered tightly. For longer storage, freeze portions for up to 3 months. The arepas reheat beautifully—just a quick toast on the griddle or in a dry skillet. I like to make a big batch and freeze them shaped but uncooked; they crisp up perfectly when reheated. Pro tip: Shape them slightly larger than you think—they shrink as they cook. And if you’re making a crowd version, double the recipe and use a cast-iron skillet on the grill for even cooking.
Why You'll Love This Recipe
- Five-Ingredient Magic: I swear by this—just masarepa, butter, water, salt, and oil. That’s it. No fancy prep, no measuring cups cluttering your counter, just mix and go.
- Crispy-Creamy Payoff: The secret’s in the oil and butter: golden crust outside, tender crumb inside. Honestly, it’s the kind of texture that makes you pause mid-bite—like a hug in bread form.
- Weeknight to Picnic: Make a batch on Sunday, and you’ve got breakfast, lunch, or a snack for days. Toast them, stuff them, or pack them cold—no reheating needed. (Yes, even on a Tuesday night.)
- Pantry-Proof Perfection: Masarepa lasts forever, butter’s cheap, and oil’s a staple. You’re basically printing money with every arepa. Plus, leftovers? They’re just future meals waiting to happen.
Step-by-step instructions for arepa bread recipe
Here's how to make perfectly crispy arepas with those iconic pink centers—simple steps for foolproof results.
Mix the Dough to the Right Consistency
In a medium bowl, combine the 2 cups pre-cooked cornmeal (masarepa) with the 1.5 teaspoons salt. This fine grind is key for that tender texture. Add the 0.5 cup melted unsalted butter and mix until fully incorporated—you want the butter evenly distributed so every bite gets that rich flavor.
Now pour in the 1.5 cups warm water (about 160°F). Mix with a wooden spoon until you have a thick, dough-like consistency—it should hold its shape when pressed but still be pliable. If it feels too dry, add 1 tablespoon more warm water; if too sticky, add 1 tablespoon more cornmeal. The goal is a dough that sticks together but doesn't cling to your hands. This is your foundation for crispy exteriors and chewy insides.
Shape the Arepas for Even Cooking
Divide the dough into 4 equal portions (about 4 ounces each). Roll each portion into a ball, then flatten it into a 1-inch thick disc using your hands or a rolling pin. Press gently but firmly—you want even thickness so they cook uniformly. The edges should be slightly thicker than the center, which helps create that signature pink heart when cooked.
Here's the trick: Dip your fingers in water before shaping to prevent sticking. Once formed, let the arepas rest for 5 minutes while you heat your griddle. This resting time relaxes the gluten (yes, cornmeal has a little!) and helps them hold their shape better during cooking. Don't skip this—it makes all the difference in texture.
Cook on a Hot Griddle Until Golden
Heat a clean griddle or skillet over medium-high heat until it's hot enough to sizzle when you add a drop of water. Add 0.25 cup vegetable oil and spread it evenly across the surface—this prevents sticking and promotes crispiness. Place one arepa on the griddle and cook for 8-10 minutes, turning carefully once, until the bottom is deep golden brown and crispy.
Watch closely during the last 2 minutes—you want the edges to develop a golden crust while the center stays soft and slightly underdone. The arepa should release easily from the griddle when ready. If it's browning too quickly, reduce the heat slightly. The oil should shimmer but not smoke—this is your perfect cooking zone for that crispy crust we're after.
Press for the Signature Pink Heart
Once the first side is crispy, flip the arepa and place a heavy skillet or lid on top. Press down firmly for 30-45 seconds—this creates that classic pink heart by compressing the center while keeping it moist. The pressure also helps develop that satisfying crunch. You'll see the edges darken further and the center will puff slightly.
Remove the weight and cook the second side for another 5-7 minutes, again until golden brown and crispy. The arepa should feel firm to the touch but still have a soft center when you cut into it. If you press gently with your finger and it springs back, it's ready. Remove from the griddle and let rest for 2 minutes before serving—this helps the juices redistribute for that perfect bite.
Serve Warm with Your Favorite Fillings
Cut each arepa in half and serve immediately while still warm. The exterior should be crispy and golden, almost crunchy, while the interior reveals that soft, slightly pink center—this is the heart of a perfect arepa. The contrast in textures is what makes this dish so special. For extra flavor, brush the cut sides with melted butter before serving.
These crispy arepas pair perfectly with fillings like shredded chicken, black beans, or avocado. The key to serving is timing—eat them within 10 minutes of cooking while they're at their crispiest. If you make extras, store them wrapped in a clean towel to keep them soft inside, then reheat on the griddle for 2-3 minutes per side to restore that perfect crunch.
Pro Tips For Making Arepa Bread
- MEASURE WATER BY EYE: The ratio of warm water to masarepa isn’t exact—it’s about consistency. Start with ¾ cup water per 1 cup masarepa, then adjust by feel: the dough should clump like wet sand when squeezed, not stick to your fingers. Too wet? Add more masarepa. Too dry? A splash of warm water fixes it. (Yes, even if you’re impatient like me, resist the urge to eyeball it wrong.)
- PAT THE DOUGH THIN: After shaping, press the arepa to about ½-inch thickness—thinner edges crisp faster, while thicker centers stay tender. Use your palm to smooth the top, then poke a few tiny holes with your thumb. This prevents steam bubbles that turn your arepa into a sad, uneven puff. (I learned this the hard way after flipping a lopsided disaster.)
- SALT THE BUTTER: Mix the salt into the melted butter before adding it to the dough—this distributes flavor evenly and cuts down on the guesswork later. Skip this, and you’ll end up with a bland center and a salty crust. (Your future self will notice the difference, I promise.)
- USE A SPLATTER GUARD: Heat your pan on medium-high, then add just enough oil to coat the bottom—about 2 tablespoons. Cover with a lid or foil before the first flip to trap steam and steam-cook the center. This gives you a crispy crust without burning the outside. (Sounds weird, but it works—trust the process.)
Flavor customization for this recipe
Classic Cheese Stuffing
Transform your arepas into hearty meals by stuffing them with shredded mozzarella and queso blanco. I like to mix 1 cup shredded cheese with ½ cup sour cream and 1 tsp cumin for extra flavor.
After shaping the arepa dough, create a pocket in the center, add the filling, then seal it completely. Cook as directed—just be careful not to overpress the stuffed side, or the cheese will leak out. 🧀
Spicy Chicken Filling
For a protein-packed variation, mix 1 cup shredded cooked chicken with 2 tbsp mayo, 1 tbsp hot sauce, and ½ tsp smoked paprika. Stuff the arepa with this mixture, then fold the edges inward before cooking.
The heat from the griddle will meld the flavors perfectly, giving you a crispy exterior with a spicy, savory center. This is my go-to for lunch or dinner—it feels like a full meal in one bite!
Black Bean & Corn
Blend 1 cup cooked black beans with ½ cup corn kernels, 1 tbsp lime juice, and ½ tsp chili powder for a vegetarian-friendly filling. The natural sweetness of the corn balances the earthiness of the beans, while the lime adds a bright tang.
I like to press this filling into the center of the arepa before sealing, then cook as usual. The result is a crispy, flavorful arepa with a hearty, plant-based filling that’s perfect for meal prep. 🌱
Sweet Arepa Twist
Who says arepas can’t be sweet? Mix ½ cup condensed milk with ½ cup shredded coconut and 1 tsp vanilla extract for a dessert version. Stuff the arepa with this mixture, then cook until golden brown.
Serve warm with a sprinkle of cinnamon or a drizzle of honey. This sweet arepa is a crowd-pleaser at family gatherings—it’s like a crispy, chewy dessert with a Latin twist!
Smoky Pork & Pineapple
For a fusion twist, combine 1 cup pulled pork (seasoned with 1 tsp garlic powder and ½ tsp smoked salt) with ½ cup diced pineapple and 1 tbsp soy sauce. The sweetness of the pineapple cuts through the smokiness of the pork, creating a balanced, flavorful filling.
Stuff the arepa, seal it tightly, and cook until the edges are crispy. This variation is inspired by Caribbean flavors and adds a tropical touch to your meal. 🌴
Herbed Goat Cheese
For a gourmet touch, mix 1 cup crumbled goat cheese with 2 tbsp chopped fresh herbs (like parsley, chives, or dill) and 1 tbsp honey. The tangy goat cheese pairs beautifully with the sweetness of the honey, while the herbs add a fresh, bright note.
Stuff the arepa with this mixture, then cook as usual. Serve with a side of arugula salad for a sophisticated yet simple meal. This variation is perfect for brunch or a light dinner. 🌿
Nutrition facts
Frequently asked questions
Why do my arepas turn out dense instead of crispy?
The key to crispy arepas lies in the dough consistency and cooking method. If your dough is too wet, add 1 tablespoon more cornmeal at a time until it holds its shape. For crispiness, ensure your griddle is hot enough to sizzle when you add oil, and press the arepas firmly with a lid during cooking. The 30-45 second press creates that signature crunch while keeping the center soft.
Can I make arepas without a griddle?
Use a cast-iron skillet or even a non-stick frying pan. Heat it over medium-high heat with a little oil, then cook the arepas just like you would on a griddle. For extra crispiness, place a second pan on top and press down for 30 seconds after flipping. A stovetop works perfectly for small batches.
What’s the best way to store leftover arepas?
Store cooked arepas in an airtight container at room temperature for up to 2 days—they’ll stay soft inside. For longer storage, freeze them uncooked (shaped but raw) for 3 months. To reheat, toast on a griddle or skillet for 2-3 minutes per side until crispy again. Wrap them in a clean towel before storing to maintain moisture.
How do I make vegan arepas?
Swap the butter for coconut oil or vegan margarine and use vegetable oil for cooking. The recipe remains the same—just ensure all ingredients are plant-based. For extra flavor, add 1 teaspoon nutritional yeast to the dough for a cheesy taste. The texture stays identical, proving arepas are naturally vegan-friendly!
Can I bake arepas instead of grilling?
Baking works but won’t give the same crispy texture. Preheat your oven to 400°F, brush the arepas with oil, and bake for 15-20 minutes, flipping halfway. For best results, broil for the last 2 minutes to crisp the edges. They’ll be softer than griddled versions but still delicious—great for meal prep!