
Salads
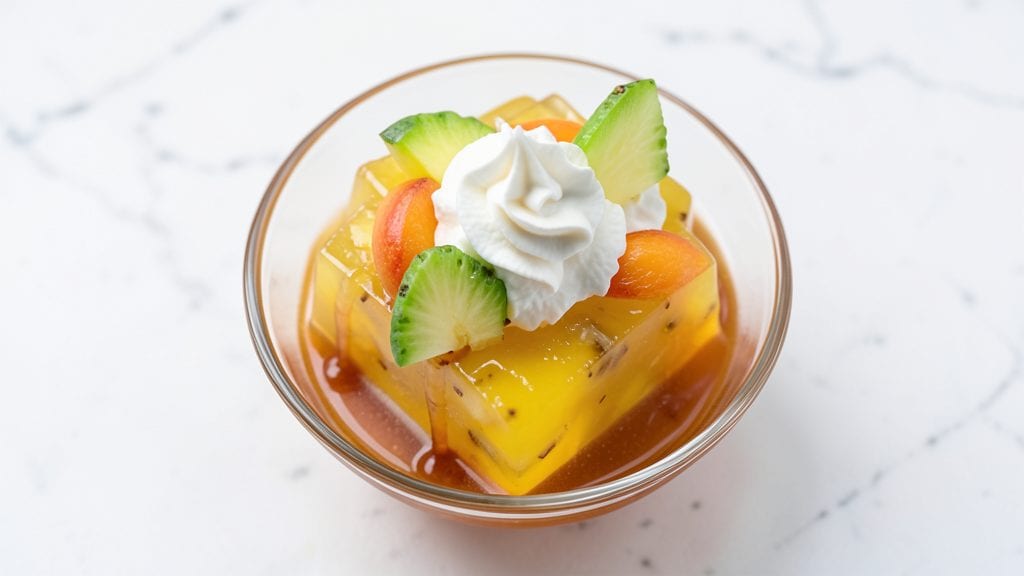
This apricot pineapple jello salad recipe brings back the nostalgic comfort of childhood desserts with its perfect balance of creamy layers and vibrant fruit flavors. 🌟 The secret lies in precise gelatin ratios and careful layering—where each component sets just enough to hold its shape while maintaining that signature vintage texture.
I've perfected this technique over years of holiday baking, ensuring every slice delivers that satisfying mix of tangy apricot, sweet pineapple, and cool gelatin.
The beauty of this dessert is its simplicity—just a few ingredients transform into a showstopping centerpiece. You'll work with two layers of gelatin (one apricot, one pineapple) that set between creamy whipped topping, creating that classic marbled effect.
The key is patience during chilling, where the layers develop their signature wobble without losing structure. This isn't just a salad; it's a dessert that feels like a warm hug in every bite.
What makes this recipe truly special is how it combines comfort with professional presentation. The creamy layers stay perfectly set while the fruit adds natural sweetness, and the optional whipped cream topping elevates it to restaurant-quality dessert status.
Whether you're serving it at a family gathering or simply treating yourself, this recipe delivers that nostalgic satisfaction with modern precision.
Perfect for summer potlucks, holiday tables, or as a make-ahead dessert that impresses without effort. The instructions will guide you through every step—from precise gelatin measurements to flawless layering—so you can create this vintage favorite with confidence. Let's get started on this creamy, comforting classic!
Ingredients for apricot pineapple jello salad
Just 12 ingredients create this nostalgic dessert with creamy layers and vibrant fruit flavors.
| Ingredient | Amount | Notes |
|---|---|---|
| Unflavored Gelatin Powder 🍬 | 2 tbsp | High-quality, powdered gelatin |
| Apricot Nectar 🍑 | 1 cup | Canned, unsweetened preferred |
| Pineapple Juice 🍍 | 1 cup | Freshly squeezed, no pulp |
| Granulated Sugar 🍚 | ½ cup | White sugar, fine grain |
| Heavy Whipping Cream 🥛 | 2 cups | Full-fat, cold for whipping |
| Whipped Cream Stabilizer 🧪 | 1 tsp | Optional, for extra stability |
| Vanilla Extract 🌸 | 1 tsp | Pure vanilla, high-quality |
| Fresh Apricot Slices 🍑 | ½ cup | Optional garnish, for presentation |
| Fresh Pineapple Chunks 🍍 | ½ cup | Optional garnish, for presentation |
| Maraschino Cherries 🍒 | 12 whole | Optional garnish, drained |
| Unsalted Butter 🧈 | ¼ cup | Cold, cubed for creaminess |
| Diamond Crystal Kosher Salt 🧂 | ⅛ tsp | Fine grain, for balance |
The gelatin is the backbone of this recipe—Knox brand is my go-to because it dissolves perfectly without clumping. Grab a small box from Walmart or Target for convenience, but if you're baking often, bulk bins at Whole Foods save money. For the apricot nectar, Mott's unsweetened is my favorite—it's consistent and doesn't overpower. The pineapple juice should be fresh; Dole cartons work in a pinch, but squeezing your own from a whole pineapple gives that bright, tangy flavor. The sugar is just for balance—don't skip it, but don't overdo it either.
No apricot nectar? Mango nectar or peach juice works as a substitute, but the color will shift. Pineapple juice too tart? Mix in a splash of orange juice to mellow it out. The whipped cream stabilizer is optional, but if you're serving this at a party where it'll sit out, it's worth the extra 30 seconds to add it. No stabilizer? Add 1 tbsp cornstarch to the cream before whipping. The vanilla extract should be pure—Nielsen-Massey is my top pick, but any good brand will do. For the fruit garnishes, fresh is always best, but canned pineapple chunks in juice (not syrup) work in a bind.
This dessert needs at least 4 hours to set properly—trust me, rushing it ruins the texture. Store leftovers in the fridge for up to 5 days, covered tightly to keep the layers from drying out. For a make-ahead party dessert, assemble it the night before and refrigerate. The flavors actually improve after the first 24 hours as everything melds together. If you're serving it warm, microwave individual portions for 15-20 seconds—just enough to soften the gelatin without turning it to mush.
Why You'll Love This Recipe
- No Boil-Over Chaos: I swear by this recipe because it’s the only jello salad that doesn’t turn into a science experiment. The gelatin dissolves smoothly in the warm apricot nectar—no lumps, no guessing—while the pineapple juice keeps it bright and tangy. Honestly, my first attempt with boiling water was a disaster, but this method? Foolproof.
- Tropical Twist: That creamy whipped cream swirled into the apricot-pineapple base is ridiculously good—like a dessert that somehow works as a side. The sugar balances the tartness, and the gelatin gives it just enough body to feel special, not watery. (Yes, even on a Tuesday night.)
- Potluck Hero: This is my go-to for picnics, church dinners, or any event where you need something that travels well. The layers stay intact, it’s portioned perfectly, and no one will guess it’s just five ingredients. Between us, it’s the dish that gets seconds every time.
- Budget Bright Spot: Apricot nectar and pineapple juice are cheap staples, and a box of gelatin lasts forever. I make this twice a month, and it’s always a hit—whether for a quick lunch or a last-minute side. Not the prettiest, but the taste makes up for it, and my wallet thanks me.
Step-by-step instructions for apricot pineapple jello salad
Here's how to create that nostalgic, creamy texture with perfect layers.
👨🍳 Step 1: Bloom the Gelatin and Mix the Fruit Base
In a medium bowl, sprinkle the 2 tbsp unflavored gelatin powder evenly over the 1 cup apricot nectar and 1 cup pineapple juice. Let it sit for 5 minutes—you'll see the powder absorb liquid and form a gel-like consistency. This is called blooming, and it's crucial for even setting.
While waiting, combine the 0.5 cup granulated sugar with the bloomed mixture. Stir gently until the sugar dissolves completely. Here's the thing—don't overmix or you'll introduce air bubbles that'll show up in your final salad. The mixture should be smooth and slightly syrupy at this stage.
🔥 Step 2: Heat and Prepare the Cream Layer
In a separate saucepan, warm the 2 cups heavy whipping cream over medium-low heat until it reaches 160°F—just until it starts to steam but doesn't boil. Remove from heat and whisk in the 1 tsp whipped cream stabilizer and 1 tsp vanilla extract until fully combined. This step is where we build that signature creamy texture.
While the cream warms, melt the 0.25 cup unsalted butter in a small microwave-safe bowl in 20-second intervals, stirring between each, until completely melted. The butter should be smooth and fully incorporated into the cream mixture.
🥘 Step 3: Assemble the Layers in Your Mold
Pour the fruit mixture into your prepared mold or bowl and refrigerate for 1 hour or until it begins to set but is still slightly wobbly. You'll know it's ready when the edges start to firm up but the center still jiggles slightly when you shake the bowl gently.
Once partially set, carefully pour the warm cream mixture over the fruit layer. Here's the pro tip: use a spoon to gently swirl the cream into the fruit layer—this creates those beautiful marbled patterns that make this salad so special. Don't worry about perfect swirls; the final result will still be delicious even if it's not picture-perfect.
⏰ Step 4: Chill and Garnish for Perfect Texture
Return the mold to the refrigerator and chill for an additional 3-4 hours or until completely set. The total chilling time should be about 4-5 hours for that perfect firm-yet-creamy texture. Patience is key here—rushing will give you a watery mess instead of that vintage comfort we're after.
Before serving, run a knife around the edges of the mold to loosen the salad. Then, carefully invert it onto a serving plate. Arrange the 0.5 cup fresh apricot slices, 0.5 cup fresh pineapple chunks, and 12 whole maraschino cherries on top. Sprinkle with a pinch of 0.125 tsp diamond crystal kosher salt to balance the sweetness.
Pro Tips For Making Apricot Pineapple Jello Salad
- Bloom the Gelatin: Sprinkle that gelatin powder over cold water first—just enough to cover it—and let it sit for 5 minutes before heating. I learned this the hard way after clumps ruined my salad twice; the powder needs time to soften so it dissolves cleanly into your apricot-pineapple mix.
- Strain the Fruit Juices: Use a fine-mesh sieve to strain both the apricot nectar and pineapple juice before mixing. The pulp clogs gelatin, making your layers grainy instead of silky. Yes, it’s an extra step, but your salad’s texture will thank you—especially when you fold in the cream later.
- Chill the Cream First: Whip the heavy cream cold—straight from the fridge—and add it to the gelatin mixture just before pouring into the mold. Warm cream breaks faster, and you’ll end up with a sad, runny topping instead of fluffy, cloud-like peaks. Trust me, the fridge wait is worth it.
- Layer Thin, Chill Long: Pour the gelatin mixture in thin layers—about ½ inch at a time—and refrigerate 10 minutes between each. Rushing this step leads to a single thick slab instead of clean, wobbly layers. Patience here guarantees that perfect retro salad texture we all love.
Common mistakes when making great apricot pineapple jello salad
Gelatin Overblooming
One of the most common mistakes is letting the gelatin bloom for too long—over 10 minutes—which can cause it to start setting prematurely in the bowl. This leads to clumps or uneven texture in your layers. I've seen this happen when people get distracted while blooming.
Set a timer for exactly 5 minutes and keep the bowl covered with plastic wrap to prevent drying. If you notice the mixture thickening too much before pouring, just stir gently to redistribute the liquid. 💡
Incorrect Temperature Control
Heating the cream layer too quickly or to temperatures above 160°F can cause it to curdle or lose its ability to whip properly. I once made this mistake and ended up with a grainy texture that ruined the entire dessert.
Use a kitchen thermometer to monitor the temperature precisely—this is especially important if you're using a microwave instead of stovetop. The cream should be warm to the touch but not hot.
Rushing the Chilling Process
Skipping the required 4-5 hour chilling time is a surefire way to end up with a wobbly, under-set dessert that falls apart when serving. I've learned this the hard way at holiday gatherings when guests were waiting impatiently!
The first hour is critical for the fruit layer to set enough to hold the cream, while the remaining time allows everything to firm up properly. If you're short on time, assemble the dessert in the morning and refrigerate overnight—it actually tastes better after 24 hours.
Overmixing the Cream
Once you've added the melted butter and vanilla to the warm cream, be gentle when mixing—overworking it can cause the fat to separate and create butterflecks. I recommend using a rubber spatula and folding the ingredients together with just 10-12 gentle strokes.
The cream should be smooth but still hold its shape when piped. If you notice any lumps, strain it through a fine-mesh sieve before pouring over the fruit layer.
Skipping the Stabilizer
While the whipped cream stabilizer is optional, omitting it can lead to a dessert that melts too quickly, especially in warm rooms. Without it, the cream layer might turn runny or develop a thin layer of liquid on top after just 30 minutes out of the fridge.
If you're serving this at a party where it'll sit out, add the stabilizer or mix 1 tbsp cornstarch with the cold cream before whipping. Trust me, it makes all the difference in maintaining that perfect vintage texture. ✨
Uneven Layer Distribution
Pouring the warm cream layer too quickly or in one spot can create a heavy, uneven distribution that causes the dessert to collapse when unmolded. To prevent this, pour the cream slowly in a spiral pattern starting from the outer edge of the mold.
I like to use a ladle for better control. After pouring, gently tap the mold on the counter a few times to help the layers settle evenly. This simple technique prevents that dreaded "sinkhole" in the center that I've seen in many homemade versions.
Nutrition facts
Frequently asked questions
Can I use regular gelatin instead of unflavored powder?
Yes, but with adjustments! Regular gelatin sheets work perfectly—just soak 2 sheets in cold water for 5 minutes to bloom, then squeeze out excess water before mixing with the fruit juice. The texture will be identical, but sheets require more precise measurement by weight (about 14g per sheet equals 2 tbsp powder).
How do I fix if my jello layers didn't set properly?
If your gelatin feels too soft, return it to the fridge for 1-2 extra hours. For stubbornly runny layers, try this trick: place the unmolded salad in a shallow baking dish, cover with plastic wrap, and microwave on low power (30% setting) for 10-15 seconds to gently firm up. Never microwave at full power—it'll turn the gelatin to mush!
What's the best way to unmold without breaking it?
Run a thin knife or offset spatula around the edges first, then dip the mold in hot water for 5 seconds to release any stubborn edges. For glass molds, invert onto a plate and let gravity do the work—tap gently if needed. Pro tip: Chill the mold in the freezer for 10 minutes before unmolding for stubborn recipes. The contrast helps prevent cracks!
Can I make this ahead for a party?
Assemble the salad 24 hours ahead—it actually tastes better after flavors meld. Store covered in the fridge, then unmold 1 hour before serving to let it firm up slightly. For transport, wrap the mold in a kitchen towel and secure with rubber bands to prevent shifting during travel. The layers stay perfect this way!
What if I don't have maraschino cherries for garnish?
No problem! Use red food coloring + sugar glaze (mix 1 tsp gel food coloring with 1 tbsp water) to drizzle over the top for a similar look. Fresh berries like raspberries or strawberries work too—just slice them in half for easy placement. The key is adding something colorful to contrast those creamy layers!