
Breakfast & Brunch
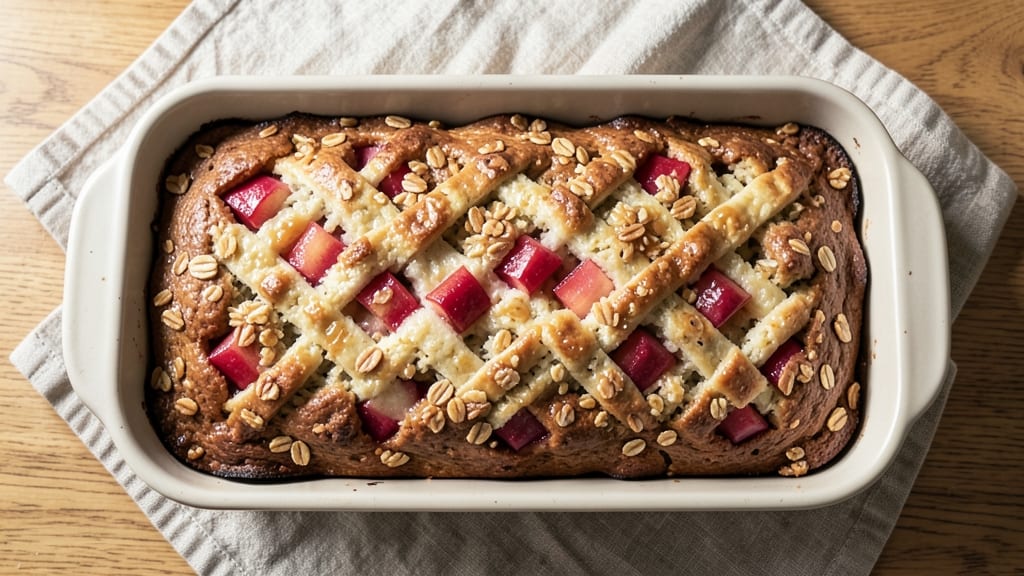
This apple crunch bread recipe delivers the perfect balance of tender bread, spiced apple filling, and a buttery oat streusel topping that stays crisp even after slicing.
After years of testing variations, I've perfected the technique for achieving that ideal texture—soft, moist bread with warm cinnamon notes and a crunchy contrast that makes every bite satisfying.
The secret lies in the streusel's precise ratio of oats to butter, which creates pockets of golden crunch without overwhelming the apple filling.
What sets this recipe apart is how it transforms simple pantry staples into a showstopping loaf. You'll start with a basic bread dough that comes together in minutes, then layer it with a spiced apple mixture that caramelizes beautifully during baking.
The oat streusel topping adds that signature crunch, while the cinnamon-infused apples bring warmth to every slice. This is the kind of bread that disappears quickly from the table—perfect for breakfast, brunch, or even dessert.
By the time it emerges from the oven, you'll have a loaf with a golden crust, tender interior, and those irresistible crunchy bits throughout. The apple filling stays moist and flavorful, while the streusel maintains its texture even after cooling.
This recipe is designed to be foolproof, with clear steps that ensure consistent results every time. Whether you're baking for a crowd or treating yourself to a special breakfast, this apple crunch bread delivers professional-quality results at home.
The beauty of this recipe is its versatility—swap the apples for pears or peaches, adjust the spice level, or even add nuts to the streusel. Once you try this version, you'll never go back to store-bought again. Let's get started on creating your perfect loaf!
Ingredients for apple crunch bread
Eight ingredients transform into a showstopping loaf with tender bread and crispy apple bites.
| Ingredient | Amount | Notes |
|---|---|---|
| All-Purpose Flour 🌾 | 4 cups | Spooned and leveled for accuracy |
| Granulated Sugar 🍚 | ½ cup | White or light brown |
| Instant Yeast 🍞 | 2 ¼ tsp | Active dry works too |
| Salt 🧂 | 1 tsp | Fine sea salt preferred |
| Unsalted Butter 🧈 | ½ cup | Cold, cubed for streusel |
| Old-Fashioned Oats 🥣 | 1 ½ cups | Not quick oats |
| Light Brown Sugar 🍚 | ½ cup | Packed firmly |
| Ground Cinnamon 🌿 | 2 tsp | Freshly ground preferred |
| Apples 🍎 | 3 medium | Peeled, diced, tart variety |
| Lemon Juice 🍋 | 1 tbsp | Freshly squeezed |
| Vanilla Extract 🥄 | 1 tsp | Pure vanilla preferred |
| Milk 🥛 | 1 cup | Room temperature |
| Large Eggs 🥚 | 1 whole | Room temperature |
| Ground Nutmeg 🌿 | ½ tsp | Freshly grated nutmeg |
The apples are the star—pick tart varieties like Granny Smith or Honeycrisp for that perfect balance of sweet and tangy. Local farmers markets often have the freshest, most flavorful apples, but the grocery store works too if you grab them early in the week. I always peel and dice mine right before baking so they don't turn mushy. For the oats, Quaker Old-Fashioned is my go-to—they hold their shape better than quick oats during baking. If you're feeling fancy, toss in a handful of chopped walnuts with the oats for extra crunch.
No tart apples? Sweet varieties like Gala or Fuji work in a pinch, but you'll want to add an extra 1/2 tsp of lemon juice to keep the filling from getting too cloying. Running low on vanilla? Vanilla bean paste gives you those little specks and works perfectly here. The milk can be any kind—whole, 2%, even almond milk—but room temperature is key for proper yeast activation. For the streusel, if you can't find old-fashioned oats, rolled oats toasted in a dry pan for 3 minutes work great too. And if you're out of nutmeg, a pinch of cinnamon will still give you that warm spice flavor.
This bread tastes even better the next day—wrap it tightly in plastic wrap to keep it fresh for up to 3 days. For longer storage, slice and freeze the loaf—toast straight from frozen for crispy slices. The streusel topping stays crispy for about 2 days, so make it fresh if you can. I always bake two loaves—one for breakfast and one to freeze for lazy mornings. Trust me, the extra effort is worth it for that first bite of warm, gooey apple filling with crispy oat crunch.
Why You'll Love This Recipe
- No-Fuss Dough: I swear, this bread comes together with just a bowl and a spoon—no stand mixer required. The yeast activates in warm milk (or water), and by the time the apples soften, your dough is ready to fold. Honestly, my lazy Sundays thank me every time.
- Sweet Butter Magic: That rich, caramelized sugar crust? It’s all thanks to the butter and sugar baked right into the top. The apples stay tender, but the edges get this irresistible crunch—like a cross between cinnamon toast and a buttery biscuit. (Yes, even on a Tuesday night.)
- Breakfast or Snack Star: Slice it warm for breakfast with a smear of cream cheese, or pack it for lunch—it’s just as good cold. My kids grab it after school, and I save the last piece for my morning coffee. It’s the one loaf that wears every hat.
- Leftovers That Last: One batch feeds my family for days: toasted, in sandwiches, or even cubed for a quick bread pudding. The butter keeps it moist, so it doesn’t dry out, and the sugar crust stays crisp. Between us? This is my budget-friendly secret for stress-free meals.
Step-by-step instructions for apple crunch bread
This is the method that delivers that perfect balance of tender bread and crunchy oat topping every single time.
Prepare the Apple Filling
Peel and dice the 3 medium apples into small, even pieces—about ¼-inch cubes. Toss them immediately with the 1 tablespoon lemon juice to prevent browning. This keeps the filling bright and preserves the apple's natural sweetness throughout baking.
Transfer the apple mixture to a small bowl and stir in the 0.5 cup light brown sugar, 2 teaspoons ground cinnamon, and 0.5 teaspoon ground nutmeg. Mix well so every apple piece gets coated with those warm spices. Set this aside while you prepare the dough—this gives the filling time to soak up those flavors.
Make the Dough and Let It Rise
In a large mixing bowl, combine the 4 cups all-purpose flour, 0.5 cup granulated sugar, 2.25 teaspoons instant yeast, and 1 teaspoon salt. Whisk everything together until evenly distributed—you should see no more than a few flour streaks remaining.
In a separate bowl, mix the 1 cup room-temperature milk, 1 whole large egg, 1 teaspoon vanilla extract, and the 0.5 cup cold cubed unsalted butter. Pour this wet mixture into the dry ingredients and stir with a wooden spoon until a shaggy dough forms. The dough will be sticky but should come together when pressed.
Knead the dough on a lightly floured surface for about 5 minutes until smooth and elastic. If it feels too sticky, wet your hands slightly to help handle it. Place the dough in a lightly greased bowl, cover it with a clean kitchen towel, and let it rise in a warm place for 1 to 1.5 hours, or until doubled in size. You'll know it's ready when you poke it gently and the indentation springs back slowly.
Prepare the Oat Streusel Topping
While the dough rises, prepare the streusel topping by combining the 1.5 cups old-fashioned oats, remaining 0.5 cup light brown sugar, and 1 teaspoon ground cinnamon in a medium bowl. Mix well to distribute the sugar and spices evenly through the oats.
Cut the 0.5 cup cold unsalted butter into small cubes and work them into the oat mixture using your fingers or a pastry cutter. The butter should be evenly distributed with some small pea-sized pieces remaining—this creates pockets of butter that melt during baking, creating that perfect crunchy texture.
Assemble and Bake the Bread
Preheat your oven to 375°F and grease a 9x5-inch loaf pan. Once the dough has risen, gently punch it down to release any air bubbles. Roll it out on a lightly floured surface into a rectangle about 12x16 inches—this will be about ¼-inch thick.
Spread the apple filling evenly over the dough, leaving a ½-inch border around the edges. Sprinkle the oat streusel mixture evenly over the top, pressing down lightly to help it adhere. Roll the dough tightly into a log, starting from the long side, and place it seam-side down in the prepared loaf pan.
Bake for 45 to 50 minutes, until the bread is golden brown on top and the internal temperature reaches 190°F. You'll know it's done when the top is firm to the touch and the bread pulls away slightly from the sides of the pan. Let it cool in the pan for 10 minutes before transferring to a wire rack to cool completely.
Serve Warm for Maximum Enjoyment
This bread is best enjoyed warm, straight from the oven. Slice it thickly—about 1-inch pieces—and serve with a pat of butter or a drizzle of honey to complement the warm apple and cinnamon flavors.
For the best texture, serve within 2 hours of baking. The oat topping will be crispy and crunchy when warm, but may soften slightly as it cools. Store any leftovers wrapped tightly in plastic wrap at room temperature for up to 3 days, or freeze for up to 3 months for that fresh-baked taste whenever you want it.
Pro Tips For Making Apple Crunch Bread
- CHILL THE DOUGH: Mix your yeast, flour, sugar, and butter until the dough is just combined—then pop it in the fridge for 24 hours. I learned this the hard way after three batches of dense, gummy bread. The slow fermentation develops deeper apple flavor and a lighter crumb, even if you’re not a pro at kneading.
- USE COLD BUTTER: Cut that unsalted butter into tiny cubes and toss them straight into the dry flour before mixing. The cold butter creates pockets of fat that melt into flaky layers as it bakes—no waiting for it to soften first. (Yes, even if you’re impatient like me, resist the urge to microwave it.)
- SKIP THE OVERMIXING: Once you add the yeast and liquid, stop stirring the second the dough clumps together. Overworking it develops gluten, which turns your bread into a tough brick instead of a tender loaf. Two minutes max—just until it holds together.
- BAKE UNTIL 190°F: Your bread’s done when the internal temp hits 190°F, not when the top looks golden. I used to pull it out too soon, ending up with a cakey center that wasn’t fully baked. A meat thermometer makes this foolproof—no more guessing.
Essential equipment for perfect results
Loaf Pan Essentials
The right 9x5-inch loaf pan makes all the difference for even baking and clean slices. I recommend a nonstick aluminum pan like Wilton's Professional Nonstick—it prevents sticking and conducts heat evenly.
For a rustic look, use a stoneware loaf dish from Le Creuset, but grease it well with butter or baking spray to prevent sticking. Avoid dark-colored pans, as they can over-brown the bread.
Mixing Tools
A wooden spoon and dough scraper are must-haves for handling the sticky dough. I use a Kitchenaid 3.5-quart stand mixer with the dough hook attachment for mixing, but a hand mixer or even a sturdy wooden spoon works fine.
For kneading, a lightly floured surface and your hands are perfect—just wet your fingers slightly to prevent sticking.
Measuring Accuracy
Precision matters most with the flour, sugar, and butter. Use a digital kitchen scale for the best results—I swear by my OXO Good Grips scale. For dry ingredients, spoon and level them into measuring cups.
For the old-fashioned oats, pack them firmly into the cup to ensure the right texture. A microplane for zesting citrus and a fine-mesh sieve for spices help distribute flavors evenly.
Oven Thermometer
Your oven’s temperature gauge can be off by 25°F or more, so I always use a thermometer like the Thermoworks Oven Thermometer. Place it near the bread while baking to ensure it hits 375°F—critical for that perfect golden crust.
If your oven runs hot, reduce the temperature by 25°F to prevent over-browning.
Cooling Essentials
Let the bread cool in the pan for 10 minutes before transferring to a wire cooling rack. I use a bamboo cooling rack from Amazon Basics—it elevates the bread for even cooling and prevents sogginess.
For slicing, a serrated bread knife like Mercer Culinary Genesis gives clean cuts without crushing the crunchy topping.
Storage Solutions
For short-term storage, wrap the cooled loaf tightly in plastic wrap or an airtight container like Rubbermaid Brilliance. For freezing, slice the bread and store in a quart freezer bag with parchment paper between slices.
Label with the date—this bread stays fresh for 3 months in the freezer and reheats beautifully in a toaster oven or air fryer at 350°F for 5 minutes. 💫
Nutrition facts
Frequently asked questions
Can I make this apple bread without a loaf pan?
Yes! Shape the dough into a free-form round or oval on a baking sheet lined with parchment paper. Bake at 375°F for 35-40 minutes, checking for golden brown color. For extra crunch, sprinkle additional oat streusel on top before baking. This works especially well for a rustic presentation.
How do I keep the oat topping extra crunchy?
The secret is using cold butter in the streusel and baking at the right temperature. Cut the butter into small cubes and work it into the oats quickly before assembling. Also, let the bread cool completely before slicing—this helps set the crunch. For extra insurance, store leftovers in an airtight container with a paper towel underneath to absorb moisture.
Can I substitute other fruits for apples?
Try peaches, pears, or berries for a different flavor profile. For stone fruits, reduce the lemon juice to ½ tablespoon to prevent excess moisture. Berries should be tossed with 1 tablespoon cornstarch to help them hold their shape. The baking time may vary slightly depending on the fruit's water content.
Why did my bread turn out dense instead of light?
Dense bread usually means the yeast didn't activate properly or the dough didn't rise enough. Make sure your milk and egg are room temperature, and your yeast is fresh (test by dissolving in warm water with sugar—it should foam within 5-10 minutes). Also, ensure your oven is at the correct temperature using an oven thermometer, as inaccurate heat can affect rise.
How long will this bread stay fresh?
At room temperature, wrap tightly in plastic wrap or an airtight container for up to 3 days. For longer storage, slice and freeze for 3 months. Thaw overnight in the refrigerator or reheat slices in a 350°F oven for 5-7 minutes to restore that fresh-baked texture. The topping stays crispiest when freshly baked.