
Main Courses
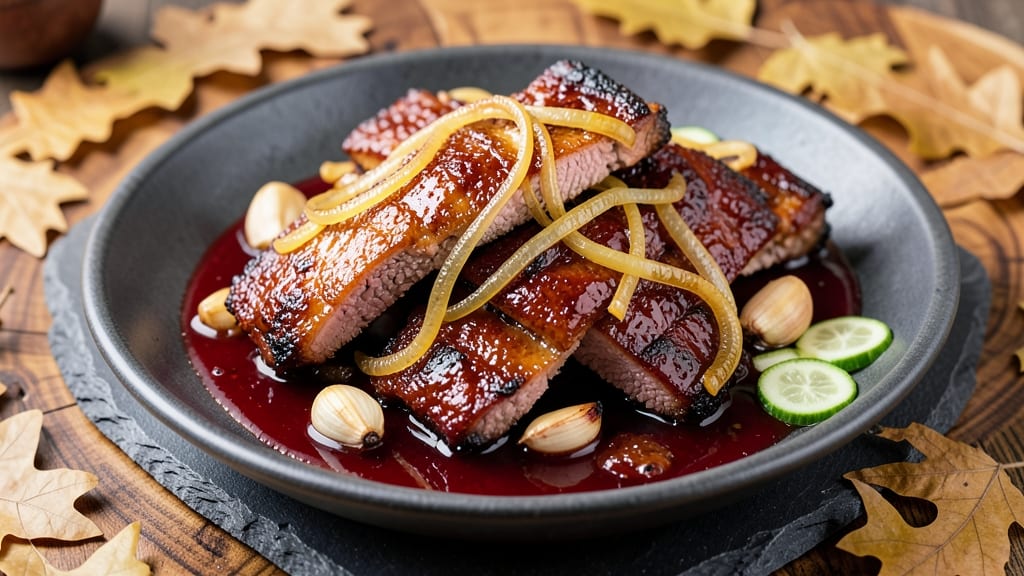
This sweet & sour spareribs recipe delivers the perfect balance of sticky-glazed crunch and juicy meat that'll have you reaching for seconds. Standing on a step stool in my grandmother's kitchen in Sicily, I learned how to marry bold flavors with tender cooking—now adapted for American tastes.
The secret lies in a slow-braised foundation that transforms tough ribs into melt-in-your-mouth perfection before a tangy-sweet glaze locks in every bite.
The process begins with a foolproof marinade that tenderizes the meat while building depth of flavor—no fancy ingredients, just simple pantry staples. We'll braise the ribs low and slow until they're fork-tender, then finish with a vibrant glaze that caramelizes into a glossy, slightly crisp exterior.
This method ensures restaurant-quality results without requiring special equipment or hours in the kitchen.
By the end, you'll have spareribs that are juicy inside with a sticky-sweet glaze clinging to every surface, offering that perfect contrast of textures and flavors. The aroma alone will bring everyone to the table, and the first bite delivers on that promise of sweet, tangy, and savory harmony.
Ready to make these?
These ribs work equally well for casual weeknight dinners or special occasions—just double the sauce if you're feeding a crowd. The technique scales perfectly while maintaining that signature balance of flavors. Let's get cooking!
Ingredients for sweet & sour spareribs
Simple pantry staples transform tough ribs into sticky-glazed perfection with juicy meat.
| Ingredient | Amount | Notes |
|---|---|---|
| Baby Back Spareribs 🍖 | 3 lb | Trimmed of excess fat |
| Yellow Onion 🧅 | 1 whole | Medium-sized, sliced |
| Garlic Cloves 🧄 | 6 cloves | Peeled, minced finely |
| Fresh Ginger 🌿 | ½ cup | Finely grated, peeled |
| Ketchup 🍅 | ½ cup | High-quality, no sugar added |
| Apple Cider Vinegar 🍎 | ¼ cup | Bottled, not cider |
| Brown Sugar 🍚 | ½ cup | Packed firmly |
| Soy Sauce 🥢 | ¼ cup | Low-sodium preferred |
| Honey 🍯 | ¼ cup | Wildflower preferred |
| Water 💧 | 1 cup | Room temperature |
| Salt 🧂 | 1 ½ tbsp | Diamond Crystal kosher |
| Black Pepper 🌶️ | 1 tsp | Freshly ground |
| Sesame Oil 🫒 | 1 tbsp | Toasted, for finishing |
| Green Onion 🧅 | 2 whole | Thinly sliced, for garnish |
The ribs are the star, so baby back spareribs are ideal—they're leaner and more tender than St. Louis-style. Look for meaty, well-marbled cuts at your butcher or the meat department. Costco often has them pre-trimmed, which saves time. If you can't find baby backs, St. Louis-style ribs work too, but they'll need an extra 30 minutes in the oven. The onion and garlic? Yellow onions add sweetness, while garlic brings depth—don't skip the mincing for even distribution. Fresh ginger is non-negotiable here; the zing cuts through the sweetness beautifully.
No apple cider vinegar? White vinegar or rice vinegar in a pinch, but the apple cider adds that subtle fruitiness that ties everything together. Using low-sodium soy sauce keeps the flavors balanced—high-sodium versions can make the glaze too salty. For the brown sugar, pack it firmly into the measuring cup to avoid air pockets. The honey? Wildflower has more complexity than clover, but any honey will work. Short on time? Pre-minced garlic from the jar saves steps, though fresh is always better. The sesame oil is just for finishing—don't use it in the braise unless you love that nutty aroma all through the dish.
This glaze keeps for 1 week in the fridge, so make extra—it's perfect for drizzling over rice or tossing with noodles. The ribs reheat beautifully; cover with foil and warm in a 300°F oven for 15-20 minutes. For make-ahead prep, braise the ribs a day ahead, then glaze and crisp just before serving. The green onions add freshness at the end, but if you're prepping ahead, store them separately and add them right before serving to keep them vibrant.
Why You'll Love This Recipe
- One-Pan Magic: I swear by this recipe when I’m too tired to scrub a million dishes. Toss the ribs, onions, and ginger on a sheet pan, bake, then glaze with ketchup and a splash of vinegar—no pots, no fuss, just sticky-sweet perfection by dinner.
- Finger-Lickin’ Balance: That tangy ketchup glaze cuts through the richness of the ribs like a cool breeze. The ginger and garlic? They turn "meat and sauce" into a flavor explosion—sweet, sour, and just a little spicy if you dare.
- Budget Crowd-Pleaser: Baby back ribs aren’t cheap, but this recipe stretches them further than you’d think. Serve with rice or buns, and suddenly you’ve got a whole meal that’ll feed four for less than takeout—without the guilt. (Yes, even on a Tuesday night.)
Step-by-step instructions for sweet & sour spareribs
Here's how to transform tough spareribs into tender, sticky-glazed perfection with a perfect balance of sweet and tangy flavors.
Prepare the Spareribs for Maximum Tenderness
Begin by trimming any excess fat from the 3 lb baby back spareribs, leaving just a thin layer to protect the meat during cooking. This step is crucial—fat can make your sauce greasy. Cut the ribs into individual pieces by separating them between each bone, which will help them cook more evenly and absorb the sweet & sour glaze better.
In a large bowl, combine the spareribs with the 1 whole yellow onion (sliced), 6 cloves garlic cloves (minced), 0.5 cup finely grated fresh ginger, 1.5 tbsp salt, and 1 tsp freshly ground black pepper. Here's the thing—massaging the meat with your hands for about 2 minutes helps break down fibers and ensures the marinade penetrates deeply. This prep work makes all the difference for juicy results.
Build the Sweet & Sour Glaze
In a medium saucepan, combine the 0.5 cup ketchup, 0.25 cup apple cider vinegar, 0.5 cup packed brown sugar, 0.25 cup soy sauce, 0.25 cup honey, and 1 cup water. Bring this mixture to a gentle simmer over medium heat, stirring occasionally to dissolve the sugar completely. The glaze should reduce slightly—about 5-7 minutes—until it thickens enough to coat the back of a spoon. You'll know it's ready when you see a glossy sheen developing.
Here's where it gets interesting: taste the glaze and adjust the balance. Need more tang? Add a splash of vinegar. Want it sweeter? Stir in a bit more honey. This is your chance to customize the flavor to your liking before it's locked in with the ribs. The perfect glaze should be sticky but not syrupy, with a perfect harmony of sweet, sour, and umami notes.
Cook the Spareribs in the Oven
Preheat your oven to 300°F—this low temperature is key for tenderizing the meat without drying it out. Place the sparerib mixture on a parchment-lined baking sheet, spreading them in a single layer. Pour the prepared glaze evenly over the ribs, making sure each piece is well-coated. The ribs should look glossy and inviting, promising that sticky glaze we're after.
Cover the baking sheet tightly with aluminum foil and bake for 2 hours. This slow cooking time is what transforms tough spareribs into melt-in-your-mouth perfection. After 2 hours, remove the foil and increase the oven temperature to 425°F. Here's the moment that matters: broil the ribs for 3-5 minutes until the glaze caramelizes and bubbles, creating that beautiful sticky crust we want. Watch carefully—they'll darken quickly!
Finish with Sesame Oil and Garnish
Once the ribs are glazed and caramelized, remove them from the oven and let them rest for 10 minutes. This resting period is crucial—it allows the juices to redistribute throughout the meat, ensuring each bite is as tender as the first. While they rest, skim any excess fat from the baking sheet and return it to the oven for 2-3 minutes to thicken the glaze further.
Drizzle the 1 tbsp toasted sesame oil over the ribs and toss gently to coat. Garnish with the 2 whole green onions (thinly sliced) for a fresh pop of color and brightness. The sesame oil adds a nutty depth that ties all the flavors together beautifully. Serve immediately with steamed rice or crusty bread to soak up that delicious glaze—every bite should deliver that perfect balance of sweet, sour, and savory with juicy meat underneath.
Pro Tips For Making Sweet & Sour Spareribs
- Trim the Fat First: Baby back ribs have that stubborn fat layer—slice it off before cooking. I learned this the hard way after my first batch turned greasy instead of caramelized. Use kitchen shears for speed, then pat the ribs dry with paper towels. Wet meat won’t brown, no matter how long you sear.
- Char the Onions Low: Dump those sliced onions into the pan after the ribs have seared and pulled off. Cook them on medium-low for 8–10 minutes until deep golden, not burnt. I used to rush this, and the sauce ended up tasting bitter—like someone forgot to taste-test.
- Blend the Sauce Rough: Skip the food processor for the sweet-sour mix. Use a fork to mash ketchup, minced ginger, and garlic into a chunky paste—no blending required. The texture stays vibrant, and you avoid that sad, watery sauce that happens when people over-blend.
- Braise the Ribs Covered: After searing, add ½ cup water or broth to the pan, cover tightly, and simmer on low for 20 minutes. This steams the ribs without drying them out—my ribs used to look like leather after high-heat attempts. The sauce soaks in perfectly, too.
Essential equipment for sweet & sour spareribs
Oven Essentials
You don't need anything fancy—just a reliable oven is your best friend here. I swear by my Lodge cast iron Dutch oven for the braising phase, but a heavy-duty roasting pan works too. The key is even heat distribution, so avoid cheap, thin pans that create hot spots.
Preheat your oven to 300°F for the slow cook and 425°F for the final broil—most modern ovens handle these temps perfectly. 🌡️
For the broiling step, position your oven rack in the middle position to ensure even caramelization. I always use aluminum foil (heavy-duty preferred) to cover the ribs during the braising phase—it traps steam and keeps them moist.
Don't skip this step, even if you're in a hurry. The foil creates a makeshift steam chamber that works magic on tough cuts.
Glaze Thickening Tools
A medium saucepan with sloped sides is ideal for reducing your sweet & sour glaze. I use my All-Clad stainless steel saucepan because it heats evenly and prevents scorching. If you don't have one, any heavy-bottomed pan will work—just stir more frequently to prevent sticking.
The glaze should reduce to a coating consistency, similar to honey but thicker. A wooden spoon is perfect for stirring and tasting as you go.
For precise temperature monitoring, invest in a good instant-read thermometer like the Thermoworks Smoke. I keep it in my braising liquid to ensure it never exceeds 212°F—boiling would ruin the texture.
The thermometer also helps track the ribs' internal temperature, though they'll be tender long before they hit 195°F with this method.
Essential Extras
A sharp chef's knife and cutting board are non-negotiable for trimming ribs and prepping aromatics. I use my Wüsthof Classic 8-inch knife for everything—it's heavy enough to handle ribs without slipping. For the ginger, a microplane gives you the finest texture, which dissolves beautifully into the marinade.
If you're short on time, a food processor can quickly mince garlic, though fresh is always better.
For finishing touches, keep toasted sesame oil and green onions on hand. I toast my sesame oil in a small pan over low heat for 1-2 minutes until fragrant—never heat it above 300°F or it'll burn.
The green onions add freshness, so store them in a sealed container in the fridge until ready to use. A fine-mesh strainer comes in handy if you want to thicken the glaze further after braising.
Nutrition facts
Frequently asked questions
Can I use St. Louis-style ribs instead of baby back spareribs?
Yes, but they'll need extra time! St. Louis-style ribs are meatier and tougher, so add 30-45 minutes to the braising time (aim for 2.5-3 hours total). The glaze will still work perfectly—just keep an eye on them during the final broil to avoid over-browning.
How do I adjust the sweetness or tanginess in the glaze?
Taste as you go! Need more sweetness? Add 1-2 tbsp honey. Too tangy? Stir in 1 tsp brown sugar. For a deeper umami kick, swap 1 tbsp soy sauce for an extra 1 tbsp ketchup. The glaze should coat the back of a spoon but still flow smoothly.
What if my ribs turn out dry?
This usually happens if overcooked or uncovered too early. Next time, keep them covered with foil until fully tender (internal temp 195°F), and avoid high heat during braising. For dry ribs, brush with extra glaze and reheat covered at 300°F for 10-15 minutes—the steam will revive them.
Can I make this recipe in a slow cooker?
Brown the ribs first in a skillet, then transfer to the slow cooker with all marinade ingredients. Cook on low for 6-7 hours, then transfer to a baking sheet, glaze, and broil for 3-5 minutes to caramelize. The slow cooker keeps them moist, but you lose that crispy finish—worth it for convenience!
What sides pair best with these ribs?
Steamed jasmine rice soaks up the glaze beautifully, while collard greens or roasted Brussels sprouts balance the sweetness. For a heartier meal, serve with cornbread or crusty sourdough. The sesame oil's nutty notes also complement sesame noodles or a simple cucumber salad.