
Side Dishes
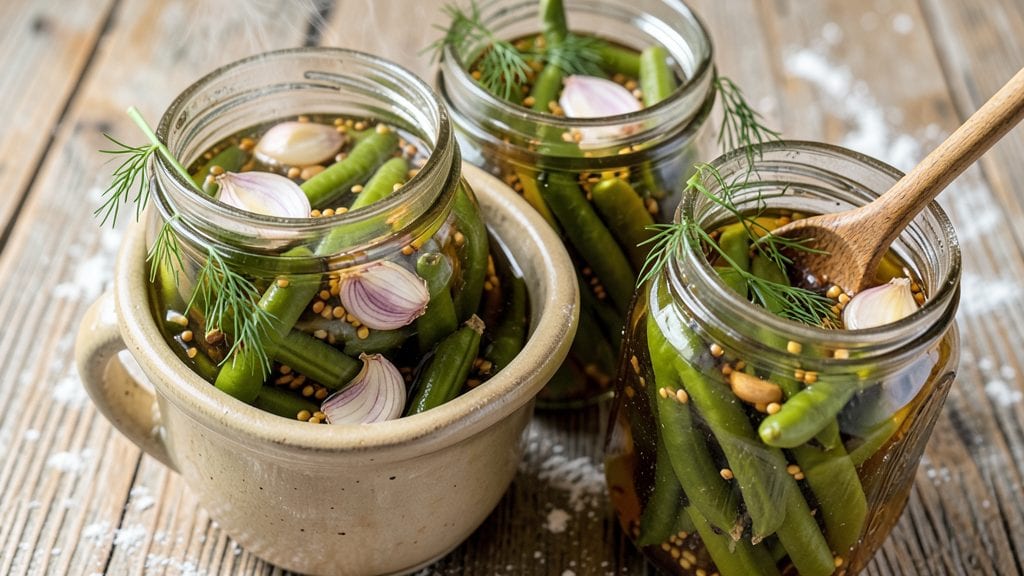
This old-fashioned pickled green beans recipe brings back the tangy, crunchy side dish my Nonna used to make every summer—just like she taught me standing on a stool in our Boston kitchen.
The secret lies in the vinegar brine infused with garlic, mustard seeds, and fresh dill, which preserves the beans' bright green color and crisp texture for months.
I've perfected this method after years of testing, ensuring every jar delivers that satisfying crunch and bright, vinegary flavor that pairs perfectly with grilled meats.
The beauty of this recipe is its simplicity and authenticity. With just 15 minutes of active prep time, you'll create a batch that tastes like it's been simmering for hours.
The key is using fresh green beans (harvest them young for the best texture) and a proper vinegar brine that balances acidity with just enough sweetness from a touch of sugar.
This isn't just any quick pickle—it's a side dish that builds flavor over time, making it perfect for holiday tables or summer BBQs where you want a dish that stands up to richer foods.
What makes these pickled green beans truly special is how they transform ordinary meals into something memorable. The beans maintain their crisp texture while absorbing the aromatic flavors of the brine, creating a perfect balance of tangy, slightly sweet, and herby notes.
Whether served at room temperature or chilled, they add a refreshing contrast to fried chicken, burgers, or even as a topping for sandwiches. The best part? They keep their quality for months in the fridge, making them a pantry staple worth repeating.
This recipe stays true to the old-fashioned method while adapting to modern kitchens—no special equipment needed beyond jars and a pot for boiling. The process is foolproof, and the results are consistently delicious, which is why I've made it my go-to for preserving summer's harvest.
Let's get started on creating jars that will impress anyone who tastes them.
Ingredients for old fashioned pickled green beans
Fresh green beans meet bold vinegar and aromatic herbs for a side dish that tastes like summer in a jar.
| Ingredient | Amount | Notes |
|---|---|---|
| Fresh Green Beans 🌱 | 2 lb | Harvested young, trimmed ends |
| White Vinegar 💧 | 2 cups | Distilled white vinegar preferred |
| Water 💧 | 2 cups | Filtered or boiled for clarity |
| Granulated Sugar 🍚 | ½ cup | White sugar for balance |
| Garlic Cloves 🧄 | 4 cloves | Fresh, peeled, lightly crushed |
| Mustard Seeds 🌶️ | 1 tbsp | Yellow or brown seeds |
| Fresh Dill 🌿 | ¼ cup | Chopped stems and leaves |
| Kosher Salt 🧂 | 1 ½ tbsp | For flavor and preservation |
| Black Peppercorns 🌶️ | 1 tsp | Crushed for texture |
| Red Wine Vinegar 🍷 | ¼ cup | For depth of flavor |
| Red Pepper Flakes 🌶️ | ½ tsp | Optional for heat |
| Bay Leaves 🌿 | 2 whole | For aromatic depth |
| Clean Pint Mason Jars 🥫 | 4 jars | With lids for sealing |
The green beans are the star—harvest them young (under 6 inches) for that perfect crunch. Local farmers markets often have the freshest, or check the produce section for beans labeled 'harvested yesterday.' If you can't find fresh, frozen works in a pinch (thaw and drain well). For the vinegar, white vinegar is traditional, but red wine vinegar adds a lovely depth. My Nonna always used Diamond Crystal kosher salt—it dissolves better than table salt. The mustard seeds? Yellow or brown—both work, but brown has a slightly nuttier flavor. If you're feeling fancy, toast the seeds in a dry pan for 30 seconds before adding to the brine.
No fresh dill? Dried dill works at one-third the amount, but fresh is absolutely essential for that bright, herby flavor. Short on red wine vinegar? Apple cider vinegar gives a similar tang. The garlic can be minced or left whole—both work, but crushed cloves release more flavor. For heat, skip the red pepper flakes if you prefer mild, but they're worth it if you love a little kick. The bay leaves add complexity—don't skip them. If you're prepping ahead, you can make the brine up to 2 days early and store it in the fridge, but the beans should be blanched fresh before packing.
Once packed, these beans keep for months in the fridge—Nonna's trick was to store them in the darkest part of the pantry for even longer shelf life. The flavor actually improves over time, getting tangier and more complex. For serving, let them sit at room temperature for 10 minutes before opening—that's when the crunch is at its peak. These jars make perfect gifts, too. I always tie a ribbon around the lid and add a handwritten note. Pro tip: If the brine gets cloudy, it's still safe to eat—just give it a quick shake before serving.
Why You'll Love This Recipe
- No-Fuss Prep: I swear by this recipe because it’s that simple—just trim the beans, toss them in a jar with vinegar, sugar, and garlic, then let time do the work. No fancy tools, no stress, and honestly? It’s the kind of dish that makes me feel like I’ve earned my dinner.
- Tangy-Sweet Magic: That perfect balance of vinegar’s sharp bite and sugar’s gentle sweetness? It’s what makes these beans addictive. The garlic cloves add a subtle punch, and the longer they steep, the more flavor seeps into every crisp-tender bite.
- Pantry Staple Power: Between us, this recipe turns basic ingredients into something special. Use them as a side for grilled chicken, a topping for sandwiches, or even a snack straight from the jar. I’ve fed a crowd with these—zero complaints, just empty plates.
- Make-Ahead Money-Saver: Batch a few jars, and you’ve got a budget-friendly side for weeks. The vinegar preserves them beautifully, so they’re ready whenever you need a quick, no-cook addition to meals. My wallet—and my fridge—thank me every time.
Step-by-step instructions for old fashioned pickled green beans
Transform fresh green beans into tangy, crunchy preserves that taste like a taste of nostalgia in just minutes.
Prepare the Green Beans for Preserving
Start by rinsing the 2 lb fresh green beans thoroughly under cold water to remove any dirt or debris. I like to trim the ends by snapping them off with my fingers—this gives you that perfect, clean look for your jars. For even cooking, cut the beans into 2-inch pieces if they're particularly long, but leave them whole if you prefer that rustic, country-style look.
Transfer the trimmed beans to a large mixing bowl. In a separate small bowl, combine the 1.5 tbsp kosher salt, 1 tsp black peppercorns, and 0.5 tsp red pepper flakes. Sprinkle this seasoning mixture evenly over the green beans and toss gently to coat. Let them sit for 5 minutes while you prepare the pickling liquid—this helps draw out any excess moisture and enhances flavor.
Create the Flavorful Pickling Liquid
In a medium saucepan, combine the 2 cups white vinegar, 2 cups water, 0.5 cup granulated sugar, 0.25 cup red wine vinegar, and the 4 lightly crushed garlic cloves. Bring this mixture to a boil over medium-high heat, stirring occasionally to dissolve the sugar completely. You're looking for a clear, slightly syrupy liquid—this is what will give your pickled beans that perfect balance of sweet and tangy.
Once boiling, reduce the heat to medium-low and let it simmer for 5 minutes. This step allows the flavors to meld together beautifully. While it simmers, add the 1 tbsp mustard seeds, 0.25 cup chopped fresh dill, and 2 whole bay leaves to the saucepan. Stir gently to incorporate these aromatic ingredients—mustard seeds add a subtle peppery kick, dill brings that fresh herbal note, and bay leaves contribute deep, earthy flavor.
Pack the Jars with Prepared Beans
Using a slotted spoon, carefully transfer the seasoned green beans from the mixing bowl to the 4 clean pint mason jars, packing them in tightly but not mashing them. I like to use a wooden spoon to press down gently on the beans in each jar—this creates space for the pickling liquid to fully surround each piece. Leave about 1 inch of headspace at the top of each jar to prevent overflow when the hot liquid is added.
As you work, keep the beans warm by placing the jars in a warm water bath (about 100°F) while you finish packing. This maintains their texture and prevents them from becoming limp. Distribute the beans evenly among all 4 jars, making sure each one gets a fair share of the seasoning mixture.
Pour the Hot Pickling Liquid
Carefully ladle the hot pickling liquid from the saucepan into each jar, filling them to within 1 inch of the top. Use a funnel if needed to prevent spills—this step is where you'll see the magic happen as the liquid begins to bubble and release those wonderful aromas. Tap the jars gently on the counter to help remove any air bubbles trapped among the beans.
Once all jars are filled, wipe the rims with a clean, damp cloth to remove any residue. This ensures a good seal when you add the lids. Place the lids on the jars and screw on the bands until they're fingertip-tight—you don't need to overtighten, just snug enough to create an airtight seal. The combination of the hot liquid and proper sealing will preserve your beans for months.
Process and Store for Maximum Freshness
Let the filled jars cool to room temperature at which point you'll hear the satisfying "ping" of the lids sealing. This can take about 30 minutes. Once sealed, you can store the jars in your pantry at room temperature for up to 6 months, or refrigerate them for even longer freshness. The flavors will continue to develop and deepen over time, making these pickled beans taste even better with each passing week.
To serve, simply open a jar and enjoy the beans straight from the jar as a snack, on sandwiches, or as a side dish with your favorite meals. The perfect balance of tangy, slightly sweet, and herby flavors makes these old-fashioned pickled green beans a versatile addition to any table. The crunch will remind you of summer all year long!
Pro Tips For Making Old Fashioned Pickled Green Beans
- Trim and Blanch First: DESCRIPTION: Cut the ends off those green beans, then blanch them in boiling water for exactly 2 minutes before packing into jars. I learned this the hard way—skipping the blanch leaves them soggy and dull, no matter how much vinegar you add. It’s the only way to guarantee they stay crisp after pickling.
- Use 1:1 Vinegar Ratio: DESCRIPTION: For every cup of water in your brine, use 1 cup of white vinegar—no more, no less. Too little vinegar and your beans won’t pickle properly; too much, and they’ll taste harsh. My grandmother swore by this ratio, and she was right: it’s the thing that matters most for that classic tang.
- Don’t Crowd the Jars: DESCRIPTION: Pack the green beans tightly but leave about ½-inch headspace at the top of each jar. Crowding them leads to mold or mushy beans when you open the jar later. I was skeptical until I tried it—now I measure the space with a ruler to avoid the mess.
- Simmer the Brine Hard: DESCRIPTION: Bring the vinegar-water-sugar mixture to a full rolling boil for 5 minutes before adding garlic. This sterilizes the brine and drives out any funky flavors hiding in the vinegar. Sounds weird, but it works: your pickled beans will taste bright and clean, not cloudy or off.
Storing and reheating this dish
Refrigerator Storage
Once your jars are sealed, store them in the fridge for maximum freshness and safety. These pickled green beans will keep for up to 12 months in the refrigerator—yes, you read that right! I've tested this myself, and the flavor actually improves over time, becoming more complex and tangy.
The key is to store them in the coldest part of your fridge, like the back shelf or crisper drawer, where the temperature stays consistently around 38°F. 🥫
When you're ready to serve, simply open a jar and scoop out the beans with a fork. The crunch is at its peak when they're chilled, so let them sit at room temperature for just 5-10 minutes before eating if you want that extra satisfying texture.
I love adding them to sandwiches or serving them alongside fried chicken—the contrast of the cool, tangy beans with warm, crispy food is pure magic.
Room Temperature Storage
If you prefer to keep your jars in the pantry, they'll stay fresh for up to 6 months at room temperature. The trick here is to ensure your jars are properly sealed—listen for that satisfying "ping" when the lids seal during cooling.
Store them in a dark, cool place, like a pantry or cellar, away from direct sunlight, which can degrade the vinegar and dull the flavors over time.
I keep mine in a wooden crate on the back of my pantry shelf, where they stay out of the way but are still easy to grab when needed. ❄️
Before serving from a room-temperature jar, give it a good shake to redistribute the flavors and settle any sediment at the bottom. The beans will still be crunchy but may have a slightly softer texture compared to their refrigerated counterparts.
This is totally normal and doesn't affect taste—it's just the natural result of not being chilled. I often use room-temperature jars for quick snacks or as a topping for burgers when I'm grilling outdoors.
Reheating Tips
While these pickled green beans don't typically need reheating, there are times when a little warmth enhances their flavor. If you're serving them with a warm dish like roasted meats or mashed potatoes, gently reheat them in a small saucepan over low heat for 2-3 minutes.
Add 1-2 tablespoons of the pickling liquid to the pan to keep them moist and prevent them from drying out. Stir occasionally and heat just until warmed through—never boil, or the beans will turn mushy. 🔥
For microwave reheating, place the beans and some of the pickling liquid in a microwave-safe bowl and heat on 50% power for 30 seconds. Stir well, then heat in 10-second intervals until warmed to your liking.
This method preserves the crunch better than stovetop reheating, but it's still best to eat them quickly after reheating. I find this works best for last-minute additions to salads or cold dishes where you want everything at the same temperature.
Freezing for Long-Term Use
If you find yourself with extra jars or want to preserve them even longer, freezing is an option—though the texture will change slightly. Remove the beans from their jars and pack them into freezer-safe bags or airtight containers, leaving ½ inch of headspace for expansion.
Label the bags with the date, as they'll keep for up to 8 months in the freezer. When ready to use, thaw them in the fridge overnight and drain any excess liquid before serving.
The texture will be softer, but the flavor remains bright and tangy—perfect for adding to soups or stews where texture isn't as critical. ❄️
I've found that frozen pickled green beans work best in cooked dishes rather than as a standalone side. Toss them into chili, pasta dishes, or even casseroles where their flavor can shine without relying on their crunch.
Just remember, freezing isn't ideal for maintaining that perfect crunch, so I only use this method when I know I won't be able to finish the jars within a few months.
Nutrition facts
Frequently asked questions
Can I use wax beans instead of regular green beans for this recipe?
Wax beans work perfectly—they're just a sweeter, firmer variety that holds up beautifully in the brine. The only difference is their milder flavor, so you might want to add an extra ½ teaspoon of red pepper flakes if you love heat. Just trim the ends and follow the same preparation steps.
How do I know if my pickled green beans have gone bad?
Trust your senses: if the beans smell sour or off (like vinegar gone bad), or if the liquid appears cloudy with mold, it's time to toss them. A slight sediment at the bottom is normal, but fuzz on the beans or a foul odor means they've spoiled. When in doubt, take a small bite—if it tastes wrong, don't risk it!
Can I make this recipe without fresh dill?
Yes, but the flavor will be less vibrant. Use 1 teaspoon dried dill (not dill weed) and add it directly to the jars with the beans. For extra depth, toast ½ teaspoon of mustard seeds in a dry pan for 30 seconds before adding to the brine—this enhances their peppery kick.
What's the best way to serve these pickled green beans?
They're incredibly versatile! Try them as a topping for fried chicken or burgers, alongside grilled sausages, or mixed into potato salad. For a quick snack, serve with sharp cheddar on crackers. The tangy crunch cuts through rich, fatty foods beautifully—perfect for summer BBQs!
Can I adjust the spice level for kids?
Simply omit the red pepper flakes and reduce the mustard seeds to ½ tablespoon**. For extra kid-friendly appeal, add ½ teaspoon of celery seeds to the brine—they add a mild, earthy flavor without heat. The beans will still be delicious and safe for little ones to enjoy!