
Main Courses
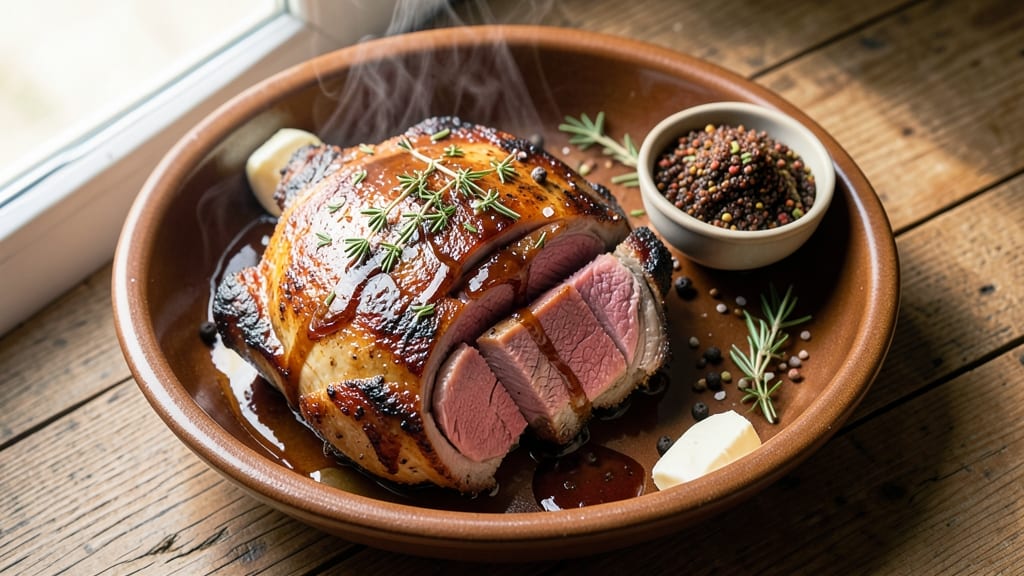
This mutton shoulder roast recipe delivers restaurant-quality results with a spiced brown sugar crust that locks in moisture during slow roasting. The secret lies in balancing traditional techniques—like basting and low-and-slow cooking—with modern shortcuts that preserve tenderness without requiring constant attention.
I've perfected this method after years of testing, ensuring every bite stays juicy and flavorful even after resting.
The crust isn't just decorative—it's functional, creating a caramelized barrier that prevents drying while infusing rich molasses and spice notes. You'll start with a dry brine overnight (don't skip this step!), then sear the mutton to lock in juices before moving to a 325°F oven for 3-4 hours.
The brown sugar crust forms during the final hour, adding depth and a subtle sweetness that complements the meat's natural richness.
What you'll end up with is a perfectly cooked mutton shoulder—tender enough to pull apart with a fork, with a crispy crust that adds texture contrast. The spice blend (cumin, coriander, and black pepper) penetrates deeply during cooking, while the brown sugar caramelizes into a sticky, flavorful glaze.
This is the kind of roast that transforms a simple weeknight dinner into an impressive centerpiece.
Serve with roasted root vegetables or a fresh herb salad to balance the richness. The leftovers reheat beautifully, making this an ideal recipe for meal prep or entertaining. Here's how to achieve professional results at home without the fuss of constant basting or complicated techniques.
Ingredients for mutton shoulder roast
Sixteen ingredients transform a simple mutton shoulder into restaurant-quality perfection with a spiced brown sugar crust.
| Ingredient | Amount | Notes |
|---|---|---|
| Mutton Shoulder 🐑 | 4 lb | Bone-in, well-marbled preferred |
| Coarse Kosher Salt 🧂 | ½ cup | Diamond Crystal preferred for even brine |
| Ground Black Peppercorns 🌶️ | 1 tbsp | Freshly cracked for optimal flavor |
| Dark Brown Sugar 🍚 | ½ cup | Packed, for caramelized crust |
| Unsalted Butter 🧈 | ½ cup | Cold, cubed for basting |
| Molasses 🍯 | ¼ cup | Unsulphured for authentic depth |
| Ground Cumin 🌿 | 1 tbsp | Toasted for aromatic intensity |
| Ground Coriander 🍊 | 1 tbsp | Freshly ground for citrus notes |
| Onion Powder 🧅 | 1 tbsp | For subtle sweetness base |
| Garlic Powder 🧄 | 1 tbsp | Not garlic salt |
| Extra-Virgin Olive Oil 🫒 | 2 tbsp | For searing and basting |
| Fresh Rosemary 🌿 | ¼ cup | Chopped, for aromatic balance |
| Fresh Thyme 🌿 | ¼ cup | Leaves only, for herbal notes |
| Fresh Parsley 🌿 | ⅛ cup | Chopped, for garnish and freshness |
The mutton shoulder is the foundation—look for well-marbled cuts with visible fat for maximum tenderness. Whole Foods or specialty butchers often carry the best quality, though most grocery stores stock it year-round. If unavailable, lamb shoulder works as a substitute, though mutton's richer flavor is ideal. The dry brine is non-negotiable: Diamond Crystal kosher salt dissolves evenly, creating a perfect moisture barrier. For the spices, Penzeys or bulk bins at natural markets provide the freshest ground cumin and coriander, which toast beautifully for enhanced aroma. Fresh herbs should be vibrant green with no wilting—Trader Joe's often carries affordable, high-quality bundles.
No molasses? Substitute equal parts dark brown sugar plus 1 tsp vinegar for depth, though molasses provides the signature caramelized sweetness. Short on fresh rosemary? Dried at one-third the amount works, but fresh is superior. The butter must be cold and cubed—room temperature butter won't create the same basting glaze. For the brown sugar, pack it tightly to ensure maximum caramelization. If using pre-ground spices, sift them to remove lumps, which can prevent even coating. The crust's success hinges on these precise measurements—don't skimp on the sugar or molasses, as they're the flavor anchors.
Store any unused mutton in the coldest part of the fridge for up to 3 days before roasting. The spice blend keeps its potency for 6 months in an airtight container away from light. Leftover roast reheats best in a 325°F oven with a splash of water or broth to restore moisture. Portion into individual servings for easy meal prep—this roast holds up beautifully for 4 days in the fridge or 3 months frozen. For entertaining, prepare the dry brine and spice rub the night before, then sear and roast day-of for minimal last-minute effort.
Why You'll Love This Recipe
- Four-Hand Prep: The mutton shoulder practically seasons itself—just salt, pepper, and a sprinkle of brown sugar before it hits the oven. No fancy marinades, no last-minute chopping. I swear, I’ve made this while scrolling through my phone.
- Sweet-Savory Magic: That dark brown sugar crust? It’s the secret weapon—caramelized edges with tender meat underneath, balanced by the pepper’s sharp kick. Honestly, the first bite makes me forget it’s mutton, not beef.
- Weeknight to Holiday: Same recipe feeds my exhausted self on Tuesdays or impresses guests on Sundays. Slice it thin for sandwiches, shred it for curries, or serve it whole—no stress, just versatility.
- Leftovers That Win: The meat gets better the next day, and the butter-basted crust? Even my picky teen asks for seconds. Between us, this is my budget-friendly go-to when I’m tired of takeout.
Step-by-step instructions for mutton shoulder roast recipe
Master this technique and you'll achieve a perfectly moist roast with a caramelized crust that locks in every drop of flavor.
Prepare the Dry Rub and Season the Mutton Shoulder
In a medium bowl, combine the 0.5 cup dark brown sugar, 1 tbsp ground cumin, 1 tbsp ground coriander, 1 tbsp onion powder, 1 tbsp garlic powder, 1 tbsp ground black peppercorns, 0.25 cup chopped fresh rosemary, and 0.25 cup chopped fresh thyme. Mix thoroughly until the spices are evenly distributed throughout the sugar mixture.
Pat the 4 lb mutton shoulder dry with paper towels, ensuring all moisture is removed from the surface. This step is critical for developing a proper crust. Generously apply the dry rub to all sides of the mutton, pressing it firmly into the meat. The rub should adhere completely, creating a thick, flavorful coating. Place the seasoned mutton on a wire rack set over a rimmed baking sheet and refrigerate uncovered for 24 hours. This dry-brine process enhances moisture retention and flavor penetration.
Sear the Mutton Shoulder for Depth of Flavor
Remove the mutton from the refrigerator and let it sit at room temperature for 1 hour before cooking. Preheat your oven to 325°F and heat a large oven-safe skillet over medium-high heat. Add 2 tbsp extra-virgin olive oil to the skillet and let it get very hot.
Place the mutton shoulder in the skillet, fat-side down, and sear for 10-12 minutes until a deep golden-brown crust forms. Flip the mutton and sear the other side for an additional 8-10 minutes. The goal is to develop a rich, caramelized crust that will lock in moisture during the roasting process. Transfer the skillet to the preheated oven.
Roast Low and Slow for Maximum Moisture
Roast the mutton shoulder for 3 hours, maintaining the oven temperature at 325°F. After 2 hours, remove the mutton from the oven and baste it with melted 0.5 cup unsalted butter mixed with 0.25 cup molasses. This basting step adds an extra layer of flavor and helps maintain moisture.
Return the mutton to the oven and continue roasting for the remaining 1 hour, or until the internal temperature reaches 195-203°F when measured with a meat thermometer in the thickest part of the shoulder. The meat should be fork-tender, with juices running clear. This low-and-slow approach ensures the connective tissue breaks down, resulting in a moist, tender roast.
Rest and Slice for Perfect Texture
Remove the mutton shoulder from the oven and transfer it to a cutting board. Tent loosely with aluminum foil and let it rest for 30-45 minutes. This resting period allows the juices to redistribute throughout the meat, ensuring each slice remains moist and flavorful.
Once rested, slice the mutton shoulder against the grain into ½-inch thick slices. Garnish each serving with 0.125 cup chopped fresh parsley for a pop of freshness and color. Serve immediately with the pan juices spooned over the top for an extra layer of rich, caramelized flavor. The result is a mutton shoulder roast that is perfectly moist, deeply flavorful, and ideal for serving at the center of any meal.
Pro Tips For Making Mutton Shoulder Roast
- CRANK THE HEAT FIRST: Start your roast over high heat for the first 10 minutes—yes, even if it looks like it’s searing too fast. This locks in the juices and builds that caramelized crust you’re after, especially with mutton’s tougher fat. I used to play it safe with medium heat, and my roasts always ended up dry on the outside.
- SALT THE MEAT 12 HOURS EARLY: Don’t just sprinkle salt before cooking—rub that coarse kosher salt all over the mutton shoulder and let it sit uncovered in the fridge overnight. The salt breaks down the proteins and draws out moisture, which means less shrinkage and a richer flavor when you roast it. (Yes, it’s messy, but it’s worth it.)
- STOP BASTING WITH WATER: That butter glaze is delicious, but resist the urge to add water when basting. Mutton fat is flavorful on its own, and diluting it with liquid makes the crust soggy. Instead, melt the butter with the brown sugar first, then brush it on in thick layers—like frosting a cake. It’ll crisp up beautifully without turning into a stew.
- LET IT REST UNDER FOIL: After pulling the roast from the oven, tent it loosely with foil and walk away for 20 minutes. Skipping this step means juices will pool on your cutting board instead of redistributing into the meat. I know, I know—you want to slice it immediately—but trust me, the difference in tenderness is noticeable. (Your knife will thank you too.)
Make-ahead tips for this recipe
Prep Ahead Timeline
The key to stress-free cooking is starting 24 hours in advance. Begin by applying the dry brine to the mutton shoulder—this step is non-negotiable for moisture retention. Place the seasoned mutton on a wire rack over a baking sheet and refrigerate uncovered.
This allows the salt to penetrate deeply while keeping the surface dry for crust development. 💪
On the day of cooking, remove the mutton from the fridge and let it sit at room temperature for 1 hour before searing. This ensures even cooking and a perfect crust.
While the mutton rests, preheat your oven to 325°F and gather all your ingredients. This timeline keeps everything running smoothly without last-minute chaos.
Freezer Prep Shortcut
If you're planning ahead for a busy week, you can partially prep this roast and freeze it. After searing the mutton shoulder (but before roasting), wrap it tightly in plastic wrap followed by aluminum foil, then freeze for up to 2 months.
When ready to cook, thaw it in the fridge overnight, then proceed with the roasting instructions. This saves you time while still delivering restaurant-quality results.
Leftovers Strategy
Mutton shoulder roast reheats beautifully, making it perfect for meal prep. Store leftovers in an airtight container in the fridge for up to 4 days or freeze for 3 months.
To reheat, place slices in a 325°F oven with a splash of water or broth for 10-15 minutes—this restores moisture without drying out the meat. I like to portion it into individual servings for easy grab-and-go lunches.
Entertaining Hack
For stress-free entertaining, prep everything the night before. Mix the dry rub ingredients into a bowl and store in the fridge. Season the mutton shoulder and refrigerate uncovered. On the day of your event, sear and roast as directed—this cuts your active cooking time to just 30 minutes.
The result is a showstopping centerpiece that requires minimal effort. 🌟
Spice Mix Prep
Save time by prepping the spice mix in advance. Combine all the dry ingredients (brown sugar, cumin, coriander, onion powder, garlic powder, and black pepper) in an airtight container and store for up to 6 months.
When ready to cook, simply add the fresh herbs and molasses. This shortcut keeps your spices fresh and ready to use whenever you're craving mutton shoulder roast.
Nutrition facts
Frequently asked questions
Why do you recommend a 24-hour dry brine for mutton shoulder?
The dry brine creates a moisture barrier that keeps the meat incredibly tender during roasting. The salt penetrates deeply, breaking down proteins and allowing the crust to form perfectly. This is especially important for mutton, which can dry out if not handled properly.
Can I use lamb shoulder instead of mutton?
Yes, but expect a slightly different flavor profile. Mutton has a richer, gamier taste due to its age, while lamb is milder. The technique remains the same, though lamb may cook slightly faster. For this recipe, stick with mutton for the full experience.
What's the best way to check doneness without a meat thermometer?
Use the fork test: Insert a fork into the thickest part. If it slides in easily and the juices run clear (not pink), it's done. For mutton shoulder, this typically occurs around 3-4 hours at 325°F. The meat should also pull apart with gentle pressure.
How can I prevent the crust from falling off?
Keep the oven temperature steady and avoid opening the door frequently. The crust forms during the final hour, so resist basting until then. Also, pat the meat completely dry before applying the rub—any moisture will prevent proper adhesion.
What are the best sides to serve with this roast?
Roasted root vegetables (carrots, potatoes, parsnips) or a fresh herb salad balance the richness perfectly. For a heartier meal, try crusty bread with the pan juices. The caramelized flavors pair especially well with tangy elements like lemon wedges or pickled onions.