
Beverages
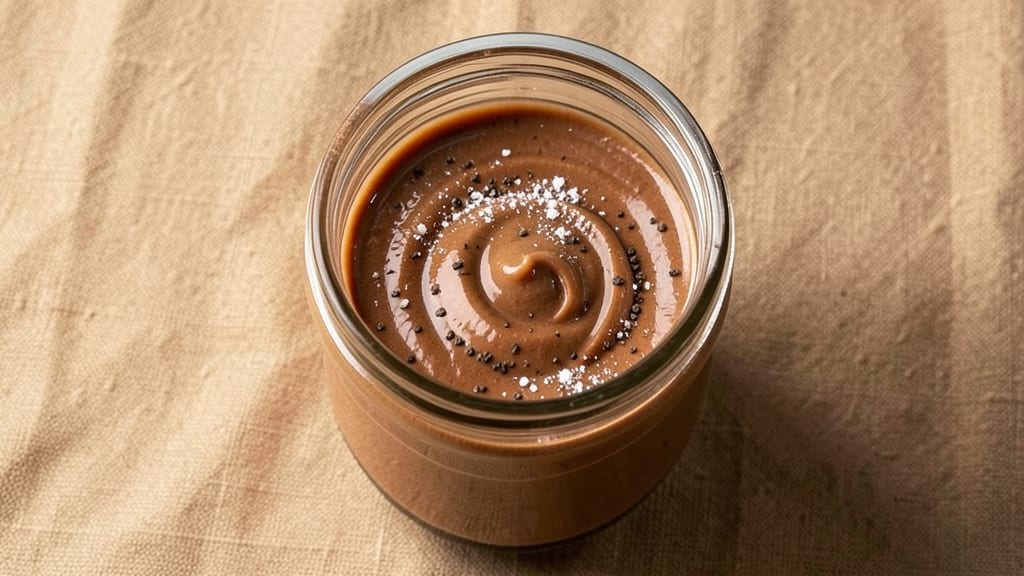
Transforming your morning coffee into a rich, velvety mocha experience doesn't require store-bought creamer—this homemade vanilla-cocoa blend delivers restaurant-quality depth with just five simple ingredients.
Standing on a step stool in my grandmother's kitchen in Sicily, I learned how to balance flavors, and this recipe carries that same precision into your cup. The secret lies in the ratio of cocoa powder to coffee, which creates that perfect bittersweet harmony that commercial versions often miss.
This mocha creamer recipe is designed for versatility—use it as a liquid by whisking powdered mix into warm milk, or store the dry blend for weeks to add to hot coffee whenever you crave that indulgent mocha flavor.
The process is straightforward: dissolve instant coffee and cocoa in warm milk, then blend with vanilla and sweetener until smooth. For a powdered version, simply dry the mixture and store in an airtight container.
What you'll achieve is a creamer that's richer than store-bought, with layers of chocolatey depth and aromatic coffee notes that elevate every sip. The vanilla adds warmth, while the cocoa provides that signature mocha intensity.
Whether you're making lattes, iced coffees, or even desserts, this blend transforms ordinary drinks into something truly special.
Ready in just 10 minutes, this homemade mocha creamer is perfect for coffee lovers who appreciate quality over convenience. Let's get started on creating your signature blend that'll make your coffee routine feel like a daily treat.
Ingredients for mocha creamer
Five simple ingredients transform your coffee into velvety mocha perfection—no store-bought shortcuts needed.
| Ingredient | Amount | Notes |
|---|---|---|
| Unsweetened Cocoa Powder 🍫 | ½ cup | High-quality Dutch-processed preferred |
| Instant Coffee Granules ☕ | ¼ cup | Finely ground preferred |
| Pure Vanilla Extract 🌸 | 1 tbsp | Bottled vanilla preferred |
| Powdered Sugar 🍬 | ½ cup | Confectioners' sugar preferred |
| Whole Milk 🥛 | ½ cup | Warm, not hot |
| Pinch of Salt 🧂 | ⅛ tsp | Enhances flavor balance |
The cocoa is where the magic happens. Dutch-processed cocoa gives that smooth, rich flavor without bitterness—Ghirardelli or Hershey's Special Dark are solid choices. Instant coffee matters too; Starbucks VIA or Nescafé work great, but avoid anything with fillers. The vanilla? Bottled is better than imitation—trust me, you'll taste the difference. Milk should be warm enough to dissolve everything but not so hot it kills the coffee flavor. And that pinch of salt? It rounds out the sweetness—don't skip it.
No Dutch-processed cocoa? Natural cocoa powder works too, but you might want to add a splash of vinegar to mimic the smoothness. Short on vanilla? Vanilla bean paste gives better flavor than imitation. No powdered sugar? Granulated sugar blended into a powder works in a pinch. The milk can be any kind—whole, 2%, even almond milk—but whole gives the creamiest texture. For a powdered version, just skip the milk and mix everything dry—it keeps for months in an airtight container.
This creamer stays fresh in the fridge for up to 2 weeks if you use the liquid version. For the powdered mix, it lasts 6-12 months in a sealed jar. I always make a double batch—one for the fridge, one to keep dry for emergencies. Freeze portions if you won't use them within a week. And if you're feeling fancy, add a splash of heavy cream to the liquid version for extra richness.
Why You'll Love This Recipe
- Here’s what sold me: the deep, bittersweet balance of cocoa and coffee hits hard, but the powdered sugar keeps it smooth—not cloying, just perfectly sweet. It’s the kind of flavor that makes me pause mid-sip, even when I’m rushing.
- Five-Minute Mix: I swear by this—just whisk cocoa, coffee, and vanilla into warm milk, then dust with powdered sugar. No measuring cups, no waiting, no fuss. That’s all it takes to turn plain coffee into something that tastes like a café treat.
- Rich Without Guilt: Here’s what sold me: the deep, bittersweet balance of cocoa and coffee hits hard, but the powdered sugar keeps it smooth—not cloying, just perfectly sweet. It’s the kind of flavor that makes me pause mid-sip, even when I’m rushing.
- Morning & Midnight Fix: Between us, this creamer is my go-to for everything—drizzled over oatmeal, stirred into cold brew, or even mixed into yogurt for a dessert-like breakfast. Honestly, I’ve used it so much, I’ve lost count of the ways.
Step-by-step instructions for homemade mocha creamer
Here's how to whip up this rich, velvety mocha creamer that'll transform your coffee into a decadent treat.
Whisk Dry Ingredients Until Smooth
In a medium bowl, combine the 0.5 cup unsweetened cocoa powder and 0.25 cup instant coffee granules. Use a whisk to break up any clumps and create a fine, even mixture. This ensures your creamer dissolves perfectly in coffee without any gritty texture. I like to press the back of the whisk against the bottom of the bowl to really work through any stubborn lumps.
Next, add the 0.5 cup powdered sugar and the 0.125 tsp pinch of salt. Whisk everything together again until completely homogeneous. The powdered sugar should blend seamlessly with the cocoa and coffee, creating a uniform base. This step is crucial for achieving that silky smooth texture you get from store-bought creamers.
Add Vanilla and Warm Milk
Pour in the 1 tbsp pure vanilla extract and stir it in thoroughly. The vanilla will infuse into the dry mixture, adding depth of flavor that's essential for that authentic mocha taste. Then, gradually add the 0.5 cup warm whole milk (not hot—just slightly above room temperature) while continuing to whisk.
I've found that warm milk blends better than cold, preventing any lumps from forming. You want the consistency to be like a thick, smooth paste at this stage—it'll thin out as you stir. If it looks too thick, add just a splash more milk until it reaches a spreadable consistency. This is your ideal working texture before it transforms into a creamy liquid.
Blend Until Silky Smooth
Transfer the mixture to a blender and blend on high speed for 30-45 seconds until completely smooth. You should hear the motor working hard to break down any remaining particles. The result should be a thick, velvety liquid with no visible specks of cocoa or coffee. If it's still too thick after blending, add 1-2 teaspoons of milk at a time until it reaches a pourable consistency.
Here's the thing—this is where the magic happens. The blending process emulsifies the fats in the milk with the cocoa and coffee, creating that luxurious mouthfeel you crave in your coffee. Taste a small amount to check the flavor balance. It should be rich and chocolatey with a subtle coffee note, not overpowering. Adjust with more powdered sugar if needed, but usually this blend is perfectly balanced.
Store and Use Your Creamer
Pour the finished mocha creamer into a clean, airtight jar or bottle. I prefer glass containers because they keep flavors fresh longer. Store it in the refrigerator for up to 2 weeks. The flavors will actually develop and deepen over time, becoming more complex as they sit.
To use, simply shake the jar well before each use (the creamer will settle and thicken when refrigerated). Add 1-2 tablespoons to your hot coffee and stir until fully dissolved. For an extra decadent treat, you can even heat it gently before adding to coffee—this enhances the chocolate and coffee aromas. Each sip should deliver that perfect balance of chocolatey richness and coffee depth that makes this homemade version worth every minute.
Pro Tips For Making Mocha Creamer
- Whisk Like You Mean It: Don’t just stir—whisk the cocoa powder and powdered sugar into the warm milk until you see no dry spots. I learned this the hard way: lumps in mocha creamer ruin the smoothness, and no amount of shaking later will fix it.
- Sift the Cocoa: Unsweetened cocoa powder is clumpy—sift it directly into your measuring cup before adding it to the milk. This cuts down on clumps and ensures every sip is velvety, not gritty.
- Measure Coffee Precisely: Use a scale for instant coffee granules (1 tablespoon = ~7 grams). Eyeballing it leads to either weak or bitter creamer—consistency matters, especially if you’re making this for a crowd.
- Warm the Milk First: Heat the milk to just below a simmer (160°F/71°C) before mixing in the dry ingredients. Cold milk means uneven dissolving and a weaker coffee flavor—warm milk incorporates everything smoothly.
Creative variations of this mocha creamer
Spiced Mocha Twist
Add ½ teaspoon cinnamon and ¼ teaspoon ground nutmeg to the dry ingredients for warmth that mimics Italian-American coffeehouse styles. I learned this trick from my Nonna, who always sprinkled a pinch of cinnamon into her espresso.
The spices blend beautifully with the cocoa and coffee, adding complexity that makes your creamer taste like it came from a specialty café. For extra depth, toast the spices in a dry pan for 30 seconds before adding them to the mixture. 🌶️
Espresso-Infused Version
Skip the instant coffee granules and use 1 tablespoon finely ground espresso powder instead. This creates a more intense coffee flavor that's perfect for those who love their mocha strong. I use Lavazza Qualità Rossa espresso powder for its rich, robust taste.
For an even deeper flavor, dissolve 1 shot of hot espresso in the warm milk before blending. This version works especially well in lattes and cappuccinos. ☕
Sweetened Condensed Milk Swap
Replace the milk and powdered sugar with ½ cup sweetened condensed milk for a caramelized, ultra-rich creamer. The condensed milk adds natural sweetness and thickness that eliminates the need for blending. This version is perfect for iced coffee drinks or when you want that classic mocha shop experience at home.
I've found that Goya sweetened condensed milk gives the best results. Just whisk it directly with the cocoa and vanilla until smooth. 🥛
Powdered Mocha Mix
For a shelf-stable version, simply omit the milk and blend all dry ingredients together until completely homogeneous. Store in an airtight container for up to 12 months. To use, mix 2 tablespoons of the powder with ¼ cup warm milk until dissolved.
This is my go-to for travel or when I need a quick mocha boost without refrigeration. The powdered version keeps beautifully in the pantry, ready whenever coffee cravings strike. ✨
Dairy-Free Adaptation
Swap the whole milk for ½ cup unsweetened almond milk or oat milk to create a creamy, dairy-free version. For best results, use a full-fat dairy alternative like Silk Extra Creamy Almond Milk.
The blending process is the same, but you may need to add 1 extra tablespoon of milk to achieve the right consistency. This version works perfectly in plant-based lattes and iced coffees. 🌱
Mocha Creamer Dessert Topping
Use this creamer to elevate desserts like pancakes, ice cream, or cheesecake. Drizzle 1-2 tablespoons over warm desserts or mix 1 tablespoon** into whipped cream for a mocha mousse. I love adding it to vanilla ice cream with a sprinkle of sea salt for a sophisticated dessert.
For extra richness, warm the creamer slightly before using. This dual-purpose blend makes it perfect for both coffee and dessert lovers. 🍰
Nutrition facts
Frequently asked questions
Can I make this mocha creamer without a blender?
Yes! If you don't have a blender, whisk the dry ingredients with warm milk until completely smooth, then strain through a fine-mesh sieve for ultra-silky texture. For extra richness, heat the mixture gently in a saucepan (don't boil) while stirring constantly until fully dissolved. The result will be slightly thicker but still delicious in your coffee.
How do I adjust the sweetness level?
Start with the given 0.5 cup powdered sugar, then taste before blending. For less sweetness, reduce by 2 tablespoons at a time. For more richness, add 1 tablespoon granulated sugar per batch—it dissolves better when blended with warm milk. Remember, cocoa and coffee already add depth, so go slow with extra sweetener.
Will this creamer work in iced coffee?
For cold drinks, use the liquid version chilled or make the powdered mix. Shake well before adding to iced coffee—start with 1 tablespoon per 8 oz of liquid. For extra creaminess, blend with 2 oz cold milk before pouring. The powdered version works best for travel mugs since it won't separate.
Why did my creamer separate?
Separation usually happens when milk was too hot (coagulated proteins) or blending wasn't thorough. Always use warm (not hot) milk and blend until completely smooth. For prevention, whisk vigorously before blending or add 1 teaspoon cornstarch to the dry ingredients. Store in the fridge and shake well before each use—this keeps the fats suspended.
Can I make this with decaf coffee?
Yes! Just replace the instant coffee with 0.25 cup decaf instant granules. The flavor will be slightly milder, but the chocolate and vanilla will still shine. For extra depth, add ½ teaspoon instant espresso powder to maintain some coffee intensity. This works perfectly for evening coffee rituals without caffeine.