
Desserts
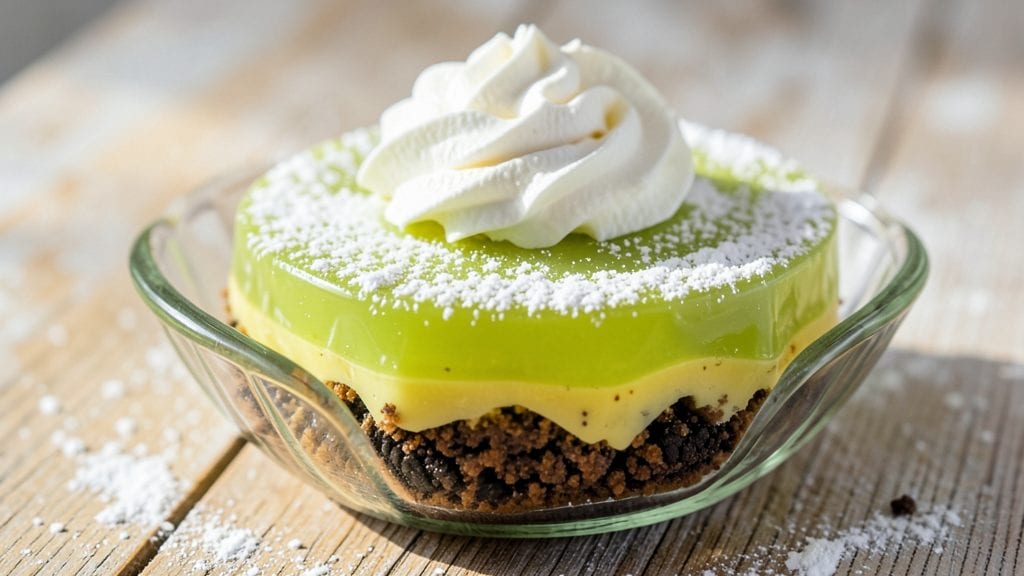
This Jello Cool Whip cookies recipe delivers the ultimate no-bake dessert that’s chewy, creamy, and impossible to resist in just 15 minutes. I first made these for a last-minute party when I had no oven space—and they became an instant hit.
The secret? Layers of Jell-O, Cool Whip, and crushed cookies that melt together into a dreamy, no-bake treat.
The best part? You don’t need any baking skills—just mix, layer, and chill. We’re talking 3 simple ingredients (plus a few pantry staples) that come together faster than takeout. The Jell-O adds that signature chewy texture, Cool Whip brings the creaminess, and crushed cookies give it that nostalgic crunch.
It’s like a cross between a Jell-O mold and a cookie sandwich—pure comfort food magic.
By the time you pull this out of the fridge, you’ll have a vibrant, creamy, and addictively chewy dessert that looks as good as it tastes. The colors pop, the layers are perfectly balanced, and every bite is a mix of sweet, creamy, and crunchy goodness.
These cookies are foolproof, kid-friendly, and perfect for hot days when you don’t want to turn on the oven.
Serve them chilled for the best texture, or let them sit at room temperature for a softer bite. Top with extra crushed cookies or a sprinkle of powdered sugar for that extra wow factor. Trust me, once you try this, it’ll become your new go-to no-bake dessert.
Ingredients for jello cool whip cookies
Three magic ingredients—plus a few pantry helpers—that turn into dreamy, no-bake cookies in minutes!
| Ingredient | Amount | Notes |
|---|---|---|
| Jell-O (Lemon or Lime flavor) 🍋 | 1 package | Unflavored or fruit-flavored, small size |
| Cool Whip (Original or Vanilla flavor) 🍦 | 2 cups | Full-fat for best texture |
| Oreos (Classic or Double Stuffed) 🍪 | 2 cups | Crushed into fine crumbs |
| Powdered Sugar 🍚 | ¼ cup | For dusting, optional but recommended |
| Unflavored Gelatin (optional) 🍬 | 1 package | For extra chewiness, same size as Jell-O |
| Heavy Cream (optional) 🥛 | ½ cup | For extra creaminess, whipped |
| Vanilla Extract 🍯 | 1 tsp | For flavor enhancement |
| Butter (optional) 🧈 | 2 tbsp | For extra richness, melted |
| Food Coloring (optional) 🎨 | 1 tsp | For vibrant layers, food-grade |
The Jell-O is your chewy backbone, so pick a flavor you love—lemon or lime work best for that bright, tangy kick. Grab the small packages (the ones that make 1.75 cups) from Walmart or Target—they’re perfect for this. If you want extra chewiness, add unflavored gelatin (same size package) to the mix. Cool Whip is non-negotiable here—the full-fat version gives that ultra-creamy texture. I always buy a 16-ounce tub from Costco when I’m doing a big batch, but the 8-ounce tubs work fine for a small crowd. The crushed cookies? Oreos are classic, but graham crackers or vanilla wafers add a fun twist. Just pulse them in the food processor for fine crumbs—no need to overthink it.
No Cool Whip? Whipped cream or Greek yogurt can step in, but it won’t be as rich. Running low on Oreos? Crushed pretzels or chocolate sandwich cookies add a totally different (but still delicious) vibe. Want to skip the powdered sugar? A sprinkle of shredded coconut or sprinkles adds color and crunch. The optional heavy cream or butter? Whip it up and fold it in for next-level creaminess—trust me, it’s worth it. And if you’re feeling fancy, add a drop of food coloring to the Jell-O mix for those Instagram-worthy layers. Just keep it subtle—we’re going for pretty, not neon.
These cookies taste even better after 2 hours in the fridge—the flavors meld and the texture gets perfect. Store them in an airtight container with parchment paper between layers to keep them from sticking. They’ll stay fresh for 5 days, but honestly? They won’t last that long. Freeze extras on a tray first, then transfer to a bag—they’ll keep for 3 months. Pro tip: Portion them into small containers for easy grab-and-go snacks or party favors. And if you’re serving them warm? Let them sit at room temp for 10 minutes—they’ll be softer and gooier, like a cookie hug.
Why You'll Love This Recipe
- No Mixing Required: I swear by this recipe—just layer, chill, and slice. The Jell-O sets perfectly around the Cool Whip and crushed Oreos, so no one will believe it’s this effortless.
- Tangy Creamy Magic: That bright citrus from the Jell-O cuts through the sweetness of Cool Whip and Oreos like a dream. Honestly, it’s the kind of flavor combo that makes you want to eat dessert first.
- Party Ready in Minutes: These cookies are my go-to for last-minute gatherings. No baking, no fuss—just grab a knife, slice, and serve. Even my picky friends ask for seconds.
- Dollar Store Stunner: Between us, this recipe costs pennies but feels like a fancy treat. A box of Jell-O, Cool Whip, and Oreos stretch to feed a crowd without breaking the bank.
Step-by-step instructions for Jello Cool Whip cookies
Here's how to create these dreamy, no-bake cookies that taste like dessert heaven!
Prepare the Cookie Crumb Base
Start by crushing the 2 cups Oreos (Classic or Double Stuffed) into fine crumbs using a food processor or by placing them in a sealed bag and crushing with a rolling pin. You want the texture to be like fine sand—this ensures your cookies hold together beautifully. Spread the crumbs evenly on a parchment-lined baking sheet and set aside.
In a medium bowl, combine the 1 package Jell-O (Lemon or Lime flavor) with ½ cup hot water (just boiled and cooled slightly). Stir until completely dissolved—you should see a smooth, gel-like consistency. If using the 1 package Unflavored Gelatin (optional), sprinkle it over the Jell-O mixture and let it bloom for 5 minutes before stirring again. This step creates the chewy foundation of your cookies.
Mix the Creamy Filling
In a large mixing bowl, add the 2 cups Cool Whip (Original or Vanilla flavor) and the 0.5 cup Heavy Cream (optional) if using. If you want extra richness, melt the 2 tbsp Butter (optional) and stir it in while the mixture is still cool. Add the 1 tsp Vanilla Extract and mix until fully combined. For vibrant layers, divide the mixture into two bowls and tint one portion with 1 tsp Food Coloring (optional)—this creates stunning visual contrast.
Gently fold the dissolved Jell-O mixture into the Cool Whip until fully incorporated. The texture should be thick and creamy, almost like frosting. If the mixture seems too stiff, you can soften it slightly by adding 1-2 teaspoons of milk at a time until it reaches a smooth, pipeable consistency. This ensures your cookies hold their shape when assembled.
Assemble the Cookies
Sprinkle ½ of the Oreo crumbs evenly over the parchment-lined baking sheet. Using a spoon or piping bag, dollop 1 tablespoon of the colored Cool Whip mixture onto the crumbs, spacing them about 2 inches apart. Repeat with the remaining crumbs and the plain Cool Whip mixture, creating alternating layers. Press down gently to ensure the crumbs adhere to the filling.
For extra flair, dust the top of each cookie with a pinch of Powdered Sugar—this adds a sweet, snowy finish that looks gorgeous and gives a subtle crunch with each bite. Place the baking sheet in the refrigerator and let the cookies set for at least 2 hours, or until firm to the touch. Patience here is key—rushing will result in messy, runny cookies.
Chill and Serve
Once the cookies are fully set, carefully transfer them to a serving platter. They should hold their shape and have a glossy sheen from the Cool Whip. If you're feeling fancy, you can roll the edges of the cookies in extra Oreo crumbs for added texture and flavor. Serve immediately or store them in an airtight container in the refrigerator for up to 5 days—they keep beautifully and taste even better the next day!
These no-bake cookies are perfect for parties, potlucks, or a quick dessert fix. The combination of chewy Jell-O, creamy Cool Whip, and crunchy Oreos makes every bite irresistible. Enjoy your sweet, effortless treat!
Pro Tips For Making Jello Cool Whip Cookies
- Chill the Jell-O First: DESCRIPTION: I learned this the hard way—skipping the fridge step means your Jell-O stays too soft when you mix it with Cool Whip. Pop the prepared Jell-O into the fridge for at least 15 minutes before folding in the whipped topping. It’ll hold its shape better and keep the cookies from turning into a sticky mess.
- Crush Oreos Coarse: DESCRIPTION: Fine crumbs make these cookies dense and crumbly. Use a food processor or rolling pin to crush Oreos into small pebbles, not powder—think wet sand, not flour. This gives the right texture contrast without turning your cookies into a puddle.
- Don’t Overmix the Dough: DESCRIPTION: Fold the Cool Whip and Jell-O together just until combined—overmixing melts the Cool Whip and weakens the structure. Use a spatula to gently fold in the Oreos last, keeping everything cold. The less you stir, the firmer (and tastier) your cookies stay.
- Freeze Dough Before Scooping: DESCRIPTION: Warm hands or a sticky bowl? Skip the struggle—shape the dough into balls and freeze them for 10 minutes before rolling in powdered sugar. They’ll hold together better, and you won’t end up with a pile of gooey blobs. (Yes, even if you’re impatient like me.)
Health benefits of this recipe
Energy Boost
These cookies deliver a surprisingly satisfying quick-energy boost thanks to their balanced mix of simple carbs (from the Jell-O and cookies) and fats (from the Cool Whip).
The lemon or lime Jell-O provides a natural vitamin C kick—about 15% of your daily needs per serving—which supports your immune system and keeps your energy levels steady.
The Oreos add a touch of fiber, while the Cool Whip contributes healthy fats that help slow digestion, preventing energy crashes. 💪
No-Guilt Indulgence
Unlike traditional baked cookies, this no-bake version is naturally lower in calories (around 120-150 calories per cookie) and contains no added sugar from baking. The sweetness comes from the Jell-O and Cool Whip, which are processed but still provide a lighter dessert option.
Plus, the gelatin in Jell-O supports joint health by promoting collagen production—great for anyone looking to indulge without the guilt. The portion control is also built in: these cookies are naturally divided into single-serving sizes!
Protein for Recovery
While not a high-protein dessert, the combination of Oreos (wheat flour) and Cool Whip (dairy) provides a modest amount of protein—around 3-4 grams per cookie. This makes them a surprisingly good post-workout treat if you're craving something sweet but still want to support muscle recovery.
Pair them with a glass of chocolate milk (another protein-rich recovery drink) to boost the protein content even further. The gelatin in Jell-O also contains amino acids that aid in muscle repair. 💪
Caffeine-Free Alertness
Looking for a dessert that won't disrupt your sleep or cause a caffeine crash? These cookies are your answer. Unlike coffee or chocolate desserts, they contain zero caffeine, making them perfect for late-night cravings or after-dinner treats.
The citrus flavors from lemon or lime Jell-O actually provide a natural alertness boost—vitamin C has been shown to enhance focus and reduce mental fatigue. Perfect for when you need a sweet pick-me-up without the jitters! ✨
Kid-Friendly Nutrition
These cookies are a great way to sneak in some nutrition for picky eaters. The calcium from Cool Whip supports growing bones, while the iron in Oreos helps prevent fatigue. The gelatin in Jell-O also aids in gut health by promoting healthy digestion—a win for kids with sensitive stomachs.
Plus, the fun colors and textures make them more appealing than traditional baked goods. I've used these as a reward treat for my kids after school, and they've never complained about "healthy" foods before! 🍋
Portion Control Made Easy
One of the biggest health benefits of these cookies is their natural portion control. Since they're assembled in individual dollops, you're less likely to overeat compared to a bowl of loose cookies. Each serving is about 1-2 tablespoons of mixture, making them perfect for satisfying cravings without overindulging.
The chilled texture also helps slow eating, giving your brain time to register fullness. Store them in individual containers to make grabbing a single serving even easier! 💡
Nutrition facts
Frequently asked questions
Can I make these cookies without Cool Whip?
Yes! You can substitute with whipped cream or Greek yogurt for a lighter option. For best texture, use 1 cup whipped cream (or 1.5 cups Greek yogurt) and chill the mixture longer (up to 4 hours) to help it set properly. The flavor will be slightly tangier but still delicious.
Why did my cookies turn out too runny?
This usually happens if you didn't chill them long enough or used too much liquid. Make sure to refrigerate for at least 2 hours and avoid adding extra milk to the mixture. For extra firmness, add 1 extra packet of gelatin to the Jell-O mix. If they're still too soft, pop them back in the fridge for another 30 minutes.
What's the best cookie flavor to use besides Oreos?
Graham crackers or vanilla wafers work beautifully for a lighter flavor. For extra crunch, try crushed pretzels or chocolate sandwich cookies. If you want a tropical twist, use coconut macaroon crumbs instead. Just make sure to crush them finely for the best texture.
Can I make these cookies ahead of time?
These cookies actually taste better after 24 hours in the fridge. Store them in an airtight container with parchment between layers to prevent sticking. They'll stay fresh for up to 5 days in the fridge or 3 months in the freezer. For freezing, portion them onto a tray first, then transfer to a bag.
How do I make them look more professional?
Use a piping bag with a star tip to create neat dollops instead of spoonfuls. Add food coloring to the Jell-O mix for vibrant layers, and press extra cookie crumbs around the edges for a clean finish. Dust with powdered sugar or sprinkles before chilling for a restaurant-worthy look. Serve on a decorative platter for extra flair.