
Desserts
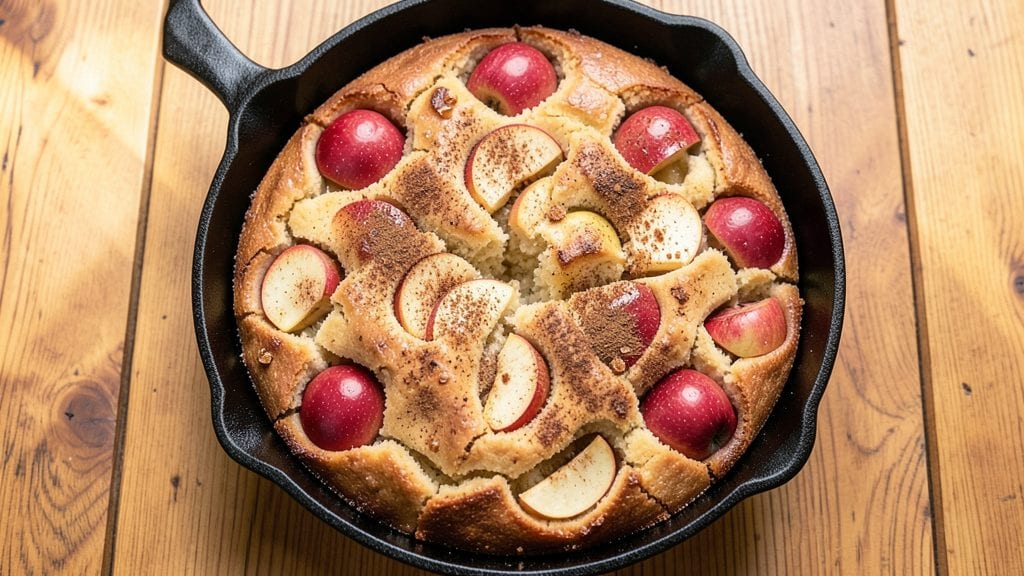
My grandma’s old-fashioned Dutch apple cake recipe was the one she’d reach for each autumn, its warm spice swirls and buttery layers creating a dessert that tastes like nostalgia.
The secret lies in the layered pastry and spiced apple filling that bakes into golden perfection, with cinnamon and nutmeg infusing every bite. I've baked this exact recipe for decades—it's the one that always gets requested at family gatherings.
The cake's magic comes from its simple yet precise technique: tender layers of flaky pastry wrapped around a fragrant apple filling that caramelizes beautifully in the oven. No fancy equipment is needed, just a few basic ingredients and about an hour of baking time.
The result is a dessert that balances sweetness with warm, comforting spices, making it perfect for holidays or cozy weeknight treats.
What makes this recipe special is how it captures that homemade, old-fashioned charm while still being approachable for modern kitchens. The apples soften just enough to release their juices, creating a moist filling that soaks into the buttery pastry.
Each slice reveals those signature spice swirls and a perfect balance of textures—flaky, tender, and slightly caramelized.
Serve it warm with a scoop of vanilla ice cream or a dusting of powdered sugar for that classic touch. This is the kind of dessert that brings people together, and once you try it, you'll understand why it's been a family tradition for generations. Let's get baking!
Ingredients for grandma's old fashioned dutch apple cake
Twelve simple ingredients for a cake that tastes like autumn memories.
| Ingredient | Amount | Notes |
|---|---|---|
| All-Purpose Flour 🌾 | 3 cups | Sifted for light texture |
| Unsalted Butter 🧈 | 1 cup | Cold, cubed for pastry |
| Granulated Sugar 🍚 | 1 ½ cups | White sugar preferred |
| Brown Sugar 🍚 | ½ cup | Packed firmly |
| Large Eggs 🥚 | 2 whole | Room temperature |
| Ground Cinnamon 🌶️ | 2 tbsp | Freshly ground preferred |
| Ground Nutmeg 🌿 | 1 tsp | Freshly grated nutmeg |
| Salt 🧂 | ½ tsp | Fine sea salt |
| Red Apples 🍎 | 4 medium | Peeled, cored, sliced |
| Lemon Juice 🍋 | 2 tbsp | Freshly squeezed |
| Vanilla Extract 🥄 | 1 tsp | Pure vanilla preferred |
| Powdered Sugar 🍚 | ½ cup | For dusting |
The apples are the heart of this cake—Granny Smith or Honeycrisp work best for their balance of tartness and sweetness. Local farmers markets often have the freshest varieties, but any firm, crisp apple will do. Peel and slice them just before baking to prevent browning. For a more rustic touch, leave the skins on—just be sure to remove any bruised spots. Costco or Whole Foods usually carry prepped apples in the fall, but slicing them yourself ensures the best texture. The cinnamon and nutmeg should be freshly ground for maximum flavor, though pre-ground works in a pinch.
No vanilla extract? Vanilla bean paste or even a scraped vanilla bean will give that authentic flavor. Short on apples? Substitute pears for a slightly different but equally delicious twist. The butter should be cold and cubed when mixed into the flour—this creates those signature flaky layers. If you're in a hurry, let the butter sit at room temperature for 10 minutes first. For a gluten-free version, substitute almond flour at a 1:1 ratio, though the texture will differ slightly. The powdered sugar is optional but adds that classic finishing touch—dust it over warm slices for an instant dessert feel.
This cake keeps well for 3-4 days in an airtight container at room temperature, though it's best enjoyed fresh. For longer storage, wrap tightly and refrigerate for up to 1 week. The filling can be prepped ahead and refrigerated for 24 hours before baking. Freeze the baked cake for up to 3 months—thaw at room temperature before serving. Slice and serve warm with vanilla ice cream for that nostalgic treat your grandma would approve of.
Why You'll Love This Recipe
- No Mixer Needed: I swear by this recipe because it’s all about the creaming—just butter, sugar, and eggs beaten until light and fluffy by hand. No fancy equipment, no stress, just elbow grease that pays off in that tender crumb.
- Spice & Sweet Magic: That combo of brown sugar’s deep caramel notes and granulated sugar’s crisp bite? Chef’s kiss. Plus, the apples (tart or sweet, your call) soak up the syrup while the cinnamon and nutmeg work their warmth—like a hug in cake form.
- Weeknight to Holiday: Bake it for breakfast with a scoop of ice cream, pack slices for lunch, or serve it warm at Thanksgiving. The butter-rich layers stay fresh for days, and honestly? It’s the kind of cake that makes even simple gatherings feel special.
- Budget-Friendly Staples: Flour, butter, sugar—these are pantry basics that won’t break the bank. I’ve made this for 12 people for under $10, and the leftovers? They disappear faster than I can reheat them. (Yes, even on a Tuesday night.)
Step-by-step instructions for Grandma's old-fashioned Dutch apple cake
Here's how to create layers of tender crumb and spiced apple filling that will transport you straight to Grandma's kitchen.
Prepare the Apple Filling
Peel, core, and slice the 4 medium red apples into ¼-inch thick rounds. Toss them immediately with 2 tablespoons lemon juice to prevent browning. This step is crucial—acidic lemon juice preserves the apples' bright color and tender texture while you work.
In a medium bowl, combine the treated apple slices with 0.5 cup brown sugar, 2 tablespoons ground cinnamon, 1 teaspoon ground nutmeg, and 0.5 teaspoon salt. Gently toss until every apple slice is evenly coated. Let this mixture sit for 10 minutes while you prepare the crust—this allows the spices to infuse and the sugar to begin drawing out moisture from the apples, creating a syrupy filling.
Create the Crust Mixture
In a large mixing bowl, combine 3 cups all-purpose flour, 1.5 cups granulated sugar, 2 tablespoons ground cinnamon, 1 teaspoon ground nutmeg, and 0.5 teaspoon salt. Whisk until evenly distributed—you'll see no more flour streaks, just a uniform golden mixture. This dry blend forms the foundation of our cake's signature texture.
Cut in the 1 cup cold unsalted butter using a pastry cutter or your fingers until the mixture resembles coarse crumbs with pea-sized butter pieces. The butter should be cold enough to hold its shape but soft enough to break down—this ensures flaky layers when baked. If the mixture feels too dry, add 1 tablespoon ice water to help bind it.
Assemble the Cake Layers
Preheat your oven to 350°F and grease a 9-inch round cake pan with butter, then dust with flour. Press two-thirds of the crust mixture firmly into the bottom of the pan, creating an even layer. The crust should be about ½-inch thick—press gently but evenly to avoid gaps.
Spread the prepared apple filling evenly over the crust layer. Then sprinkle the remaining one-third of the crust mixture over the apples. Use your fingers to gently press this top layer into the filling, creating a lattice effect where some crust peeks through. This layering creates the signature swirl pattern of Dutch apple cake while ensuring every bite has both crumb and fruit.
Bake to Golden Perfection
Bake the cake for 45-50 minutes until the top is golden brown and a toothpick inserted in the center comes out clean. The edges should pull away slightly from the pan, indicating proper baking. If the top browns too quickly, loosely tent with foil after 30 minutes to prevent over-browning while allowing the center to cook through.
Remove from the oven and let the cake cool in the pan for 15 minutes. Then transfer to a wire rack to cool completely. This resting period allows the layers to set properly and prevents the cake from falling apart when you slice it. The contrast between the warm, spiced apples and the buttery crust will be irresistible.
Finish with Vanilla Glaze
While the cake cools, prepare the glaze by whisking together 0.5 cup powdered sugar and 1 teaspoon vanilla extract with 1-2 tablespoons milk (or reserved apple juice) until smooth. The glaze should be thick enough to coat the back of a spoon but still drizzle easily—add liquid gradually to achieve this consistency.
Once the cake is completely cool, drizzle the vanilla glaze evenly over the top. Let it set for 10 minutes before slicing. This final step adds a delicate sweetness that complements the warm spices and tender apples. Serve warm with vanilla ice cream or whipped cream for the ultimate Grandma-approved experience.
Pro Tips For Making Grandma'S Old Fashioned Dutch Apple Cake
- Cream Butter Slowly: The Dutch apple cake’s texture hinges on how you handle the butter—don’t rush it. Beat the butter and sugars together until it’s light and fluffy (about 3-4 minutes), not just pale. I used to cut corners here, and the cake turned out dense. This step is where the magic starts.
- Use Cold Apples: If your recipe calls for fresh apples, slice them just before folding into the batter—and keep them chilled. Warm apples release moisture too fast, making the cake soggy. Toss the slices in a little flour first to absorb any excess juice. (Yes, even if the recipe doesn’t say so—trust me.)
- Don’t Overmix the Batter: Once you add the flour, stop mixing the moment it’s just combined. Overworking it develops gluten, and your cake will turn out tough instead of tender. Give it 10-12 strokes max—this isn’t pancake batter. I learned this after a batch that tasted more like a brick.
- Bake Until Golden: The cake’s done when the edges pull away from the pan and a toothpick comes out clean and the top is a deep golden brown. Skimp on time, and it’ll taste underdone; overbake, and it’ll dry out. If you’re unsure, check at 45 minutes—this recipe is forgiving, but not that forgiving.
Pro cooking tips for perfect results
Butter Temperature Matters
The secret to that perfect flaky texture lies in using cold, cubed butter when mixing with flour. I always cut my 1 cup unsalted butter into ½-inch cubes and keep it refrigerated until ready to use.
This ensures the butter stays firm enough to create those signature layers while still breaking down into pea-sized pieces. If your butter feels too soft, pop it in the freezer for 10 minutes before cutting—this makes all the difference in achieving that tender, crumbly crust. 🧈
Spice Infusion Trick
Don't just sprinkle the spices on top of your apples—toss them together thoroughly to ensure every slice gets that warm, aromatic coating. I like to let the spiced apples sit for 10 minutes before assembling the cake.
This gives the cinnamon and nutmeg time to release their oils and infuse the apples, creating a more flavorful filling. For extra depth, I sometimes add ¼ teaspoon ground allspice to the spice mix—it adds a subtle complexity that pairs beautifully with the apples. 🌶️
Even Layering Technique
When pressing the crust mixture into your pan, aim for even pressure—this prevents thick spots that might burn while thinner areas stay undercooked. I use the bottom of a measuring cup to press the crust firmly into the pan, working from the center outward.
For the top layer, don't just dump the remaining crumbs—gently press them into the apples to create that classic swirl pattern. This ensures every bite has both the buttery crust and spiced apple filling. 🍎
Baking Time Precision
Your oven's hot spots can make or break this cake, so rotate the pan halfway through baking. I check for doneness at 45 minutes—the edges should pull away slightly from the pan, and a toothpick should come out clean (or with just a few moist crumbs).
If the top browns too quickly, tent with foil after 30 minutes to prevent over-browning while keeping the center tender. The cake will continue cooking slightly after removal, so don't rush it! 🌡️
Glaze Consistency Tip
The vanilla glaze should be thick but pourable—like heavy syrup. I start with ½ cup powdered sugar and add milk or apple juice one tablespoon at a time until I reach that perfect consistency.
For a more professional look, strain the glaze through a fine-mesh sieve to remove any lumps. Let it sit for 10 minutes before drizzling—this gives it time to thicken slightly for cleaner presentation. A light dusting of powdered sugar on top adds that final Grandma-approved touch. ✨
Resting Prevents Cracks
Never slice this cake immediately after baking! Let it cool completely in the pan for 15 minutes, then transfer to a wire rack. The resting period allows the layers to set properly, preventing cracks when you slice.
If you're in a hurry, I've found that cooling the cake on a rack for 30 minutes still yields great results—just be gentle when serving. The contrast between the warm, spiced filling and cool crust is what makes this dessert truly special. 💫
Nutrition facts
Frequently asked questions
Can I make this Dutch apple cake without apples?
The apples are essential for that signature spiced filling, but you can substitute 4 cups peeled, sliced pears for a similar texture. For a more dramatic flavor change, try 4 cups cooked and drained rhubarb, though it will have a tart contrast to the sweet crust. The key is using fruit that holds its shape while releasing juices during baking.
Why does my cake turn out dense instead of flaky?
Overmixing the crust or using warm butter are the most common culprits. Always keep your 1 cup butter cold and cubed, and mix just until the crumb forms—no more than 30 seconds with a pastry cutter. Another trick: press the crust firmly into the pan to create an even base, then chill the assembled cake in the fridge for 15 minutes before baking to help the layers set properly.
Can I prepare this cake ahead of time?
Assemble the cake (unbaked) and refrigerate for up to 24 hours before baking. For even better results, bake the cake a day ahead and store it in an airtight container at room temperature. The flavors deepen overnight, and it reheats beautifully in the oven at 300°F for 10 minutes before serving. This makes it perfect for holiday gatherings.
What's the best way to serve leftover slices?
Warm slices taste best! Pop them in the oven at 350°F for 5-7 minutes until heated through. For a make-ahead breakfast, toast slices with butter and cinnamon sugar—they make amazing French toast. You can also layer chilled slices with whipped cream and fresh berries for a deconstructed dessert. The cake keeps well for 4-5 days at room temperature.
How do I adjust the recipe for a smaller pan?
For an 8-inch pan, reduce all ingredients by about 25% (use 2 cups flour, ½ cup butter, etc.). For a 6-inch pan, reduce by 50% but keep the same proportions. The baking time will decrease—aim for 35-40 minutes for an 8-inch cake. Always check for doneness with a toothpick, as smaller cakes bake faster but can dry out more quickly.