Side Dishes
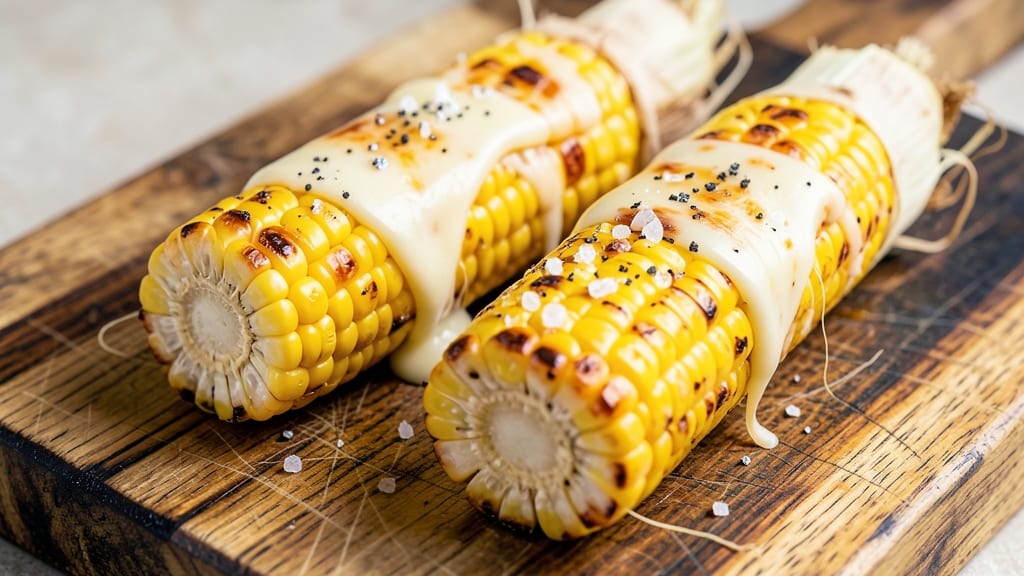
Grandma's baked corn recipe brings warmth to the table with its golden crust and tender kernels that taste like summer in every bite. The secret lies in the buttery, cheesy topping that melts into a crispy blanket while keeping the corn perfectly moist inside.
I first learned this technique from my grandmother, who always said great corn starts with fresh ears and patience in the oven.
This recipe delivers homestyle comfort with just five simple ingredients—no fancy techniques required. The magic happens when you steam the corn in its husks before baking, locking in flavor and texture.
A sprinkle of butter, cheese, and a pinch of salt creates that signature crust that everyone will ask for seconds of. It takes about 45 minutes, but the results are worth every minute of that slow baking process.
By the time it emerges from the oven, you'll have perfectly caramelized corn with a golden, buttery crust that shatters at the slightest touch. The kernels stay tender and sweet, while the cheese creates pockets of creamy goodness in every bite.
This is the kind of side dish that transforms a simple meal into something special—simple enough for weeknights but impressive enough for company.
Serve it alongside grilled meats, roasted vegetables, or even as a standalone dish with a dollop of sour cream. The possibilities are endless, but the technique remains the same: fresh corn, proper steaming, and that perfect buttery topping. Let's get baking!
Ingredients for grandma's baked corn
Five ingredients transform simple corn into golden, crispy perfection with tender kernels inside.
| Ingredient | Amount | Notes |
|---|---|---|
| Fresh Corn on the Cob 🌽 | 4 whole | Medium-sized, husks intact |
| Unsalted Butter 🧈 | ½ cup | Cold, cubed for even melting |
| Shredded Sharp Cheddar Cheese 🧀 | 1 ½ cups | Freshly shredded, not pre-shredded |
| Sea Salt 🧂 | 1 tsp | Fine grain preferred |
| Ground Black Pepper 🌶️ | ½ tsp | Freshly ground for best flavor |
The corn is non-negotiable—freshness makes all the difference. Look for ears with tight husks and plump, vibrant kernels at local farmers markets or the produce section. If you can't find fresh, frozen works in a pinch, but thaw completely first. Grandma always said the secret was in the husks—leave them on during baking to steam the corn gently, then peel back to reveal that golden crust. For extra flavor, some families add a pinch of sugar to the butter, but I find the natural sweetness of fresh corn shines on its own.
No sharp cheddar? Monterey Jack or pepper jack work beautifully, though the flavor profile changes slightly. Pre-shredded cheese has anti-caking agents that prevent proper melting, so grate your own from a block if possible. Short on butter? Olive oil or margarine can substitute, but butter's richness is key to that signature crust. The pepper is optional, but a light sprinkle adds depth. For a smoky twist, swap half the cheese for smoked Gouda—it pairs wonderfully with the sweet corn.
This dish reheats beautifully—just pop it back in the oven for 5-10 minutes at 375°F until the crust is crispy again. Store leftovers covered in the fridge for 3-4 days, though I've never had any last that long. The corn keeps best if you bake just enough for dinner—no need to make extra. For a crowd, double the recipe and use a larger baking dish. The crust stays crispy if you let it cool slightly before serving, so patience pays off.
Why You'll Love This Recipe
- Five-Ingredient Magic: I swear, this recipe lives up to the hype—just corn, butter, cheese, salt, and pepper. That’s it. No fancy prep, no stress, and no last-minute grocery runs. Honestly, I keep the ingredients stocked just for this.
- Melty Cheese Bliss: The sharp cheddar gets golden and gooey, clinging to every kernel like a hug. Between us, the first bite always makes me pause—I’ve never tasted corn quite this rich.
- Tailgate or Tuesday: Serve it at a picnic with a cold drink, or toss it on the dinner table when you’re too tired to cook. My college kids devour it straight from the oven, and my book club friends beg for the recipe. (Yes, even on a Tuesday night.)
- Budget Stretch: A single ear of corn costs pennies, and that butter and cheese stretch across multiple servings. I make a big batch, reheat leftovers in the air fryer, and still have cash left for actual vegetables. (Okay, maybe not.)
Step-by-step instructions for grandma's baked corn recipe
Here's how to create that perfect balance of buttery crust and tender sweet kernels.
Prep the Corn for Baking
Preheat your oven to 375°F to ensure even cooking. Remove the husks from the 4 whole fresh corn on the cob, leaving the silk intact. Cut off the kernels about ½ inch from the bottom of each ear to create a stable base for baking. This small cut prevents the corn from tipping over during baking.
Stand each ear of corn upright in a 9x13-inch baking dish, spacing them evenly. You want about 1 inch between each ear to allow the butter and cheese to distribute properly. The baking dish should be large enough to accommodate all 4 ears comfortably without crowding.
Create the Signature Buttery Mixture
In a small bowl, melt the ½ cup unsalted butter in the microwave for 20-30 seconds or until completely liquid. Stir in the 1.5 cups freshly shredded sharp cheddar cheese until fully combined and smooth. The cheese should melt into the butter, creating a thick, creamy mixture.
Add the 1 teaspoon fine sea salt and ½ teaspoon freshly ground black pepper to the butter-cheese mixture. Stir well to distribute the seasoning evenly. The sharpness of the cheddar will complement the sweetness of the corn perfectly, while the pepper adds a subtle kick that enhances the overall flavor.
Assemble and Bake to Golden Perfection
Carefully pour the butter-cheese mixture evenly over the corn on the cob, ensuring each ear is fully coated. Use a spoon to spread the mixture down the sides of the corn and into the cut kernels at the bottom. This step is crucial for creating that signature crispy crust while keeping the kernels tender.
Bake uncovered for 35-40 minutes until the cheese has melted completely and turned a deep golden brown color. The corn should be tender when pierced with a fork, and the cheese topping should be bubbly and slightly crispy around the edges. You'll know it's ready when the aroma fills your kitchen with that irresistible buttery-cheesy scent.
Rest and Serve Warm
Remove the baked corn from the oven and let it rest for 5 minutes before serving. This brief resting period allows the juices to redistribute, ensuring each bite is packed with flavor. The crust will firm up slightly, making it easier to handle and serve.
Use a serving spoon to carefully lift each ear of corn from the baking dish, being mindful of the crispy cheese topping. Serve immediately while still warm, as the cheese continues to melt slightly with each bite. This dish pairs beautifully with a simple green salad or as a side to grilled meats for a complete meal experience.
Pro Tips For Making Grandma'S Baked Corn
- Trim the Husks First: Peel back the husks before baking—no need to remove all the silk. Just pull them back far enough to expose the corn, then fold them loosely over the top after seasoning. This keeps the kernels moist while letting the cheese brown properly. (I used to over-trim, and the corn always dried out faster.)
- Butter Generously, Then Salt: Use at least 1 tablespoon of softened butter per ear, rubbing it under the husks and between the kernels. Sprinkle salt before adding cheese—this guarantees even seasoning, not just salty spots on top. After burning three batches with uneven salt, I finally got it right.
- Bake at 400°F, Not Lower: The oven needs to be hot enough to melt the cheese properly without steaming the corn. If your oven runs cool, bump it to 425°F for the first 10 minutes, then drop to 375°F to finish. I learned this the hard way when my first batch came out soggy instead of crispy.
- Rest Before Serving: Let the baked corn sit wrapped in foil for 5-10 minutes after pulling it from the oven. This lets the residual heat distribute, keeping the kernels tender and the cheese gooey. Skipping this step means cutting into wet, uneven corn—trust me, it’s not worth it.
Pro cooking tips for this recipe
Butter Consistency Matters
Use cold, cubed butter instead of melted for the best crust—it melts gradually during baking, creating pockets of air that make the topping crispy rather than greasy. I like to cut the butter into small cubes so it distributes evenly.
If your butter melts too quickly, chill the baking dish for 10 minutes before adding the corn. 🧈
Cheese Freshness is Key
Freshly shredded cheese makes all the difference—pre-shredded varieties contain anti-caking agents that prevent proper melting. For extra flavor, I sometimes mix ½ cup sharp cheddar with ½ cup smoked Gouda for a subtle smoky depth.
Shred the cheese yourself using the large holes on a box grater for even distribution. 🧀
Even Spacing Prevents Crowding
Stand the corn ears 1 inch apart in the baking dish to allow the butter and cheese to flow freely. Crowding causes uneven cooking and a soggy crust.
If your dish is too small, use a 9x13-inch or larger pan. For extra stability, cut ½ inch off the bottom of each ear before baking. 🌽
Low and Slow Baking
Bake at 375°F for 35-40 minutes—higher temps risk burning the cheese before the corn cooks through. If the crust browns too quickly, tent loosely with foil.
The corn is done when it pierces easily with a fork and the cheese is bubbly with golden edges. Patience here ensures perfect texture. ⏱️
Resting Before Serving
Let the baked corn rest for 5 minutes after removing from the oven. This allows the juices to redistribute, preventing a dry crust and keeping the kernels tender. Serve immediately while the cheese is still slightly melty—it solidifies as it cools. 💡
Reheating for Leftovers
To revive the crust, pop leftovers in a 375°F oven for 5-10 minutes until bubbly and golden. Avoid microwaving—it makes the cheese rubbery. Store leftovers in an airtight container for up to 3 days, though I rarely have any last that long! ❄️
Nutrition facts
Frequently asked questions
Can I use frozen corn instead of fresh?
Yes, but thaw it completely first and pat dry with paper towels to remove excess moisture. Frozen corn works best when you're not in peak corn season. Just be sure to trim off any unusually wet or mushy kernels before baking to prevent a soggy crust.
What if my cheese topping gets too brown before the corn is done?
Cover the dish loosely with aluminum foil for the last 10-15 minutes of baking to slow browning. The cheese will still melt and create that signature crust, but at a gentler pace. If it's already over-browned, serve it immediately—the crust will firm up slightly as it cools.
Can I make this ahead of time?
Assemble the corn with butter and cheese, then refrigerate uncovered for 1-2 hours before baking. This helps create an extra crispy crust. For leftovers, store in an airtight container for 3-4 days and reheat in the oven to restore the crispy texture.
What's the best cheese substitute if I don't have cheddar?
Try Monterey Jack for a milder flavor or pepper jack for a subtle kick. For a smoky twist, use smoked Gouda—it pairs beautifully with the sweet corn. Just shred it fresh to avoid anti-caking agents that prevent proper melting.
How do I know when the corn is fully cooked?
The corn is ready when it pierces easily with a fork and the cheese is bubbly with golden edges. If the kernels still feel slightly firm, bake for another 5 minutes**. The crust should be crispy but not hard—it'll soften slightly as it cools.