Snacks
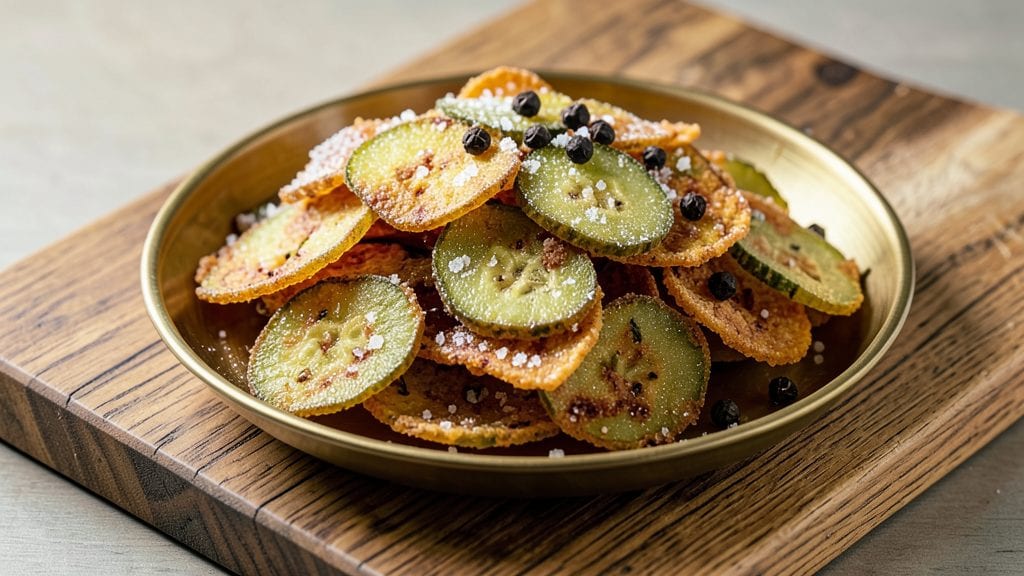
Try this easy fried dill pickle chips recipe to turn sour pickles into addictively crispy, vinegar-kissed bites—just 15 minutes for restaurant-style crunch. The secret lies in properly drying the slices and using a light, airy batter that creates a delicate, golden crust while preserving that signature tangy flavor.
I developed this method after years of experimenting with snack foods—this version is foolproof, with a perfect balance of crunch and flavor that disappears faster than you can say "ranch dip."
The process starts with thin, even slices that dry completely before frying—this ensures maximum crispiness without greasiness. A simple batter of flour, baking powder, and ice water creates a light, lacy coating that fries up golden and crispy in hot oil.
The key is maintaining the right temperature (around 350°F) and frying in small batches to avoid overcrowding, which guarantees even cooking every time. This isn't just a snack; it's a textural experience that turns ordinary pickles into a gourmet treat.
What you'll end up with is a plate of golden, vinegar-kissed chips that shatter with each bite, delivering that perfect harmony of tangy, briny flavor with irresistible crunch.
The aroma alone will have everyone gathering around your kitchen—imagine the crispy edges, the tender centers, and that unmistakable pickle tang that makes every bite unforgettable. These chips pair perfectly with ranch dressing, blue cheese dip, or even as a unique topping for burgers and sandwiches.
Whether you're hosting a game day gathering or simply craving a satisfying snack, this recipe delivers restaurant-quality crunch with minimal effort. The best part?
You can make a big batch ahead of time and store them in an airtight container for up to a week—just be sure to reheat them in the oven to restore that perfect crispiness. Let's get frying!
Ingredients for fried dill pickle chips
Nine essentials for transforming sour pickles into addictively crispy, golden chips—game day ready in 15 minutes.
| Ingredient | Amount | Notes |
|---|---|---|
| Dill Pickle Spears 🥒 | 16 whole | Brine-cured, firm spears only |
| All-Purpose Flour 🌾 | 1 cup | White or whole wheat preferred |
| Baking Powder 🧂 | 1 tbsp | Aluminum-free for best results |
| Ice Water 💧 | ¾ cup | Freshly chilled for light batter |
| Vegetable Oil 🫒 | 3 cups | High smoke point preferred |
| Diamond Crystal Kosher Salt 🧂 | ½ tsp | For seasoning after frying |
| Lemon Juice 🍋 | 1 tbsp | Freshly squeezed for brightness |
| White Vinegar 🍶 | 1 tbsp | For extra tangy kick |
| Fresh Dill Sprigs 🌿 | 2 whole | For garnish (optional) |
| Ranch Dressing 🥛 | ½ cup | For serving (optional) |
| Paper Towels 🧻 | 2 sheets | For drying slices |
The pickles are non-negotiable—firm, brine-cured spears from Heinz or Vlasic work best, not those mushy jarred ones. Look for spears that hold their shape when sliced; Costco or Trader Joe's often carry the best quality in bulk. Thin, even slices are key—use a mandoline for perfect uniformity, or carefully hand-slice with a sharp knife. Pro tip: Pat them dry with paper towels before drying on a rack; moisture is the enemy of crispiness. The batter needs to be light and lacy, so ice water is essential—it keeps the flour from over-developing gluten, which would make your chips dense instead of crispy.
No dill pickles? Kosher dill pickles or even bread-and-butter pickles will work in a pinch, but the flavor profile changes slightly. Short on baking powder? Baking soda at half the amount can substitute, but your chips might brown faster. The vinegar and lemon juice are optional but absolutely essential for that signature tang—skip them, and you lose that restaurant-quality kick. For the oil, vegetable or canola oil is ideal (high smoke point, neutral flavor), but peanut oil works too if you're avoiding soy. The key is maintaining 350°F oil temperature—use a thermometer, not guesswork, to avoid soggy chips.
Freshly fried chips are best served immediately, but if you need to prep ahead, reheat in a 375°F oven for 3-5 minutes to restore crispiness. Store leftovers in an airtight container for up to 5 days, but honestly? They disappear faster than you can say "ranch dip." The secret to keeping them crispy? Layer them with parchment paper between sheets in the container. Garnish with fresh dill and a sprinkle of salt right before serving—that's when the magic happens. Double the batch; you won't regret it.
Why You'll Love This Recipe
- Five-Ingredient Magic: I swear, this recipe is the kind of thing you’ll bookmark immediately. Just flour, baking powder, ice water, and those tangy spears—no fancy gadgets, no waiting for dough to rise. Honestly, I’ve made it while microwaving leftovers in the other hand.
- Crunch Meets Tang: That first bite? Chef’s kiss. The chips get this addictive crisp while staying cool inside, and the dill’s bright punch cuts through anything—beer, burgers, or just straight-up guilt-free snacking. Between us, I’ve seen grown adults reach for seconds without shame.
- Party in a Bag: Seriously, this is my go-to for game day, potlucks, or when my kid’s soccer team needs a snack that won’t end in sugar crashes. Toss them in a bowl with ranch or serve them straight from the oven—no one will guess how little effort they took.
- No-Waste Win: Use up those half-empty pickle jars before they turn to mush. The batter clings perfectly to the spears, so no sad, soggy scraps here. And if you fry a big batch? They keep crisp for days in the freezer—just reheat in the oven when you need a quick, salty crunch.
Step-by-step instructions for vinegar-kissed crunch
Here's how to transform simple pickles into addictive, crispy chips with a perfect tangy crunch.
Prepare the Pickle Slices for Maximum Crispiness
Lay out the 16 whole dill pickle spears on a clean cutting board. Using a sharp chef's knife, slice each spear lengthwise into ¼-inch thick strips—you should end up with about 64 slices total. The thinner the slices, the crispier they'll become, but don't go too thin or they'll break apart during frying.
Pat each slice dry immediately with the 2 sheets of paper towels. Any remaining moisture will prevent the flour coating from adhering properly and will cause the chips to steam instead of crisp. Work in batches if needed, keeping the dried slices in a single layer on the cutting board until ready for coating.
Create the Light, Airy Batter
In a medium bowl, whisk together the 1 cup all-purpose flour and 1 tablespoon baking powder until completely combined. The baking powder will help create tiny air pockets that make these chips extra crispy. In a separate small bowl, combine the 0.75 cup ice water, 1 tablespoon lemon juice, and 1 tablespoon white vinegar. The acidity from the lemon juice and vinegar will enhance the pickle flavor while helping the batter cling to the slices.
Slowly pour the wet ingredients into the dry ingredients while whisking continuously. You're aiming for a smooth, thin batter that coats the back of a spoon but still flows easily. If it's too thick, add 1 teaspoon of ice water at a time until you reach the perfect consistency. Let the batter rest for 5 minutes while you prepare the frying station.
Fry to Golden Perfection
Pour the 3 cups vegetable oil into a deep, heavy-bottomed skillet or Dutch oven and heat over medium heat until the oil reaches 350°F. Use a deep-fry thermometer to monitor the temperature—this precise heat level is crucial for even cooking. While the oil heats, dip each pickle slice into the batter, letting any excess drip off before carefully placing it in the hot oil.
Fry the slices in batches of 8-10 at a time to avoid overcrowding, which will lower the oil temperature. Cook for 2-3 minutes per batch, turning occasionally, until the edges are deep golden brown and the chips puff up slightly. They should be crisp enough to hold their shape but still tender in the center. Remove with a slotted spoon and drain on a wire rack or paper towel-lined plate.
Season and Serve Immediately
While the chips are still hot, sprinkle them generously with the 0.5 teaspoon diamond crystal kosher salt. The salt enhances the vinegar-kissed flavor and helps maintain crispness. For an optional garnish, gently press the 2 whole fresh dill sprigs into the warm chips to release their aromatic oils.
Serve immediately with the 0.5 cup ranch dressing for dipping—its creamy texture perfectly balances the tangy, crispy chips. These vinegar-kissed crunch bites disappear faster than you can say "second helping," so prepare extra if you're feeding a crowd. Store any leftovers in an airtight container for up to 3 days, but honestly, they're best enjoyed fresh from the fryer!
Pro Tips For Making Fried Dill Pickle Chips
- Pat dry the pickles: I learned this the hard way—wet pickles steam instead of fry, and you end up with soggy, greasy chips. Grab paper towels and really press between them. The extra 30 seconds now means crispy, golden chips later.
- Use cold oil, hot fryer: Fill your pot with oil and let it sit for 10 minutes to come to temperature after heating. Then crank the heat to 350°F and fry in small batches. Cold oil burns faster, and overcrowding drops the temp—both ruin the texture.
- Add baking powder: Skip the extra salt in the batter—just 1 teaspoon of baking powder per cup of flour lightens the coating. It’s not just for muffins; it makes the chips puff slightly and stay crisp longer. Trust me, your taste buds will notice.
- Shake off excess batter: After dipping, let the spears drip for 10 seconds, then give them a quick shake over the bowl. Too much batter = thick, doughy chips. A light, even coat is all you need for that perfect crunch.
Creative variations of this fried dill pickle chips
Spicy Jalapeño Pickle Fusion
Swap out dill pickles for jalapeño pickles to add a fiery kick while keeping that tangy crunch. Use 16 jalapeño pickle spears (firm, not too soft) and slice them the same way. For extra heat, add ½ teaspoon cayenne pepper to the batter before frying.
Serve with a side of spicy ranch dressing or a drizzle of chipotle mayo for the ultimate game-day snack. 🌶️
Garlic-Herb Twist
Infuse your chips with bold flavors by adding 1 tablespoon minced garlic and 1 teaspoon dried oregano to the batter. For extra aroma, press a few garlic cloves into the warm oil before frying.
Garnish with chopped fresh parsley and a sprinkle of garlic powder for a savory, herby kick that pairs perfectly with blue cheese dip. This version is a crowd-pleaser at parties.
Sweet & Tangy Honey Glaze
After frying, drizzle the hot chips with a mix of 2 tablespoons honey and 1 tablespoon apple cider vinegar while they’re still warm. Toss gently to coat, then sprinkle with flaky sea salt.
The sweetness balances the tang, creating a caramelized glaze that’s irresistible. Serve as a sweet-and-sour appetizer or alongside charcuterie boards for a unique twist.
Crunchy Parmesan Crust
For a cheesy, crispy upgrade, mix ¼ cup grated Parmesan cheese into the batter before dipping the slices. The cheese adds a nutty depth and extra crunch. After frying, sprinkle with extra Parmesan and red pepper flakes for a flavor-packed bite.
This version works amazingly as a pizza topping or alongside warm marinara sauce for dipping. 🧀
Smoky Chipotle Version
Add 1 teaspoon smoked paprika and ½ teaspoon chipotle powder to the batter for a smoky, spicy depth. For extra flavor, infuse the frying oil with 1 minced chipotle pepper in adobo sauce (remove before frying).
Garnish with chopped cilantro and a squeeze of lime. This smoky-sweet version is perfect for taco night or as a bold snack with guacamole.
Gluten-Free Crispy Chips
For a gluten-free version, replace the all-purpose flour with 1 cup gluten-free 1:1 baking flour (like Bob’s Red Mill) and add 1 tablespoon cornstarchdairy-free ranch dressing or a side of hummus for a safe, delicious snack option. 🌱
Nutrition facts
Frequently asked questions
Can I use jarred bread-and-butter pickles instead of dill pickles?
Yes, but the flavor will be different. Bread-and-butter pickles are sweeter and less tangy, so you'll miss that signature vinegar kick. For best results, stick with firm dill pickles—look for Heinz or Vlasic spears that hold their shape when sliced. If you must use bread-and-butter, add an extra 1 tablespoon of white vinegar to the batter to boost the tang.
Why did my chips turn out greasy instead of crispy?
Greasy chips usually mean one of two things: the oil wasn't hot enough (350°F is critical) or the pickle slices weren't dry before battering. Always pat slices completely dry with paper towels and let them air-dry for 10-15 minutes on a wire rack. Also, avoid overcrowding the fryer—cook in batches of 8-10 slices at a time.
How do I keep these chips crispy for more than a day?
Store them in an airtight container with parchment paper between layers to prevent sogginess. For maximum crispiness, reheat in a 375°F oven for 3-5 minutes before serving. They'll lose some crunch after 24 hours, but the flavor stays delicious. For longer storage, freeze them for up to 1 month—just reheat straight from frozen in the oven.
Can I make these without deep-frying?
For an oven-baked version, toss the battered slices in 1 tablespoon cornstarch (for extra crispiness) and bake at 425°F for 12-15 minutes on a wire rack set over a baking sheet. They won't be as crispy as fried, but they'll still have great flavor. Air fryers work too—cook at 380°F for 5-6 minutes, shaking the basket halfway.
What's the best way to serve these chips?
They're perfect as a standalone snack with ranch or blue cheese dip, but get creative! Try them as a topping for burgers, tacos, or even salads for a tangy crunch. For a sweet-savory combo, pair with honey mustard or spicy mayo. The key is serving them warm—they lose crispiness quickly, so make fresh batches as needed.