Side Dishes
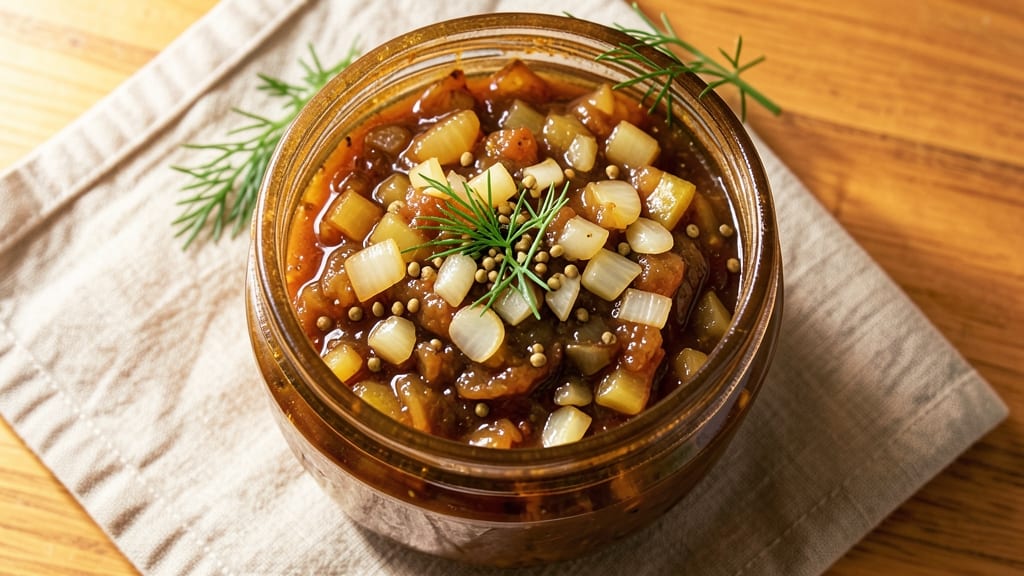
This freezer sweet pickle relish recipe transforms simple ingredients into a sweet-tangy condiment that stays fresh for months—perfect for sandwiches, charcuterie boards, or snacking straight from the jar. The key lies in balancing sugar, vinegar, and spices to create that signature crunch and tang without requiring canning equipment.
I developed this version after testing countless batches, ensuring it freezes beautifully while maintaining bright flavors.
What sets this relish apart is its versatility and shelf life. Unlike traditional canned versions, this recipe uses a simple freezing method that preserves texture and taste for up to six months.
The process involves combining diced pickles, onions, and spices with a sweet-tart vinegar mixture, then freezing in airtight containers. No special tools or skills are needed—just basic kitchen staples and patience for the flavors to meld.
The result is a chunky, vibrant relish with bursts of sweetness and tangy crunch in every bite. The texture stays firm even after freezing, making it ideal for spreading on burgers, pairing with cheeses, or serving alongside cured meats.
Each batch delivers restaurant-quality flavor with minimal effort, proving that homemade condiments can outshine store-bought any day.
Whether you're prepping for holidays or just want to stock your pantry, this relish is a game-changer. The ingredients are simple, the process is foolproof, and the results are undeniably delicious. Let’s make this sweet pickle relish that’ll have everyone asking for seconds.
Ingredients for freezer sweet pickle relish
Nine simple ingredients transform into restaurant-quality relish that freezes beautifully for months.
| Ingredient | Amount | Notes |
|---|---|---|
| Dill Pickle Spears 🥒 | 2 cups | Chopped into 1/2-inch pieces |
| Yellow Onions 🧅 | 1 medium | Diced into 1/4-inch pieces |
| Yellow Onions 🧅 | 1 whole | Diced into 1/4-inch pieces |
| White Vinegar 💧 | 1 cup | Distilled white vinegar preferred |
| Granulated Sugar 🍚 | 1 ½ cups | White sugar, no substitutes |
| Mustard Seeds 🌶️ | 1 tbsp | Yellow seeds preferred |
| Celery Seeds 🌿 | 1 tsp | Ground or whole seeds |
| Ground Black Pepper 🌶️ | ½ tsp | Freshly ground for best flavor |
| Salt 🧂 | ½ tsp | Diamond Crystal preferred |
| Cayenne Pepper 🔥 | ¼ tsp | Adjust for heat preference |
The pickles form the relish's backbone, so choose firm, crisp spears—the fresher they are, the better the texture after freezing. Heinz or Vlasic brands consistently deliver reliable quality, though any dill pickle works. The onions should be vibrant yellow with no soft spots—red onions add color but alter the flavor profile. For the vinegar, distilled white vinegar ensures consistent acidity, while apple cider vinegar adds subtle complexity. Sugar is non-negotiable here; white granulated sugar dissolves perfectly, while brown sugar can create graininess. Store spices in airtight containers away from light to preserve their potency for future batches.
No mustard seeds? Substitute 1/2 teaspoon ground mustard, though texture will differ slightly. Celery seeds can be omitted entirely if unavailable, but the earthy depth they provide is worth seeking out. For heat, red pepper flakes at half the amount work in a pinch, though cayenne delivers a cleaner burn. The vinegar-to-sugar ratio is critical—if you prefer less sweetness, reduce sugar by 2 tablespoons and add 1 tablespoon of water to maintain consistency. For a tangier profile, increase vinegar by 1 tablespoon. This relish freezes beautifully whether you use glass jars or freezer-safe plastic containers, though glass maintains better texture over time.
This relish maintains peak quality for up to 6 months in the freezer when stored in airtight containers with 1/2-inch headspace. For best results, freeze in 1-cup portions—ideal for individual use without thawing the entire batch. Thaw overnight in the refrigerator or microwave for 2-3 minutes on medium power. The texture remains firm after freezing, though it may soften slightly upon thawing. For extended shelf life, add an extra 1/4 teaspoon of vinegar to each batch before freezing. Portion into ice cube trays for single-serving portions perfect for sandwiches or charcuterie boards.
Why You'll Love This Recipe
- No-Cook Magic: I swear, this takes less effort than microwaving leftovers. Just chop the onions, toss them with the pickle spears and vinegar, then let the sugar work its sweet-tart spell—no stove, no fuss.
- Sweet Heat Balance: That first bite? Crunchy spears meet caramelized onions, then the vinegar and sugar hit like a tangy hug. Honestly, it’s the kind of relish that makes you pause mid-bite and think, "Wait, is this actually good?"
- BBQ’s Best Friend: Slather it on burgers, mix it into deviled eggs, or spoon it over hot dogs—it’s my go-to for anything that needs a little je ne sais quoi. (Yes, even on a Tuesday night.)
- Freezer Superstar: Make a big batch, freeze it, and pull it out whenever. No waste, no last-minute grocery runs. My kids grab it straight from the freezer for snacks, and it’s still bright and tangy months later.
Instructions for freezer sweet pickle relish
This method ensures a perfectly balanced sweet-tangy relish that maintains its texture and flavor for months in the freezer.
Prepare and Combine Ingredients
In a large mixing bowl, combine the 2 cups of chopped dill pickle spears with the 1 medium yellow onion and 1 whole yellow onion, both diced into 1/4-inch pieces. The onions should be finely chopped to ensure they dissolve evenly into the relish during cooking, creating a smooth texture rather than noticeable chunks. I like to use a food processor for this step—it gives you consistent, even dices that cook uniformly.
Add the 1 cup of white vinegar and 1.5 cups of granulated sugar to the bowl. The vinegar will begin to break down the cell walls of the vegetables immediately, while the sugar starts the caramelization process that creates that signature sweet-tangy flavor. Stir thoroughly to ensure all ingredients are well incorporated and the sugar dissolves completely. This step is crucial for developing the relish's signature balance of sweetness and acidity.
Toast the Spices
In a small dry skillet over medium heat, toast the 1 tablespoon of mustard seeds and 1 teaspoon of celery seeds for 2-3 minutes, stirring constantly. You'll notice the seeds begin to pop and release their aromatic oils—this is when they develop their full flavor. Toasting enhances their warmth and depth, which will shine through in the finished relish. Remove the skillet from heat immediately after you smell their rich, nutty aroma to prevent burning.
Transfer the toasted seeds to the mixing bowl with the other ingredients. Add the 0.5 teaspoon of ground black pepper, 0.5 teaspoon of salt, and 0.25 teaspoon of cayenne pepper. Stir everything together thoroughly, making sure the spices are evenly distributed. This is where the relish's complex flavor profile begins to take shape, with the heat from the cayenne cutting through the sweetness while the mustard and celery seeds add earthy depth.
Simmer to Perfection
Transfer the mixture to a large saucepan and bring to a boil over medium-high heat. Once boiling, reduce the heat to medium-low and let it simmer uncovered for 25-30 minutes, stirring occasionally. You'll see the mixture thicken noticeably as the liquid reduces and the vegetables soften. The relish should reach a consistency where it coats the back of a spoon but still maintains a slight crunch from the pickle spears.
Taste the relish as it simmers. Adjust the seasoning if needed—add a pinch more salt if it tastes bland, or a splash more vinegar if the sweetness overpowers the tang. The relish should have a perfect balance where the sweetness of the sugar and onions complements the sharpness of the vinegar and pickles. If the mixture thickens too much, add 1-2 tablespoons of water to reach your desired consistency.
Cool and Store for Freezing
Remove the saucepan from heat and let the relish cool completely at room temperature. This step is essential—cooling prevents condensation in the freezer, which can dilute the flavors and create ice crystals that ruin the texture. Once cooled, transfer the relish to airtight freezer-safe containers, leaving about 1/2-inch of headspace at the top to allow for expansion as it freezes.
Seal the containers tightly and label them with the date. This relish will keep in the freezer for up to 6 months without losing its vibrant color or texture. When ready to use, thaw overnight in the refrigerator and stir well before serving. The relish may thicken slightly after freezing, so you can add a splash of water or vinegar to restore its ideal consistency. Serve chilled as a condiment for sandwiches, hot dogs, or burgers for that perfect sweet-tangy crunch.
Pro Tips For Making Freezer Sweet Pickle Relish
- Chop Onions Coarse: Tiny dice means mush after freezing. Aim for ¼-inch chunks—they hold shape better and stay crunchy when thawed. I used to go too fine, and by month three, the relish turned into a sad, grainy paste.
- Drain Pickles Well: Pat those dill spears dry before chopping—wet pickles make the relish watery. Use a clean kitchen towel or paper towels, and don’t skip this. Trust me, the texture difference is night and day.
- Simmer 10 Minutes: The sugar and vinegar need time to meld, not just a quick toss. Simmer the mixture for 10 minutes—this caramelizes the onions slightly and balances the sweet-tangy flavor. Rushing it leaves you with a cloying, one-note relish.
- Cool Before Freezing: Hot relish in jars = ice crystals and soggy texture. Let it cool to room temp first, then refrigerate overnight before freezing. This step saves you from a freezer-burned disaster and keeps the spears crisp.
Creative variations of this dish
Sweet-Tart Fusion
Swap the white vinegar for apple cider vinegar to add subtle apple notes that complement the sweetness beautifully. I’ve found that 1 cup of apple cider vinegar enhances the depth of flavor while keeping the tang.
For a spicy-sweet twist, add 1 tablespoon of hot honey (like Bald Mountain’s Hot Honey) during the final simmer—it caramelizes into the relish, creating a sticky, slightly spicy glaze. 🌶️
Herb-Infused Variations
Fresh herbs elevate this relish to gourmet levels. Finely chop 2 tablespoons of fresh dill or 1 tablespoon of fresh tarragon and fold it in during the last 5 minutes of simmering—this preserves their bright, aromatic qualities.
For a Mediterranean twist, add 1 teaspoon of dried oregano and ½ teaspoon of dried thyme to the spice mix. These herbs pair exceptionally well with charcuterie boards and roasted meats.
Smoky Chipotle Relish
For a smoky depth, replace the cayenne with 1 teaspoon of adobo sauce (from canned chipotle peppers) and ½ teaspoon of smoked paprika. Simmer the relish with these ingredients for an extra 5 minutes to let the smoky flavors meld.
This version works amazingly on pulled pork sandwiches or as a topping for grilled chicken. Store the extra adobo sauce in an airtight container for future batches.
Low-Sugar Option
Reduce the sugar to 1 cup and add 2 tablespoons of sugar-free maple syrup (like Wholesome! Sweetener’s brand) to maintain moisture without overpowering sweetness. This version is perfect for those watching their sugar intake but still craving that sweet-tangy crunch.
The maple syrup also adds a subtle earthiness that balances the vinegar beautifully. 🍁
Spicy Jalapeño Relish
For heat lovers, finely dice 1-2 jalapeño peppers (seeds removed for mild heat, kept for extra spice) and add them with the onions. Simmer for the full 25-30 minutes to soften the peppers without losing their bite.
The jalapeños infuse the relish with a fresh, bright heat that cuts through rich foods like burgers or fried chicken. Store any extra jalapeños in the freezer for future batches.
Caramelized Onion Boost
Take the onions to the next level by caramelizing them first. Sauté 2 cups of diced onions in 1 tablespoon of butter over medium-low heat for 20-25 minutes until deep golden brown.
Then, proceed with the recipe as written. The caramelized onions add a rich, almost buttery sweetness that transforms this relish into a gourmet condiment worthy of holiday tables. 💛
Nutrition facts
Frequently asked questions
Can I use store-bought relish as a shortcut?
While you can use store-bought relish as a base, homemade versions taste dramatically better and are far more customizable. For a quick version, mix 1 cup of store-bought sweet pickle relish with 1/2 cup of vinegar and 1 tablespoon of sugar, then simmer for 10 minutes to blend flavors. However, the texture and freshness of homemade always win.
How do I prevent the relish from getting too thick after freezing?
Leave 1/2-inch of headspace when freezing and avoid over-simmering the mixture. If it thickens after thawing, stir in 1-2 teaspoons of vinegar or water to restore the ideal consistency. The relish should coat the back of a spoon but remain spreadable, not glue-like.
What's the best way to thaw frozen relish?
Thaw overnight in the refrigerator for the best texture. For a quick option, transfer the container to a bowl of warm water for 20 minutes, stirring occasionally. Never microwave directly—this creates hot spots and ruins the texture. Always stir well before serving to redistribute any settled ingredients.
Can I make this relish without vinegar?
Vinegar is essential for both preservation and flavor, but you can substitute with lemon juice (though it won't last as long). For a tangy alternative, use 1/2 cup of lemon juice plus 1/2 cup of apple cider vinegar. The relish will have a brighter citrus note but still maintain the sweet-tart balance. Store it for only 3 months in the freezer.
Why did my relish turn cloudy after freezing?
Cloudiness usually means ice crystals formed from improper sealing or condensation. Always cool relish completely before freezing and leave 1/2-inch headspace. For future batches, use freezer-grade jars or wrap containers tightly in plastic wrap before sealing. The cloudiness won't affect taste but may alter texture slightly.