
Desserts
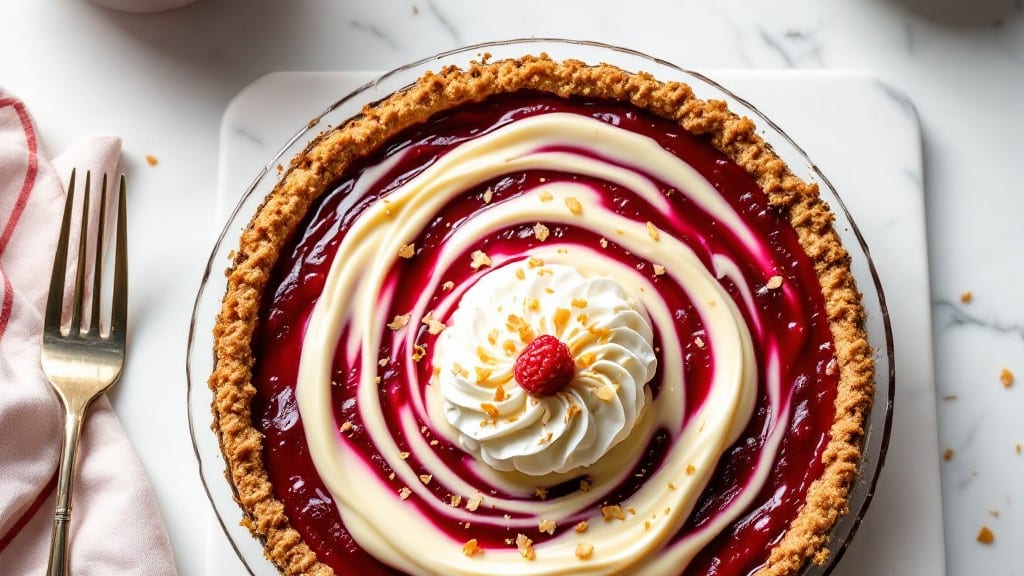
This classic Jello pudding pie recipe delivers the nostalgic dessert you remember from childhood—creamy layers of pudding and jello set over a buttery crust, all without a single trip to the oven. The secret lies in precise timing and layering, ensuring each component sets perfectly for that signature wobble.
I’ve perfected this version over years of holiday baking, where it consistently disappears faster than any other dessert on the table.
The beauty of this no-bake pie is its simplicity: just 15 minutes of active prep followed by chilling time that transforms ingredients into a restaurant-worthy dessert. The jello layer provides structure while the pudding adds richness, creating a texture that’s both satisfying and playful.
This recipe stays true to tradition while cutting down on fuss—no baking required, no last-minute stress.
What you’ll end up with is a pie that looks elegant enough for company but comes together effortlessly for family gatherings. The top layer of jello adds vibrant color and subtle fruit flavor, while the pudding beneath delivers that familiar, comforting creaminess.
Serve it chilled with whipped cream or fresh berries for an extra touch of sophistication.
Perfect for potlucks, holiday menus, or satisfying a sudden dessert craving, this pie keeps well for up to 5 days in the fridge. The layers stay distinct and the flavors deepen with time. Let’s get started on creating this timeless dessert that never goes out of style.
Ingredients for classic jello pudding pie
Fifteen minutes of prep transforms simple pantry staples into elegant no-bake dessert perfection.
| Ingredient | Amount | Notes |
|---|---|---|
| Classic Vanilla Pudding Mix 🥄 | 2 boxes | Instant, prepared with milk |
| Unsalted Butter 🧈 | ½ cup | Cold, for crust |
| All-Purpose Flour 🌾 | ½ cup | For crust texture |
| Granulated Sugar 🍚 | ¼ cup | For crust sweetness |
| Jello (Fruit Flavor) 🍓 | 1 box | Any fruit variety |
| Heavy Whipping Cream 🥛 | 1 cup | Full-fat for stability |
| Milk 🥛 | 2 cups | Whole milk preferred |
| Granulated Sugar 🍚 | ½ cup | For pudding layer |
| Vanilla Extract 🌿 | 2 tsp | Pure, for flavor |
| Salt 🧂 | ¼ tsp | Kosher preferred |
| Whipped Cream 🍦 | 1 cup | Stabilized, for topping |
| Fresh Berries 🍓 | 1 cup | Optional garnish |
The crust is where texture begins. Cold butter is critical—cut it into the flour using a pastry cutter or your fingers until it resembles coarse crumbs. Diamond Crystal kosher salt enhances flavor without overpowering. For a shortcut, pulse butter and flour in a food processor, but hand-cutting ensures better distribution. The sugar adds subtle sweetness that balances the jello's tartness. Store flour in an airtight container away from heat sources to preserve freshness, and always use all-purpose flour for optimal crumb structure.
Jello selection matters for that signature wobble. Knit jello brands like Jell-O provide superior set, while fruit varieties add vibrant color and subtle flavor. For the pudding layer, instant vanilla mix simplifies preparation, but homemade custard elevates texture. Substitute vanilla extract with almond extract at half the amount for depth. Heavy cream stabilizes the pudding mixture, preventing separation. When making substitutions, maintain the 2:1 ratio of milk to pudding mix for proper consistency.
This pie requires precise chilling. Four hours minimum ensures proper setting, with flavors deepening overnight. Store leftovers in an airtight container for up to 5 days, though the layers may separate slightly. For extended storage, freeze individual slices wrapped in parchment for up to 3 months. Bring frozen slices to room temperature before serving to restore texture. The whipped cream topping should be added fresh to prevent sogginess, and berries should be tossed in a bit of powdered sugar before garnishing for visual appeal.
Why You'll Love This Recipe
- Fridge-to-Table Magic: I swear by this—just mix the pudding, set the Jello, and boom. No baking, no waiting hours, just a creamy, wobbly masterpiece that’s ready when you are. The crust? Five minutes with butter, flour, and sugar—no rolling required.
- Dual-Layer Bliss: That first bite? Chef’s kiss. The cool, tangy Jello layer cuts through the rich vanilla pudding like a dream. Honestly, it’s the perfect balance—sweet but not cloying, with that fun texture shift that makes it feel special.
- Picnic Party Star: Between us, this is my go-to for potlucks, kid birthday parties, or lazy summer afternoons. Swap the vanilla pudding for chocolate or the Jello for lime, and suddenly you’ve got a crowd-pleaser that costs next to nothing. (Yes, even on a Tuesday night.)
- No-Waste Win: Make it once, eat it twice. The leftovers? Just as good cold from the fridge or reheated (if you dare). And if you mess up the crust? Toss it in a smoothie with the Jello scraps—no guilt, just flavor. Budget-friendly? Absolutely. A lifesaver? Even more so.
Step-by-step instructions for classic jello pudding pie
This no-bake dessert delivers restaurant-quality layers with minimal effort—just follow these precise steps.
Prepare the Crust Mixture
In a medium bowl, combine the 0.5 cup unsalted butter and 0.5 cup all-purpose flour using a pastry cutter or your fingers until the mixture resembles coarse crumbs with pea-sized butter pieces. This texture is crucial for creating a flaky, sturdy crust. Add the 0.25 cup granulated sugar and mix until evenly distributed throughout the crumb mixture.
Press this mixture firmly into the bottom of a 9-inch pie dish, using the back of a spoon to create an even, compact layer. The crust should cover the entire bottom and extend about 1 inch up the sides. Place the pie dish in the freezer while you prepare the filling—this prevents the crust from softening when you add the warm pudding layer later.
Make the Jello Layer
In a separate bowl, dissolve the 1 box jello (fruit flavor) in 1 cup hot water (just boiled and cooled for 1 minute). Stir until completely dissolved—no lumps should remain. In a saucepan, heat the 1 cup heavy whipping cream and 2 cups milk over medium heat until steaming but not boiling.
Remove the saucepan from heat and whisk in the dissolved jello mixture. Return the pan to low heat and stir constantly for 3-5 minutes until the mixture thickens to a pudding-like consistency. This layer should coat the back of a spoon and hold its shape when dropped from a spoon. Immediately pour this mixture over the chilled crust in the pie dish.
Prepare the Vanilla Pudding Layer
In a large bowl, combine the 2 boxes classic vanilla pudding mix with the 2 cups milk according to package instructions. Stir vigorously for 2 minutes until completely smooth and thickened. Add the 0.5 cup granulated sugar, 2 teaspoons vanilla extract, and 0.25 teaspoon salt, mixing well to incorporate.
Pour this vanilla pudding mixture evenly over the jello layer in the pie dish. Use a rubber spatula to spread it smoothly, ensuring it covers the entire surface. Gently tap the pie dish on the counter a few times to eliminate any air bubbles that may have formed. Place the pie in the refrigerator and let it set for at least 4 hours, or until completely firm.
Assemble and Garnish
Before serving, whip the 1 cup heavy whipping cream to stiff peaks. Spread this whipped cream evenly over the top of the chilled pudding pie. Arrange the 1 cup fresh berries decoratively on top, pressing lightly so they adhere. The contrast of the berries against the creamy layers creates a visually stunning presentation.
Serve immediately for the best texture contrast—warm berries against cool pudding. If you need to prepare ahead, cover the pie with plastic wrap and refrigerate for up to 24 hours. The flavors will meld beautifully, but the whipped cream topping should be added just before serving to maintain its airy texture.
Pro Tips For Making Classic Jello Pudding Pie
- Melt Butter Slowly: Dump cold butter into the flour-sugar mix and you’ll end up with lumps that fight back. Instead, cut the butter into tiny cubes and toss them into the dry ingredients—let them coat like tiny snowballs before adding liquid. I learned this the hard way when my crust turned out like a sad, greasy brick.
- Bloom the Jello: Skip this, and your jello layer will turn out grainy or weak. Sprinkle the Jello powder over cold water (or milk, if using) first, let it sit for 2–3 minutes to fully dissolve, then heat gently. Sounds fussy, but it guarantees that silky texture—no one wants a chewy mouthful of regret.
- Don’t Overmix the Crust: The second you start stirring that butter-flour-sugar mix, resist the urge to go full speed. Use a fork or your fingers to work it just until it clumps—overmixing makes the crust tough. I was skeptical until I tried it: the difference between a flaky, melt-in-your-mouth base and a dense one is that little bit of restraint.
- Chill the Pudding Filling: Pour the hot pudding mix into the crust while it’s still warm, and you’ll end up with a soggy bottom. Let the pudding cool to room temperature (about 20 minutes) before assembling—this keeps the layers clean and the texture perfect. Yes, even if you’re impatient like me.
Perfect pairings for this classic jello pudding pie
Creamy Toppings
Whipped cream is the classic topping for Jello pudding pie, but don’t stop there. I like adding a layer of homemade chocolate ganache (melt ½ cup semi-sweet chocolate chips with ¼ cup heavy cream) for a decadent twist.
For a lighter option, try coconut whipped cream—whip 1 cup chilled coconut cream with 1 tsp vanilla until fluffy. 🥥
Fruit Accents
Fresh berries add vibrant color and a juicy contrast. I recommend raspberries or blackberries for their tartness, which balances the sweetness. For a tropical vibe, use mandarin orange segments or mango slices.
Arrange them in concentric circles or scatter them randomly for a rustic look. A sprinkle of powdered sugar enhances their appearance.
Crunchy Contrast
Add texture with a sprinkle of crushed graham crackers or toasted nuts. I love pecans or walnuts for their buttery flavor. For extra crunch, press crushed Oreos into the whipped cream layer before adding berries. This adds a fun, unexpected element that keeps every bite interesting.
Boozy Upgrades
For an adult-friendly twist, fold 1 tbsp coffee liqueur (like Kahlúa) into the pudding layer or drizzle caramel sauce over the whipped cream. A splash of vanilla vodka in the whipped cream adds subtle depth. Serve with a sprinkle of cocoa powder for a sophisticated finish. 🍷
Seasonal Swaps
Summer calls for citrus zest (lemon or lime) mixed into the whipped cream, while fall begs for pumpkin spice whipped cream (add ½ tsp pumpkin pie spice to the whipped cream). Winter versions shine with cinnamon-dusted whipped cream and candied cranberries on top. Adjust flavors to match the season’s harvest.
Make-Ahead Garnishes
Prep garnishes ahead to streamline serving. Store berries in an airtight container with a paper towel to absorb moisture. Whipped cream can be piped into a bag and refrigerated for up to 24 hours—just rewhip before use.
Chocolate shavings or sprinkles keep well in airtight containers for weeks, ready to elevate the pie at a moment’s notice. ✨
Nutrition facts
Frequently asked questions
Can I make this pie without a pie crust?
The crust adds texture and structure, but you can skip it for a no-crust version. Simply layer the jello mixture directly in a serving dish, then top with pudding. Use a 9-inch round springform pan or individual cups for portion control. The chilling time remains the same (4 hours), but the texture will be softer and less stable.
Why does my jello layer turn out too runny?
Overheating the jello mixture or not cooling it enough before adding to the crust causes runniness. Always stir constantly on low heat until it coats the back of a spoon, then let it cool to room temperature before pouring. If it's still too thin, add 1 tablespoon cornstarch mixed with water to thicken.
How do I prevent the layers from separating?
Separation happens when the pie doesn't chill long enough or if the jello layer isn't fully set before adding pudding. Let each layer firm in the fridge for at least 1 hour between steps, and use a rubber spatula to create clean edges when pouring. For extra insurance, sprinkle a thin layer of powdered sugar between layers to act as a glue.
Can I use store-bought pudding instead of mix?
Yes! Use 2 cups of prepared vanilla pudding (homemade or store-bought) and reduce the milk to 1 cup to maintain consistency. Adjust the sugar to taste since store-bought pudding may already be sweet. The texture will be slightly smoother but equally delicious. For best results, chill the pudding for 1 hour before layering.
What’s the best way to serve leftovers?
Slice the pie and store in an airtight container for up to 5 days. Refrigerate until fully chilled before serving. To restore texture, let slices sit at room temperature for 10 minutes before adding fresh whipped cream and garnishes. For a quick refresh, dip slices in warm chocolate sauce or caramel for a decadent twist.