
Desserts
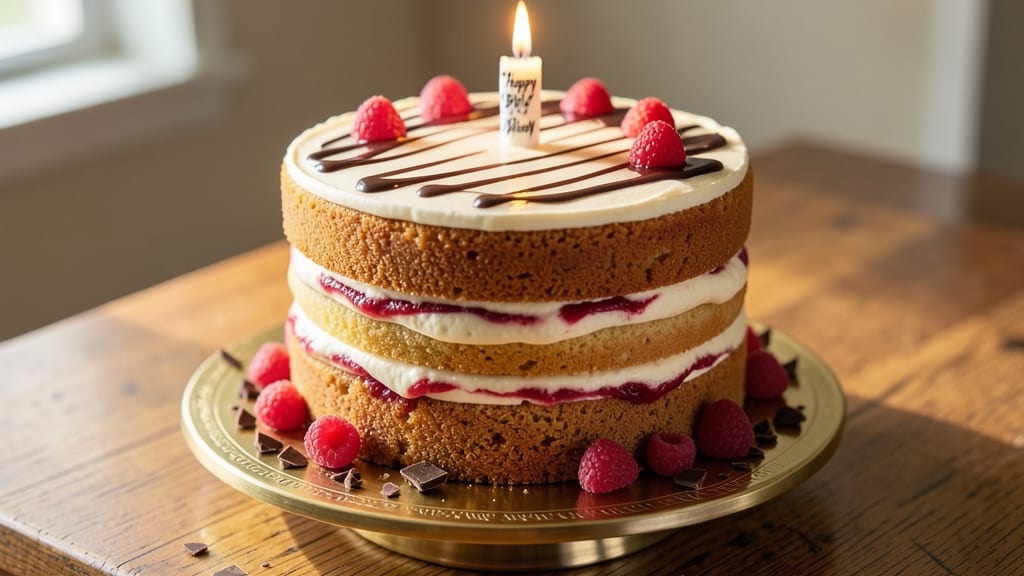
This classic birthday cake recipe delivers the timeless combination of moist vanilla layers and swirling buttercream that makes every celebration feel special. ✨ The secret lies in precise measurements and gentle folding to maintain that signature light, airy texture—something even beginners can master with just a few key techniques.
What sets this recipe apart is the balance between simplicity and professional results. You'll work with standard pantry ingredients like all-purpose flour, granulated sugar, and vanilla extract, but the method ensures layers that stay tender and frosting that swirls beautifully.
The cake bakes at 350°F for 25-30 minutes, giving you perfect golden domes every time.
By the time you're done, you'll have a cake with three rich vanilla layers, separated by velvety buttercream swirls that create that iconic birthday look. The frosting isn't just decorative—it adds sweetness that complements the cake's natural flavor without overpowering it.
This is the kind of cake that tastes as good as it looks.
Perfect for birthdays, anniversaries, or any celebration that calls for a crowd-pleasing centerpiece. The recipe scales easily for larger gatherings, and the techniques translate perfectly to cupcakes or sheet cakes when you're ready to experiment. Let's get baking!
Ingredients for classic birthday cake
Twelve essential ingredients transform into three perfect layers of vanilla heaven with swirling buttercream.
| Ingredient | Amount | Notes |
|---|---|---|
| All-Purpose Flour 🌾 | 3 cups | Sifted for lightness, plus extra for dusting |
| Granulated Sugar 🍚 | 2 ¼ cups | Divided for cake and buttercream |
| Unsalted Butter 🧈 | 1 ½ cups | Cold, cubed, room temperature preferred |
| Large Eggs 🥚 | 6 whole | Room temperature for even baking |
| Pure Vanilla Extract 🌿 | 2 tbsp | High-quality, imitated extract works |
| Milk 🥛 | 1 cup | Room temperature, whole preferred |
| Baking Powder 🧂 | 2 tsp | Aluminum-free for consistent rise |
| Salt 🧂 | ½ tsp | Fine sea salt for balanced flavor |
| Vanilla Bean Paste 🌿 | 1 tbsp | For intensified vanilla aroma |
| Powdered Sugar 🍚 | 4 cups | Sifted for smooth buttercream |
| Heavy Whipping Cream 🥛 | 1 cup | Cold, 35% fat minimum |
| Cornstarch 🌾 | 2 tbsp | For buttercream stability |
The foundation begins with all-purpose flour—King Arthur or Gold Medal brands are ideal for their consistent protein content. Granulated sugar should be domestic white (not raw or turbinado) to ensure proper dissolving and cake structure. For butter, Land O'Lakes or Plugrá are reliable choices, but avoid salted varieties. Eggs must be large and room temperature—cold eggs create dense layers. Pure vanilla extract from McCormick or Nielsen-Massey guarantees authentic flavor, while vanilla bean paste adds depth without overpowering. The baking powder should be aluminum-free to prevent metallic aftertaste, and Diamond Crystal is the gold standard for consistent leavening. Powdered sugar for the buttercream should be sifted to eliminate lumps, and Domino is widely trusted for its fine texture. Heavy whipping cream should be 35% fat minimum—Hillfarm or Organic Valley are excellent choices for stable whipping.
Substitutions begin with flour alternatives: King Arthur measure-for-measure gluten-free blend works well, though texture may vary slightly. Sugar swaps include coconut sugar (1:1 ratio) or honey (reduce by 1/4 cup). For butter, vegetable shortening can be used (1:1 ratio), though flavor differs. Egg substitutes include flax eggs (1 tbsp ground flax + 3 tbsp water per egg) or aquafaba (3 tbsp per egg). Vanilla extract can be replaced with vanilla sugar (1 tbsp per 1 tbsp extract), though intensity is reduced. For buttercream, cream cheese frosting (add 8 oz cream cheese) offers tangy variation. Powdered sugar can be substituted with confectioners' sugar (same thing) or blended granulated sugar (though texture suffers). Heavy whipping cream can be replaced with whipped cream (36% fat) or coconut cream (chilled overnight).
Store baked layers in an airtight container at room temperature for up to 3 days or refrigerate for 5 days. Buttercream keeps 5 days refrigerated or 3 months frozen—thaw at room temperature before use. Unbaked dough can be refrigerated for 2 days or frozen for 3 months (thaw overnight). For long-term storage, wrap each layer individually in plastic wrap and freeze. Buttercream should be whipped again after thawing for optimal texture. Garnishes like sprinkles or fresh berries should be added just before serving to maintain freshness.
Why You'll Love This Recipe
- No-Fuss Mixing: The butter and sugar cream in seconds—no food processor needed. I just use a sturdy spoon and my arms; it’s that simple. That rich, velvety base is the secret to how light and tender the crumb stays.
- Vanilla Butter Bliss: That pure vanilla extract? It’s not just flavor—it’s the soul of the cake. The butter keeps it moist, but the vanilla makes every bite taste like a warm hug from your favorite childhood memory. Honestly, I’ve tried store-bought frosting, but nothing beats the real deal on this cake.
- Birthday Every Day: Make it for a party, a surprise lunch, or just because Tuesday. The same batter works for cupcakes, sheet cake, or even a quick loaf—no recipe tweaks needed. My kids ask for it on random afternoons, and I always say yes.
- Budget-Friendly Staples: Flour, sugar, butter, eggs—these are ingredients you already have. No fancy substitutions, no last-minute grocery runs. And the leftovers? They last forever in the fridge, so you’re never scrambling for dessert again. (Yes, even on a Tuesday night.)
Step-by-step instructions for classic birthday cake
Here's the method that delivers a timeless vanilla cake with professional swirls and perfect height.
👨🍳 Step 1: Prepare the Cake Batter
Preheat your oven to 350°F and grease two 9-inch round cake pans with nonstick spray, then dust with a thin layer of the 3 cups all-purpose flour you've set aside for dusting. Line the bottoms with parchment circles for easy removal.
In a stand mixer fitted with the paddle attachment, beat the 1.5 cups unsalted butter and 1 cup granulated sugar (reserve the remaining 1.25 cups granulated sugar for later) on medium speed for 3-4 minutes until light and fluffy. This creaming process incorporates air, which creates the tender crumb we want in a classic birthday cake.
Add the 6 whole large eggs, one at a time, mixing well after each addition. Then stir in the 2 tbsp pure vanilla extract and 1 tbsp vanilla bean paste until fully combined. Scrape down the sides of the bowl to ensure even mixing.
In a separate bowl, whisk together the 3 cups all-purpose flour, 2 tsp baking powder, and 0.5 tsp salt. Gradually add this dry mixture to the wet ingredients, alternating with the 1 cup milk, beginning and ending with the flour. Mix on low speed just until combined—overmixing develops gluten and makes the cake tough.
Divide the batter evenly between the prepared pans, smoothing the tops with a spatula. Bake for 25-30 minutes or until a toothpick inserted in the center comes out clean. Rotate the pans halfway through baking for even browning. Let the cakes cool in the pans for 10 minutes, then transfer to a wire rack to cool completely.
🥘 Step 2: Create the Vanilla Buttercream
While the cakes cool, prepare the buttercream by beating the 1.5 cups unsalted butter (softened but not melted) in a stand mixer fitted with the paddle attachment until smooth and creamy. Gradually add the 4 cups powdered sugar and the remaining 1.25 cups granulated sugar, mixing on low speed until incorporated.
Add the 1 cup heavy whipping cream and mix until smooth. In a small bowl, whisk together the 2 tbsp cornstarch with 2 tablespoons milk to create a slurry. Slowly add this to the buttercream mixture while mixing on low speed. This cornstarch slurry helps stabilize the buttercream and gives it that silky, professional texture.
Finally, add the 2 tbsp pure vanilla extract and 1 tbsp vanilla bean paste to the buttercream and mix until fully combined. The buttercream should be smooth, thick, and pipeable. If it's too thick, add 1 teaspoon milk at a time until it reaches the desired consistency. Cover and chill in the refrigerator for 30 minutes to firm up slightly before piping.
🍳 Step 3: Assemble the Cake with Swirls
Once the cakes are completely cool, level the tops if necessary using a serrated knife. Place one cake layer onto a cake stand or plate. Spread a generous layer of chilled buttercream over the top, leaving a ½-inch border around the edges. This will create the classic swirl effect.
Using an offset spatula or bench scraper, create a well in the center of the buttercream. Place the second cake layer on top and press down gently. Spread another layer of buttercream over the top and sides of the cake, creating a smooth surface. Use a piping bag fitted with a star tip to pipe decorative swirls on top of the cake, starting from the center and working outward.
For the sides, pipe buttercream rosettes or simple swirls around the cake, spacing them evenly. Chill the assembled cake in the refrigerator for 15 minutes to help the buttercream set slightly before serving. This classic birthday cake delivers the perfect balance of tender crumb, rich vanilla flavor, and professional-looking swirls.
Pro Tips For Making Classic Birthday Cake
- Cream Butter Slowly: I learned this the hard way—dumping cold butter into sugar and whipping it like crazy just creates a greasy mess. Instead, soften your butter first (it should dent when pressed), then beat it with the sugar on medium speed for 2-3 minutes until it’s light and fluffy. That’s when the air gets incorporated, and your cake won’t turn out dense.
- Sift That Flour: Skipping the sifting is lazy, and your cake will suffer. Flour settles over time, packing more air into your batter and creating a smoother texture. Use a fine-mesh sieve and tap it gently over your bowl—yes, even if you’re in a hurry. The extra 30 seconds makes a real difference.
- Room-Temp Eggs Only: Cold eggs? Nope. They won’t blend smoothly and can cause lumps in your batter. Take your eggs out of the fridge 30 minutes before mixing—just crack them into a bowl, give them a quick whisk, and let them sit. Warm eggs incorporate better and keep your cake tender, not gummy.
- Don’t Overmix: Once your batter looks smooth, stop. Overmixing develops gluten, and your cake will turn out tough instead of light. Fold in the dry ingredients just until combined—no need to stir like you’re making pancakes. A few streaks of flour? That’s fine. A fully blended batter? That’s overkill.
Common mistakes when making perfect results
Overmixing the Batter
One of the most common mistakes is overmixing the cake batter after adding the dry ingredients. When you mix beyond the point of just combining, you activate the gluten in the flour, creating a tough, dense cake instead of the light, tender texture we want.
I always use a stand mixer on low speed and stop as soon as the batter comes together—it should look slightly lumpy, not smooth. 🌾
Skipping the Cooling Step
Rushing to frost your cake before it's completely cooled is a recipe for disaster. Hot cake layers will melt the buttercream, creating a soggy mess. Let each layer cool in the pan for 10 minutes, then transfer to a wire rack to cool completely.
I've learned this the hard way—patience here makes all the difference in texture and presentation.
Incorrect Butter Temperature
The butter for both the cake and buttercream must be at room temperature (about 65-68°F). Cold butter creates dense cake layers, while melted butter can cause the buttercream to separate. I recommend taking your butter out of the fridge 1-2 hours before baking.
For the buttercream, it should be soft but not greasy—press a finger into it; if it leaves a slight indentation, it's perfect. 🧈
Uneven Baking
Failing to rotate your cake pans halfway through baking often results in uneven browning and doneness. The oven's heat circulates more in some areas, so I always rotate my pans after 15 minutes of baking.
This ensures both layers bake evenly and reach the perfect golden-brown color. Also, check for doneness with a toothpick—it should come out with a few moist crumbs, not wet batter.
Buttercream Consistency Issues
Buttercream that's too thick or too thin can ruin your cake's appearance. If it's too thick, add milk 1 teaspoon at a time while mixing. If it's too thin, chill it for 15-20 minutes to firm up.
I find that using a cornstarch slurry (2 tbsp cornstarch + 2 tbsp milk) helps stabilize the buttercream and gives it that professional silky texture. Always chill your buttercream for 30 minutes before piping to make it easier to work with. 🥛
Improper Swirl Technique
The classic swirl effect requires a light touch. Many people overfill the piping bag or press too hard, creating messy, uneven swirls. I recommend using a star tip (like Wilton 1M) and starting from the center of the cake, working outward in smooth, even strokes.
Leave about ½-inch of space between swirls to maintain the cake's structure. Practice on parchment paper first if you're new to piping!
Nutrition facts
Frequently asked questions
How do I adjust this recipe for a smaller or larger cake?
This recipe makes a two-layer 9-inch cake. For a single layer, reduce all ingredients by 1/3. For a three-layer cake, increase all ingredients by 1.5x (except frosting, which needs 1.5x the buttercream). For a sheet cake, spread batter in a 9x13-inch pan and bake for 30-35 minutes at 350°F. Always adjust oven time if scaling up.
Can I make this cake without a stand mixer?
Yes! Use a hand mixer or even a whisk for the buttercream. For the cake batter, mix the wet ingredients by hand in a large bowl, then fold in the dry ingredients with a spatula. Mix just until combined—overmixing is the key challenge without a mixer. The batter should be slightly lumpy for the best texture.
What's the best way to store leftover cake?
Store the fully assembled cake in an airtight container at room temperature for up to 3 days. For longer storage, refrigerate for 5 days or freeze for 3 months. To reheat, let it sit at room temperature for 30 minutes—this prevents condensation from making the frosting soggy. Never freeze an unfrosted cake.
How can I add chocolate flavor to this vanilla cake?
Add ½ cup cocoa powder to the dry ingredients and reduce the flour by 2 tablespoons. For a subtle chocolate note, replace 1 tablespoon vanilla extract with 1 tablespoon instant espresso powder (this enhances chocolate flavor). For a marbled effect, divide the batter and mix ½ cup melted chocolate into half before baking.
Why did my cake sink in the middle?
This usually happens from overbaking or opening the oven too soon. Check doneness with a toothpick—it should have a few moist crumbs, not wet batter. Always bake until the edges pull away from the pan but the center still jiggles slightly. For extra insurance, bake at 325°F for 28-30 minutes instead of 350°F.