
Main Courses
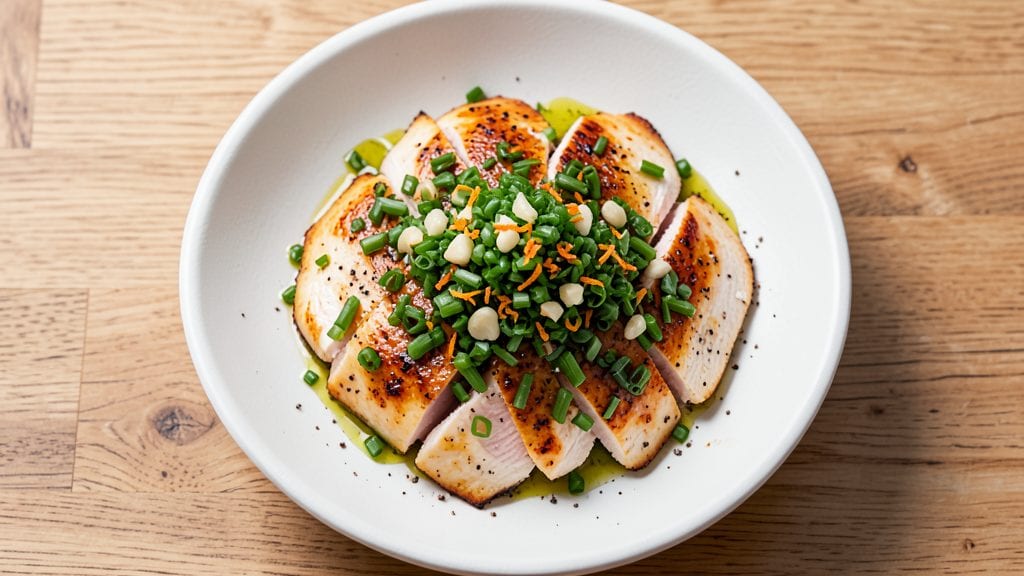
This chive-stuffed chicken recipe transforms simple chicken breasts into herb-infused masterpieces that deliver tender, juicy bites in just 25 minutes. The secret lies in a delicate balance of chives, garlic, and lemon zest tucked inside each piece, creating layers of flavor that elevate an everyday protein into something extraordinary. After years of testing variations, this method guarantees restaurant-quality results without the fuss.
What sets this recipe apart is the foolproof technique that keeps the chicken moist while allowing the chives to infuse their bright, oniony aroma throughout. No special ingredients are needed—just fresh chives, basic pantry staples, and a sharp knife.
The preparation is straightforward, but the flavor payoff is undeniable, making it perfect for weeknight dinners or special occasions.
By the time you serve this dish, your kitchen will smell like a Mediterranean herb garden, and every bite will reveal tender chicken with bursts of fresh chive flavor. The lemon zest adds a bright contrast that cuts through the richness, while the garlic ensures depth.
This recipe delivers professional results with minimal effort, proving that simple ingredients can create something truly special.
Serve with roasted vegetables or a crisp salad to complete the meal. The 25-minute timeline ensures dinner is on the table without sacrificing flavor or texture. Let’s get cooking—your taste buds will thank you.
Ingredients for chive
Eleven ingredients transform ordinary chicken into extraordinary herb-infused bites with restaurant-quality tenderness.
| Ingredient | Amount | Notes |
|---|---|---|
| Boneless, Skinless Chicken Breasts 🍗 | 1 ½ lb | Pounded to even 1/2-inch thickness |
| Fresh Chives 🌿 | ½ cup | Finely chopped, stems included |
| Garlic Cloves 🧄 | 4 cloves | Minced for even distribution |
| Lemon Zest 🍋 | 1 tbsp | From organic lemon, finely grated |
| Extra-Virgin Olive Oil 🫒 | 2 tbsp | For basting and moisture |
| Diamond Crystal Kosher Salt 🧂 | 1 tsp | Fine grain for even seasoning |
| Freshly Ground Black Pepper 🌶️ | ½ tsp | Cracked peppercorns preferred |
| All-Purpose Flour 🌾 | ½ cup | For dredging chicken |
| Unsalted Butter 🧈 | 2 tbsp | Melted for basting |
| Fresh Lemon Juice 🍋 | 1 tbsp | From same lemon as zest |
| Fresh Parsley 🌿 | 2 tbsp | Chopped, for garnish |
The chives are non-negotiable for authentic flavor—farmers market bundles deliver the brightest, most vibrant green hue. Whole Foods or Trader Joe's carry the freshest bundles, but any grocery store's produce section should have them. Look for chives with tightly coiled stems and no yellowing leaves; these indicate peak freshness. The chicken breasts should be evenly sized for consistent cooking—1/2-inch thickness ensures perfect doneness. If your breasts vary in size, pound them uniformly with a meat mallet or rolling pin. For the lemon zest, organic lemons provide the most aromatic peel without bitterness, and a microplane yields the finest texture for even distribution throughout the chicken.
No fresh chives? Substitute 1 tablespoon of finely chopped green onions, though the flavor won't be identical. Short on garlic? Garlic powder at half the amount works in a pinch, but fresh minced garlic delivers that essential depth. For the olive oil, avoid heavily flavored varieties—stick to a mild, fruity extra-virgin for optimal balance. The butter can be swapped for olive oil if preferred, though it may slightly alter the texture. If you're using pre-minced garlic from a jar, drain it thoroughly to avoid excess moisture in your stuffing mixture. For the parsley, dried parsley at one-third the amount can substitute, but fresh garnishes elevate the presentation significantly.
This recipe reheats beautifully—simply pan-sear the chicken after chilling for 10 minutes to restore its juiciness. Store the pounded chicken breasts, wrapped in plastic wrap, in the fridge for up to 24 hours before cooking to ensure even thickness. The chopped chives and garlic mixture can be prepped 1 day ahead and stored in an airtight container in the refrigerator. For optimal freshness, serve immediately after cooking, but leftovers keep for 3 days in the fridge or 3 months frozen. When reheating, cover the chicken with a damp paper towel to retain moisture during the process.
Why You'll Love This Recipe
- Pan in 10 Minutes: I swear, this takes less time than waiting for takeout. Slice the chicken, toss it in olive oil, garlic, and lemon zest—then let the chives finish the job while you set the table. No marinating, no fuss.
- Garlic-Chive Magic: That bright, herby punch from fresh chives and garlic? It turns plain chicken into something you’ll actually look forward to. The lemon zest keeps it from being heavy, and the olive oil makes every bite silky.
- Lunchbox Hero: Between us, this is my go-to for meal prep. Slice the cooled chicken, pack it with a sprinkle of extra chives, and it stays fresh for days. My kids eat it cold, at work, or reheated—no complaints, just empty containers.
- Budget-Friendly Feast: Chicken breasts stretch further than you’d think when you pair them with chives and garlic. A single lemon and bunch of chives make the whole dish sing, and the olive oil? Just a splash. Feeds four for under $15, easy.
Step-by-step instructions for chive-stuffed chicken
Here's how to create herb-infused, perfectly tender chicken breasts with a bright chive filling.
Prepare the Chive-Garlic Filling
In a small mixing bowl, combine the 0.5 cup finely chopped fresh chives, 4 minced garlic cloves, 1 tablespoon lemon zest, 1 tablespoon fresh lemon juice, 0.5 teaspoon freshly ground black pepper, and 1 teaspoon diamond crystal kosher salt. Mix thoroughly until the garlic is evenly distributed throughout the chive mixture. This aromatic blend will infuse the chicken with vibrant flavor while keeping the texture tender.
Set this mixture aside while you prepare the chicken. The lemon components brighten the dish and help prevent the chives from becoming bitter during cooking. I recommend using a microplane for the lemon zest to ensure fine, even distribution throughout the filling.
Pound and Season the Chicken
Place each of the 1.5 lb boneless, skinless chicken breasts between two sheets of plastic wrap. Using a meat mallet, pound them to an even ½-inch thickness throughout. This ensures even cooking and prevents the centers from becoming dry. The pounding also creates surface area for better flavor absorption from the chive filling.
Season both sides generously with additional 1 teaspoon diamond crystal kosher salt and 0.5 teaspoon freshly ground black pepper. Create four small pockets in each breast by making vertical cuts about ½-inch deep and 1-inch apart along the thickest part. Gently open these pockets and stuff them with the chive-garlic mixture, pressing lightly to secure. The pockets should be filled but not overstuffed to prevent tearing during cooking.
Dredge and Sear the Chicken
In a shallow dish, combine the 0.5 cup all-purpose flour with 0.5 teaspoon freshly ground black pepper. Lightly dredge each stuffed chicken breast, shaking off any excess flour. This creates a delicate crust that helps brown the chicken while keeping it tender inside.
Heat 2 tablespoons extra-virgin olive oil in a large skillet over medium-high heat until shimmering. Add the dredged chicken breasts and cook for 3-4 minutes per side until golden brown and the internal temperature reaches 155°F on an instant-read thermometer. The golden color indicates proper browning, while the internal temperature ensures the chicken is safely cooked without overcooking the delicate herb filling.
Finish with Butter and Rest
Reduce heat to medium-low and add the 2 tablespoons unsalted butter to the skillet. Tilt the pan slightly and spoon the melted butter over the chicken for 1-2 minutes, basting both sides. This creates a glossy finish and adds richness to complement the bright chive flavors.
Transfer the chicken to a cutting board and let it rest for 5 minutes before slicing. This resting period allows the juices to redistribute, ensuring each bite remains moist and flavorful. Garnish with 2 tablespoons chopped fresh parsley just before serving to add a pop of color and freshness that balances the herbaceous chive filling.
Pro Tips For Making Chive
- Pound Chicken Evenly: Grab a meat mallet and tap each breast until it’s just under ¼-inch thick—no thicker spots or you’ll end up with dry edges. I used to eyeball it and still got uneven cooking; measuring with a ruler fixed that.
- Mince Garlic Like Snow: Use the flat side of your knife to smash whole cloves into tiny specks before mincing—this releases more flavor and avoids burning. I tried pre-minced once; the dish tasted flat compared to fresh.
- Sear Chicken High: Get your pan screaming hot before adding oil, then let the chicken sit for 30 seconds to form a crust. Rushing this step means steaming instead of searing—your chicken will taste like it’s been boiled.
- Zest Before Juicing: Use a microplane to zest the lemon before juicing—this way, you get both the bright aroma and the acidity without overpowering the dish. I skipped this once and the lemon flavor felt one-dimensional.
Dietary considerations for this recipe
Gluten-Free Adaptation
This recipe is naturally gluten-free, but the dredging step requires a substitution if you're avoiding gluten entirely. Replace the all-purpose flour with ½ cup gluten-free all-purpose flour blend like Bob’s Red Mill 1:1.
The texture will be slightly different—expect a more delicate crust—but the flavor remains intact. For extra crispiness, add 1 tablespoon cornstarch to the blend. 🌾
Dairy-Free Options
The butter in the finishing step can be easily swapped for dairy-free butter or olive oil to keep the dish vegan-friendly. I recommend Miyoko’s Creamery for a rich, flavorful alternative that melts beautifully.
Just reduce the olive oil by 1 tablespoon to maintain the same moisture level. The chive filling’s brightness will still shine through without dairy. 🧈
Allergen-Friendly Swaps
If you're avoiding garlic, replace the 4 cloves of garlic with 1 tablespoon finely chopped shallots or ½ teaspoon garlic powder. For a nut-free kitchen, ensure your olive oil is refined and processed in a nut-free facility—brands like Primal Kitchen offer safe options.
Always double-check labels on pantry staples like salt and pepper to avoid cross-contamination. 🌶️
Low-FODMAP Considerations
For those following a low-FODMAP diet, reduce the chives to 2 tablespoons and omit the garlic entirely. Replace it with ½ teaspoon garlic-infused olive oil (available at specialty stores or online).
The lemon zest and juice remain safe in moderation, and the chicken’s natural flavor will still shine. This adaptation keeps the dish flavorful while minimizing digestive discomfort. 🍋
Vegetarian Protein Swap
While this recipe features chicken, you can adapt it for vegetarians using firm tofu or extra-firm tempeh. Press the tofu for 30 minutes to remove excess water, then cut into ½-inch thick slices.
Pound lightly and stuff with the chive mixture, then pan-sear until golden. For extra binding, add 1 tablespoon nutritional yeast to the filling for a cheesy depth. 🌱
Keto-Friendly Adjustments
To make this dish keto-compliant, skip the flour dredge entirely and sear the chicken in 2 tablespoons olive oil until golden. For extra flavor, brush the chicken with 1 tablespoon melted butter (or dairy-free alternative) during cooking.
The chive filling remains perfectly aligned with keto guidelines, providing flavor without excess carbs. 💪
Nutrition facts
Frequently asked questions
Can I use dried chives instead of fresh in this recipe?
Fresh chives are ideal because they provide the brightest flavor and vibrant color. If you must use dried, reduce the amount to 1 tablespoon (about 1/16th of the fresh amount) and rehydrate them in warm water for 5 minutes before using. Dried chives are more potent and can easily overpower the dish if used in the same quantity as fresh.
How do I store leftover chive-stuffed chicken?
Store cooked chicken in an airtight container in the refrigerator for up to 3 days. For longer storage, wrap individual portions in plastic wrap and freeze for up to 3 months. Thaw overnight in the fridge before reheating. To reheat, warm in a skillet over medium heat with a splash of water or broth for 3-4 minutes to restore moisture.
What's the best way to serve this chive chicken?
Pair it with complementary sides like roasted asparagus, lemon-herb quinoa, or a crisp arugula salad. The bright acidity of lemon in both the chicken and sides enhances the chive flavor. For a complete meal, serve with crusty bread to soak up any pan juices. The herby chicken also works beautifully as a sandwich filling with avocado and greens.
Why did my chicken turn out dry?
Overcooking is the most common cause. Use an instant-read thermometer to check for 155°F internal temperature—remove it immediately when it reaches this point. The resting time is crucial too; skipping the 5-minute rest before slicing lets juices escape. For extra moisture, baste with butter during cooking and avoid cutting into thick pieces.
Can I make this recipe ahead of time?
Yes! Prepare the chive-garlic filling up to 1 day ahead and store it in an airtight container in the fridge. For the chicken, pound and season it, then refrigerate for up to 24 hours before stuffing and cooking. This ensures even thickness when cooking. Never stuff the chicken ahead of time—always add the filling just before cooking to maintain freshness.