
Appetizers
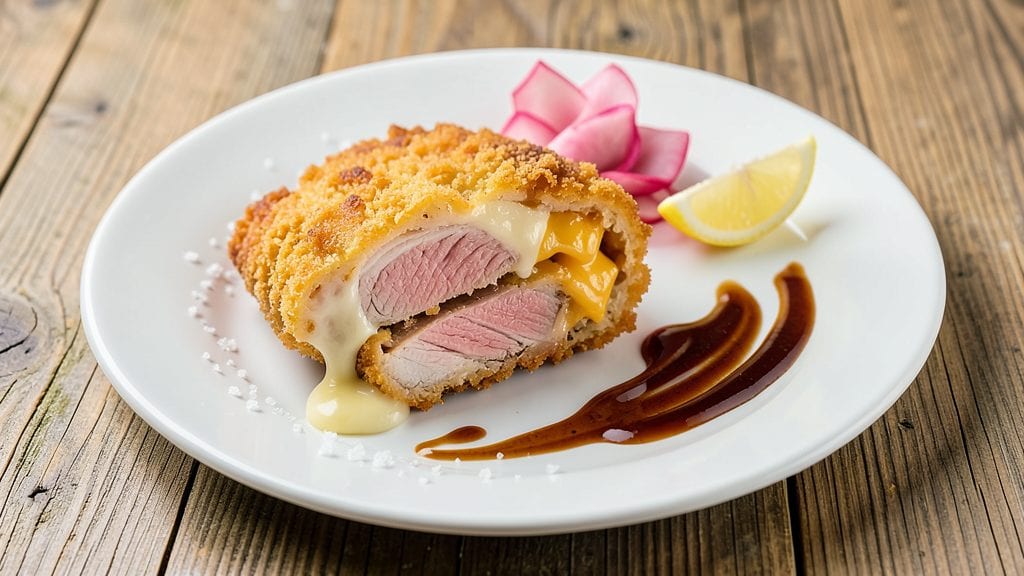
This cheese katsu recipe delivers the perfect balance of crispy, golden breading and gooey melted cheese in every bite—just like your favorite Japanese comfort food.
The secret lies in a light, airy batter that stays crisp even after frying, while the right cheese (mozzarella or cheddar) stretches into that signature pull when cut. I’ve perfected this technique after years of testing, ensuring the cutlet stays juicy inside while achieving that irresistible crunch outside.
The process is straightforward but requires precision: thin-cut pork or chicken cutlets get coated in a flour mixture, dipped in a light batter, and fried to a golden finish before being topped with cheese.
The key is maintaining the right oil temperature—too hot, and the breading burns; too cool, and the cheese won’t melt properly. Once fried, the cheese transforms the dish from ordinary to extraordinary, creating that signature stretchy pull that makes it impossible to resist.
By the time you’re done, you’ll have a crispy, cheesy cutlet that’s perfect for serving with tonkatsu sauce, steamed rice, or a fresh salad. The combination of textures—crunchy, creamy, and tender—makes it a standout appetizer or even a satisfying main dish.
This recipe is designed to impress, whether you’re cooking for a crowd or treating yourself to a homemade Japanese favorite.
Ready to master the technique? Let’s break down each step to ensure you achieve that perfect crispy-cheesy balance every time. The result is a dish that tastes like it came straight from a Tokyo izakaya, but with the convenience of your home kitchen.
Ingredients for cheese katsu
Crispy, cheesy, and impossible to resist—this katsu recipe needs just 12 simple ingredients.
| Ingredient | Amount | Notes |
|---|---|---|
| Pork Cutlets 🥩 | 1 ½ lb | Thin-cut, boneless, pounded even |
| All-Purpose Flour 🌾 | 1 ½ cups | For breading mixture |
| Panko Breadcrumbs 🍞 | 1 cup | Light and crispy |
| Large Eggs 🥚 | 2 whole | Room temperature for best coating |
| Baking Powder 🍞 | 1 tbsp | For light, airy batter |
| Milk 🥛 | 1 cup | Whole milk for richness |
| Shredded Mozzarella Cheese 🧀 | 8 oz | Freshly shredded, low-moisture |
| Vegetable Oil 🫒 | 3 cups | For deep frying, 350°F |
| Salt 🧂 | 1 tsp | Kosher or sea salt |
| Black Pepper 🌶️ | ½ tsp | Freshly ground preferred |
| Garlic Powder 🧄 | 1 tsp | For extra flavor |
| Tonkatsu Sauce 🍶 | ½ cup | Store-bought or homemade |
The pork cutlets are non-negotiable for that authentic texture. Thin-cut pork loin works best—ask your butcher for slices about 1/4-inch thick. If you can't find pre-cut, pound a whole cutlet to even thickness with a meat mallet (or rolling pin in a pinch). Costco or Whole Foods usually carry the right cuts. For extra crispiness, pat the cutlets completely dry before breading—moisture is the enemy of that golden crust. The mozzarella? Freshly shredded is a must—pre-shredded gets gummy when melted. Grab a block and shred it yourself for that perfect stretch.
No panko? Regular breadcrumbs plus a pinch of baking powder works in a bind, but panko gives that signature airy crunch. Running out of milk? Water or beer (yes, really) at the same amount keeps the batter light. Tonkatsu sauce missing? Worcestershire sauce plus a splash of soy sauce gets you close. The oil temperature is critical—350°F is non-negotiable. Use a deep fry thermometer if you've got one; otherwise, test with a breadcrumb (it should sizzle and float). For the cheese, sharp cheddar mixed with mozzarella adds a tangy kick that pairs perfectly with the crispy exterior.
This dish is all about timing—fry the cutlets just until golden (about 3-4 minutes per side), then add the cheese immediately while the oil is still hot. Work in batches to keep the oil temperature steady. Leftover cutlets? Reheat in a 300°F oven for 10 minutes to revive the crunch. Store any extra cheese in an airtight container in the fridge for up to 5 days. The tonkatsu sauce keeps for 2 weeks unopened, so grab a backup bottle—you'll want to make this again.
Why You'll Love This Recipe
- Crispy in Minutes: I swear, the double-fry method takes just 12 minutes total—no waiting around. Toss the cutlets in flour, dip in egg, coat with panko, and hit the pan. That golden crust happens faster than you can make coffee.
- Cheese Pull Magic: Between us, the melted cheese inside while the panko stays crispy? Chef’s kiss. The baking powder in the batter gives it that light, airy bite, and the gooey mozzarella (or whatever you use) makes every bite feel like a hug.
- Lunchbox Hero: Here’s what sold me—these reheat perfectly for packed lunches. Wrap one in parchment, pop it in a container, and it’s still crispy by noon. My kids fight over them, and honestly, so do I.
- Budget Crunch Savior: Pork cutlets stretch further than you’d think, and panko costs pennies per serving. Eggs and flour? Pantry staples. I make six at a time, freeze half, and never stress about dinner—especially when my wallet thanks me.
Step-by-step instructions for crispy breaded cutlets with melty cheese pull
Here's how to achieve that legendary crispy exterior and gooey cheese pull every time.
Prepare the Pork Cutlets for Perfect Crispiness
Start by patting the 1.5 lb pork cutlets completely dry with paper towels—this is absolutely critical for crispy breading. Any moisture trapped underneath will steam instead of crisp. Place each cutlet between two sheets of plastic wrap and pound them to an even ¼-inch thickness using a meat mallet or rolling pin. This ensures even cooking and maximum surface area for that crispy crust.
Season both sides generously with 1 tsp salt, 0.5 tsp black pepper, and 1 tsp garlic powder. I like to press the spices into the meat so they adhere well. Let the seasoned cutlets rest at room temperature for 15 minutes before breading—this helps them cook more evenly and prevents cold spots in the center.
Create the Light, Airy Batter Mixture
In a large shallow bowl, whisk together the 1.5 cups all-purpose flour, 1 tbsp baking powder, and a pinch of extra salt. The baking powder will create tiny air pockets that make the crust extra crispy. In another bowl, beat the 2 whole large eggs until just combined, then whisk in the 1 cup milk and the remaining spices.
This batter should be thin but coat the back of a spoon—about the consistency of heavy cream. If it's too thick, add 1-2 tablespoons of milk to loosen it. The key here is getting a light, airy coating that will create that signature crispy shell while keeping the inside tender. Keep both bowls nearby as you'll work quickly through the breading process.
Bread the Cutlets for Maximum Crunch
Working with one cutlet at a time, dip it into the egg mixture first, letting any excess drip off. Then press it firmly into the 1 cup panko breadcrumbs, coating all sides completely. The panko's light, airy texture is what gives cheese katsu its signature crunch. Place the breaded cutlet on a wire rack set over a baking sheet—this allows air to circulate underneath for even crisping.
Repeat with all cutlets, working quickly so the breading stays crisp. I like to double-bread the thickest parts by dipping them back in egg and panko for extra protection. Let the breaded cutlets rest for 5 minutes before frying—this helps the breading adhere better and prevents it from falling off in the hot oil.
Deep Fry to Golden Perfection
Heat 3 cups vegetable oil in a deep skillet or Dutch oven to 350°F. Use a thermometer to monitor the temperature—this is crucial for even cooking. Fry the cutlets in batches (don't overcrowd the pan) for 3-4 minutes per side until they're deep golden brown and the internal temperature reaches 145°F. The oil should be bubbling gently but not smoking.
Here's where the magic happens: as soon as they're golden, transfer the cutlets to a wire rack set over a paper towel-lined plate. This drains excess oil and keeps them crispy. While they're still hot, use a slotted spoon to press 4 oz of shredded mozzarella cheese onto each cutlet. The residual heat will melt the cheese into that irresistible pull you're craving.
Assemble and Serve with Tonkatsu Sauce
Let the cheese-melted cutlets rest for 2 minutes—just enough time for the cheese to set slightly but still maintain that gooey center. Cut each cutlet diagonally into 4 pieces and arrange them on a serving plate. Drizzle with the 0.5 cup tonkatsu sauce and serve immediately with steamed rice and pickled vegetables.
The secret to perfect cheese katsu is in the timing—every step from breading to frying must be executed precisely. The result should be cutlets with a shatteringly crisp exterior, a juicy pork interior, and streaky, melty cheese that pulls perfectly with each bite. Trust the process, and you'll have restaurant-quality cheese katsu right in your own kitchen!
Pro Tips For Making Cheese Katsu
- Pound Flat, Not Thin: Cheese katsu needs a thick cutlet—about ½-inch—to hold up to frying without turning into a sad, greasy pancake. I used to flatten mine too aggressively, and they’d soak up oil like a sponge. Tap the pork firmly with a meat mallet (or rolling pin) until even, but leave it with some body.
- Salt the Pork First: Season the pork cutlets generously with salt and pepper before dredging in flour. This ensures the seasoning sticks to the meat, not just the breading. I learned this the hard way—my first batch tasted bland because the salt got buried under layers.
- Double-Dip the Egg: For extra crispiness, dip the floured cutlet into the egg twice, letting excess drip off between coats. The second pass seals the panko better than a single dip. Sounds fussy, but it’s the difference between a crumbly crust and one that stays put.
- Fry in Batches: Overcrowding the pan drops the oil temperature, leading to greasy, uneven cooking. Fry one or two cutlets at a time, and resist the urge to flip too soon—wait until the edges are deep golden (about 3 minutes per side). Your future self will thank you.
Creative variations of this cheese katsu
Spicy Kimchi Katsu
Transform your cheese katsu into a Korean-Japanese fusion by adding 2 tbsp kimchi paste (or finely chopped kimchi) to the flour mixture before breading. The tangy, spicy kick from the fermented cabbage cuts through the richness beautifully.
Top with 2 oz shredded mozzarella mixed with 1 tbsp gochujang for extra heat and depth. Serve with a side of ssamjang for dipping—it’s a game-changer. 🌶️
Buffalo Chicken Katsu
Swap pork for 1.5 lb boneless chicken thighs, pounded to ¼-inch thickness, and toss the breaded cutlets in 2 tbsp melted butter and 1 tbsp hot sauce after frying. Top with 4 oz shredded cheddar cheese and broil for 2 minutes to melt.
Drizzle with extra hot sauce and serve with blue cheese dressing for dipping. This fusion is a crowd-pleaser at parties. 🔥
Vegetarian Mushroom Katsu
For a plant-based version, use 1 lb king oyster mushrooms (sliced lengthwise) as the base. Marinate them in 2 tbsp soy sauce and 1 tbsp mirin for 30 minutes before breading.
Top with 4 oz vegan mozzarella and a sprinkle of nori flakes for an umami boost. Serve with a side of miso soup and steamed greens for a complete meal. 🍄
Sweet Teriyaki Glazed Katsu
After frying, brush the cutlets with ½ cup store-bought or homemade teriyaki sauce (I love Kikkoman’s) while still hot. Top with 4 oz mozzarella and 2 tbsp crushed pineapple for a tropical twist.
The sweet-savory glaze pairs perfectly with the melty cheese. Garnish with sesame seeds for extra texture. 🍍
Crispy Tuna Katsu
Use 1.5 lb sushi-grade ahi tuna, sliced into ¼-inch thick medallions, for a luxurious twist. Skip the egg wash and dip the tuna directly into the batter, then bread with panko.
Fry until golden and top with 4 oz cream cheese mixed with 1 tbsp soy sauce. Serve with wasabi mayo and pickled ginger for an authentic Japanese sushi bar experience. 🐟
Breakfast Cheese Katsu
Turn this into a brunch star by adding a fried egg on top after the cheese melts. Use sharp cheddar instead of mozzarella for a richer flavor, and drizzle with hot sauce.
Serve on a toasted brioche bun with a side of hash browns for a decadent breakfast-for-dinner option. The runny yolk ties everything together perfectly. 🍳
Nutrition facts
Frequently asked questions
Can I use chicken instead of pork for cheese katsu?
Chicken thighs work beautifully—they stay juicy even when fried. Pound them to ¼-inch thickness and follow the same breading process. For extra flavor, marinate the chicken in 1 tbsp soy sauce and 1 tsp garlic powder for 30 minutes before breading. The texture will be slightly different but just as delicious.
What's the best cheese to use for maximum melt and pull?
Freshly shredded low-moisture mozzarella is your best bet—it melts smoothly and creates that signature stretch. For extra richness, mix in 20% sharp cheddar. Avoid pre-shredded cheese (it contains anti-caking agents that make it gummy). Pro tip: Shred your own block and store it in the freezer to prevent clumping.
How do I keep the breading from getting soggy?
Three key steps: 1) Pat your cutlets completely dry before breading, 2) Use a wire rack for frying (not a plate) to allow airflow, and 3) Fry in 350°F oil until golden (not pale). The residual heat from the oil keeps the breading crisp even after adding cheese. Work in small batches to maintain oil temperature.
Can I make cheese katsu ahead of time?
Yes, but with some adjustments. Fry the cutlets as directed, then let them cool completely. Store in an airtight container in the fridge for up to 2 days. Reheat in a 375°F oven for 10 minutes to revive crispiness, then add cheese fresh. For freezer prep, freeze uncooked breaded cutlets (before frying) for up to 1 month—cook straight from frozen.
What's the secret to getting that golden brown crust?
The perfect crust comes from two things: 1) A light batter (thin enough to coat a spoon) with baking powder for lift, and 2) Maintaining 350°F oil temperature. Test with a breadcrumb—it should sizzle and float. Don't overcrowd the pan, and fry in batches. The panko should turn deep golden in 3-4 minutes per side.