
Main Courses
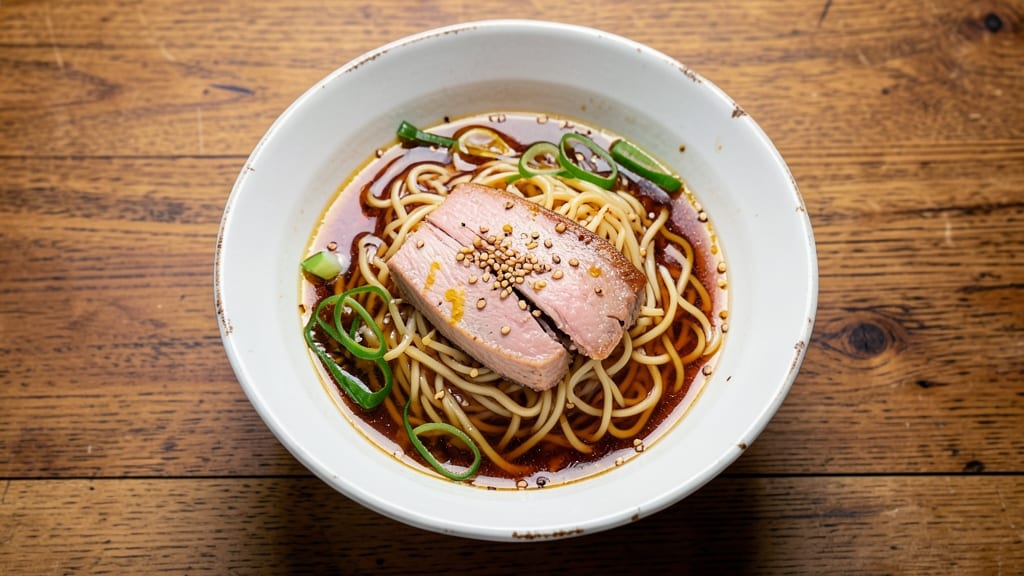
This canned tuna ramen delivers restaurant-quality umami flavor in just 15 minutes—no fancy ingredients required. 💛 I perfected it after my husband David challenged me to make a quick, satisfying lunch that actually tasted homemade.
The secret lies in balancing the salty tuna with bright, fresh toppings and a simple broth upgrade that transforms basic ramen into something special.
What makes this recipe work is its flexibility—you can use store-bought ramen or make your own broth from scratch in minutes. The canned tuna adds rich protein and depth, while quick-pickled veggies or a soft-boiled egg take it to the next level.
It's the kind of meal that proves comfort food doesn't have to be complicated or time-consuming.
By the time you're done, you'll have a steaming bowl of flavor-packed ramen with tender noodles, perfectly seasoned broth, and all the textures you crave—crunchy, creamy, and savory all in one bite.
The best part? Every bowl tastes like you spent hours in the kitchen, when really, you just opened a can and boiled some water.
Serve it as-is for a fast weeknight dinner or customize with your favorite toppings—this ramen adapts to whatever you have on hand. Let's get cooking!
Ingredients for canned tuna ramen
Pantry staples meet quick protein for a bowl that tastes like a restaurant lunch.
| Ingredient | Amount | Notes |
|---|---|---|
| Dried Ramen Noodles 🍜 | 2 packages | Any brand, seasoning packet discarded |
| Canned Tuna in Water 🐟 | 2 cans | High-quality, drained well |
| Chicken or Vegetable Broth 💧 | 2 cups | Homemade or quality store-bought |
| Sesame Oil 🫒 | 1 tbsp | Toasted for aroma |
| Soy Sauce 🍶 | 2 tbsp | Low-sodium preferred |
| Rice Vinegar 🍶 | 1 tbsp | For brightness |
| Fresh Ginger 🧄 | 1 tbsp | Finely grated, fresh preferred |
| Garlic Cloves 🧄 | 2 cloves | Minced, fresh or jarred |
| Green Onions 🧅 | 3 whole | Thinly sliced, white and green parts |
| Sesame Seeds 🌾 | 1 tsp | Toasted for crunch |
| Soft-Boiled Eggs 🥚 | 2 whole | Optional, 6-minute cook |
| Red Bell Pepper 🌶️ | ½ cup | Thinly sliced, quick-pickled |
| Sea Salt 🧂 | ½ tsp | Adjust to taste |
| Black Pepper 🌶️ | ¼ tsp | Freshly ground |
| Sriracha or Chili Garlic Sauce 🔥 | 1 tbsp | Optional, for heat |
The ramen noodles are your base—pick any brand, but skip the seasoning packet (we're making our own magic). Nissin or Maruchan are reliable, but honestly, whatever's cheapest works. The tuna is non-negotiable for that rich umami—Wild Planet or Starkist in water (not oil) keeps it light. Broth is where the flavor happens: Kitchen Basics or Pacific Foods are solid store-bought options, but homemade is easy if you've got a few minutes. Fresh ginger and garlic? Grab the jarred minced ginger if you're in a rush, but fresh makes all the difference. I always double-check the canned tuna isn't crushed—it should be flaky and moist.
No sesame oil? Toasted peanut oil works too, but it's not the same. Short on rice vinegar? Apple cider vinegar or lemon juice in a pinch. The quick-pickled red bell pepper is optional but adds that bright crunch—toss slices with a pinch of salt, 1 tsp sugar, and 1 tbsp vinegar for 10 minutes. Skip the eggs if you're vegetarian, but they're worth the 6-minute boil. Trader Joe's sells pre-peeled hard-boiled eggs if you're lazy. For extra richness, stir in 1 tbsp of miso paste with the broth. The sriracha? Only if you're brave—start with half and taste as you go.
This ramen reheats beautifully—just add hot water to the noodles and stir in the toppings. Keeps 3-4 days in the fridge, but honestly, it's better fresh. Make a double batch and freeze portions in airtight containers for up to 3 months. I always save half the toppings for the next day—just add them when reheating. The broth base freezes well too, so you can make it ahead and just add noodles and tuna later. Leftovers taste even better the next day as the flavors meld.
Why You'll Love This Recipe
- I’ll be real: this recipe is my budget’s best friend. A can of tuna, a pack of noodles, and broth? We’re talking under $5 for four servings. It’s the kind of meal that lets me feed my family well without draining my wallet—or my patience when grocery bills pile up. Plus, leftovers? They’re just as good the second day.
- Five-Ingredient Magic: I swear, this is the kind of meal where you open the pantry and boom—dinner’s ready. No chopping, no fussy prep, just toss in the noodles, pour in the broth, and let the tuna and sesame oil work their savory, umami spell. It’s the kind of recipe that makes me feel like a genius when I remember I have it in my back pocket.
- Umami Bomb: That first spoonful of broth with sesame oil swirled in? Pure flavor payoff. The tuna adds a briny richness that cuts through the noodles’ chew, while a splash of soy sauce ties it all together—salty, deep, and just a little addictive. Honestly, it’s the kind of taste that makes me want to eat ramen every night.
- Lunchbox Hero: Between us, this is my go-to for meal prep. Cook a big batch, portion it into containers, and you’ve got a protein-packed lunch that travels like a dream. Add a fried egg on top if you’re feeling fancy, or keep it simple with a sprinkle of green onions—either way, it’s a lunch that won’t leave you sluggish by 1 PM.
Step-by-step instructions for canned tuna ramen
Here's how to transform simple pantry staples into a restaurant-worthy bowl in record time.
🍳 Step 1: Cook the Ramen Noodles and Prepare the Base
Bring 2 cups chicken or vegetable broth to a rolling boil in a medium pot. Add the 2 packages dried ramen noodles (discard the seasoning packets) and cook for 2 minutes—just until al dente. Drain immediately and rinse briefly under cold water to stop the cooking process. This quick cook preserves texture while preventing mushiness.
In the same pot, add 1 tablespoon sesame oil and 1 tablespoon rice vinegar over medium heat. Let it simmer for 30 seconds until fragrant—you'll smell that nutty sesame aroma. This aromatic base forms the flavor foundation for your bowl. Keep the pot warm while you prep the remaining ingredients.
👨🍳 Step 2: Build the Umami-Packed Protein Mixture
In a separate bowl, combine the 2 cans canned tuna in water (drained thoroughly), 2 tablespoons soy sauce, 1 tablespoon finely grated fresh ginger, and 2 minced garlic cloves. Gently fold everything together using a fork—you want the tuna to stay flaky rather than breaking into tiny pieces. This mixture should look like a chunky, slightly pink sauce with visible tuna flakes.
Here's the thing—don't overmix. You're creating a textural contrast where you want some visible tuna pieces for that satisfying bite. If the mixture looks too dry, add 1 tablespoon of the reserved pasta water to help it bind together. Set this aside while you prep the remaining toppings.
🥘 Step 3: Assemble the Bowl Components
First, prepare the quick-pickled red bell pepper: Thinly slice the 0.5 cup red bell pepper and toss with 1 teaspoon sesame seeds, 1 tablespoon sriracha or chili garlic sauce, and 1 teaspoon rice vinegar. Let it sit for 5 minutes while you finish assembling—this gives it just enough time to soften slightly and develop a tangy crunch.
For the soft-boiled eggs (if using), carefully peel the 2 whole soft-boiled eggs and slice them in half lengthwise. The runny yolk will add luxurious richness to each bite. Thinly slice the 3 whole green onions and separate the white and green parts—you'll use them differently in the final assembly.
🍽️ Step 4: Combine Everything for Maximum Flavor
Return the cooked noodles to the pot with the sesame oil and vinegar base. Add the tuna mixture and toss gently to combine. The noodles will absorb the flavors instantly—you'll see the sauce clinging to each strand. If the mixture looks too dry, add 1-2 tablespoons of reserved pasta water to loosen it.
Now for the final assembly: Divide the noodle mixture evenly among 4 bowls. Top each serving with half of the sliced soft-boiled eggs, the quick-pickled red bell pepper mixture, and the sliced green onions. Sprinkle with 0.5 teaspoon sea salt and 0.25 teaspoon black pepper—this balances all the flavors and enhances the umami depth.
⏰ Step 5: Serve Immediately for Peak Freshness
Give everything a final toss right before serving to redistribute all those delicious toppings. The contrast of textures and temperatures is what makes this bowl special—the warm noodles, cool yolk, crisp pickled peppers, and fresh herbs all working together.
I like to serve this with a side of extra sesame seeds sprinkled on top and a drizzle of sesame oil for those who want even more depth of flavor. The bowl should be packed with umami from the tuna, brightness from the vinegar and peppers, and richness from the eggs. Eat it while everything's still vibrant—this dish tastes best fresh!
Pro Tips For Making Canned Tuna Ramen
- Boil Broth First: Dump those ramen noodles straight into cold broth—nope, not happening. Bring your broth to a rolling boil before adding noodles, or they’ll turn to mush before they’re done. Trust me, I’ve seen it happen when I got lazy and just tossed everything in at once.
- Drain Tuna Dry: That watery canned tuna is your enemy here. Drain it thoroughly, then give it a quick press with a paper towel to soak up extra moisture. Wet tuna makes your broth watery, and nobody wants sad, diluted ramen.
- Salt the Broth Early: Season your broth before adding noodles—noodles absorb salt like sponges, and you’ll end up with bland soup if you wait. Taste it halfway through cooking and adjust; you’re aiming for something that’d make a sailor nod in approval.
- Toast the Noodles: Skip the package’s flavor packet (it’s just salt and MSG). Instead, dry-fry the uncooked noodles in a pan for 30 seconds until they’re golden and smell nutty. It adds depth—like the difference between instant coffee and a real cup of joe.
Serving suggestions for this dish
Classic Toppings
Fresh green onions are my go-to topping—their sharp white bulbs and mild green tops add a bright contrast to the rich tuna and noodles. I like to slice them thinly and scatter them over the top just before serving.
For extra crunch, toast 1 teaspoon sesame seeds in a dry pan for 30 seconds until golden and sprinkle generously. The nutty aroma wakes up every bite. 🌱
Protein Upgrades
If you want more protein, add 2 soft-boiled eggs (6-minute cook) with runny yolks that create luxurious pools in your bowl. For a vegetarian twist, swap the tuna for crumbled tofu marinated in soy sauce and sesame oil.
I also love adding ½ cup shredded rotisserie chicken from Central Market for extra heartiness—it soaks up all the broth flavors beautifully.
Pickled Veggies
Quick-pickled red bell pepper slices add a tangy crunch that cuts through the richness. Toss ½ cup thinly sliced red bell pepper with 1 teaspoon sugar, 1 tablespoon rice vinegar, and a pinch of salt for 10 minutes before serving.
For a smoky twist, try quick-pickled cucumbers with a dash of smoked paprika. These toppings keep well in the fridge for up to 5 days in an airtight container.
Sauce Finishes
Drizzle with 1 teaspoon toasted sesame oil right before eating for an aromatic finish. For heat lovers, add 1 tablespoon sriracha or a dash of chili crisp. I also keep a small bowl of soy sauce on the table so everyone can adjust to taste.
The key is balance—start with less and add more if needed. 🔥
Garnish Like a Pro
Fresh herbs elevate this dish instantly. A handful of thinly sliced chives or cilantro adds freshness, while shredded nori strips bring umami depth. For a Southern touch, I sometimes add crumbled bacon from my local butcher—it adds smoky richness that pairs perfectly with the tuna.
Garnish just before serving to keep everything vibrant.
Beverage Pairings
This ramen pairs beautifully with a crisp Japanese lager like Sapporo or Asahi. For something lighter, try sparkling jasmine tea from Central Market—it cleanses the palate between bites. If you prefer wine, a dry Riesling complements the umami without overpowering.
I always keep a cold one handy when making this for David—he insists it's the perfect lunch combo. 🍺
Nutrition facts
Frequently asked questions about canned tuna ramen
Can I use oil-packed tuna instead of water-packed?
Water-packed tuna is ideal for this recipe because it keeps the dish lighter and lets the broth flavors shine. Oil-packed tuna will add richness, but you'll need to drain it very thoroughly and reduce the sesame oil to ½ tablespoon to avoid an overly greasy texture. The fat content can also make the broth separate, so stir well before serving.
How do I make this vegetarian?
Swap the tuna for ½ cup crumbled firm tofu marinated in 1 tablespoon soy sauce and 1 teaspoon sesame oil for 10 minutes. For extra protein, add ½ cup edamame or ¼ cup nutritional yeast for a cheesy flavor. The broth and seasonings will still provide that satisfying umami punch.
Can I make this ahead of time?
Yes! Cook the noodles and broth base, then store them separately in airtight containers for up to 3 days. Reheat the broth and noodles separately—don't combine until serving. The toppings (pickled peppers, eggs, green onions) should be added fresh. For freezing, portion the broth and noodles together (without toppings) and freeze for up to 3 months. Thaw overnight in the fridge.
Why does my ramen turn out too salty?
The seasoning packet in store-bought ramen is often the culprit, but we discard it in this recipe. If your broth tastes salty, use low-sodium soy sauce and reduce the salt to ¼ teaspoon. For homemade broth, use ½ teaspoon salt per 2 cups and taste before adding the tuna mixture. The canned tuna itself adds enough saltiness—don't double up on seasonings.
What's the best way to add spice?
For balanced heat, add ½ teaspoon chili flakes directly to the broth while simmering. For smoky depth, stir in ½ teaspoon smoked paprika with the sesame oil. Heat lovers can drizzle 1 teaspoon sriracha or chili garlic sauce on top just before eating. Always start with less—you can't remove spice once it's in the bowl.