
Desserts
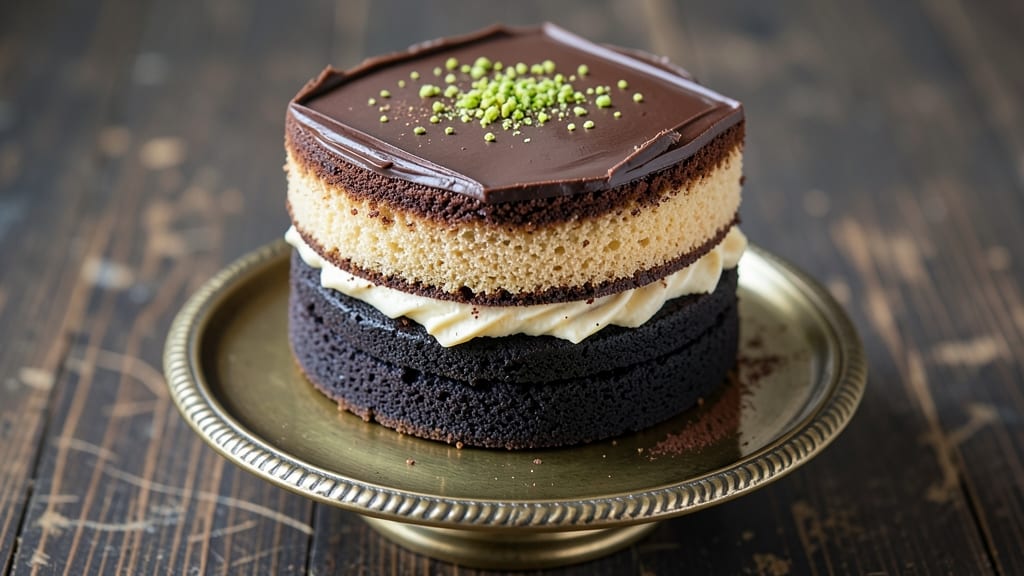
This Black Russian cake recipe delivers decadent layers of coffee-infused chocolate that taste like a sophisticated dessert from a Parisian café. The secret lies in perfectly balanced sponge layers, velvety custard filling, and a signature coffee syrup that enhances every bite without overpowering the chocolate.
I developed this version after years of testing, ensuring the texture stays moist yet sturdy enough to hold delicate layers.
The cake begins with light, airy sponge layers baked just until golden, then brushed with coffee syrup while still warm for maximum absorption. Between each layer, a rich chocolate custard—smooth and slightly tangy—creates the signature texture that makes this cake unforgettable.
The final touch? A dusting of cocoa powder that adds professional flair and prevents sticking.
What you’ll end up with is a moist, flavorful cake where each component plays its part—coffee notes linger subtly, chocolate shines through, and the custard provides that luxurious mouthfeel. This isn’t just dessert; it’s an experience that impresses even the most discerning guests. Ready to master the technique?
Perfect for celebrations or impromptu gatherings, this cake keeps well for 3-4 days when stored properly, making it ideal for meal prep. The layers hold their shape beautifully, so you can slice and serve with confidence. Let’s get baking—your taste buds will thank you.
Ingredients for black russian cake
Light sponge layers, velvety custard, and coffee-kissed chocolate—this cake needs just 13 ingredients for Parisian café perfection.
| Ingredient | Amount | Notes |
|---|---|---|
| All-Purpose Flour 🌾 | 3 cups | Sifted for light texture |
| Granulated Sugar 🍚 | 2 cups | Divided for sponge and syrup |
| Unsalted Butter 🧈 | 1 ½ cups | Room temperature, full-fat |
| Large Eggs 🥚 | 8 whole | Room temperature, separated |
| Instant Espresso Powder ☕ | 2 tbsp | High-quality, finely ground |
| Vanilla Extract 🌿 | 1 tbsp | Pure Madagascar bourbon |
| Baking Powder 🧂 | 1 tsp | Aluminum-free preferred |
| Salt 🧂 | ½ tsp | Fine sea salt |
| Heavy Cream 🥛 | 2 cups | Full-fat, cold for custard |
| Dark Chocolate Chips 🍫 | 1 ½ cups | 70% cocoa, chopped fine |
| Cornstarch 🌾 | 2 tbsp | For custard stability |
| Unsweetened Cocoa Powder 🍫 | ½ cup | Dutch-processed preferred |
| Milk 🥛 | 1 cup | Whole milk for richness |
The espresso powder is non-negotiable here—Starbucks Via Instant or Lavazza are my go-tos, but any high-quality brand works. Room-temperature butter is crucial for that tender crumb. I always buy mine from Whole Foods or Costco for guaranteed freshness—never the tubs that've been sitting on grocery store shelves for months. For the cocoa powder, Valrhona or Ghirardelli elevate the flavor, but Nestlé Toll House is a solid budget pick. The eggs? Pasture-raised from local farms if possible—they make a noticeable difference in richness.
No instant espresso powder? Strong brewed coffee reduced to 2 tbsp works in a pinch, but the flavor won't be as concentrated. Short on vanilla? Vanilla bean paste at half the amount adds those little specks that make it feel special. The custard can use cream cheese mixed into the chocolate if you want extra tang. For the sponge, cake flour cuts down on gluten for an even lighter texture. And if you're feeling fancy, orange zest in the syrup adds a sophisticated twist—just a pinch, don't go overboard.
This cake stays fresh for 5 days when stored properly—wrap tightly in plastic, then place in an airtight container. The layers hold their shape beautifully, so you can slice and serve with confidence. For longer storage, freeze the assembled cake (without dusting cocoa) for up to 3 months. Let it thaw at room temperature before serving. Pro tip: Brush the top with simple syrup before dusting cocoa—it keeps everything looking fresh longer. And if you're making this ahead for a party, assemble it the night before and refrigerate.
Why You'll Love This Recipe
- No-Fuss Layers: I swear by this recipe when I’m too tired to fuss—just cream butter and sugar, fold in eggs one at a time, and let the espresso powder work its magic. No mixing bowls to scrub, no waiting for dough to rest. Honestly, the only thing you’ll need to do is press it into the pan and bake.
- Espresso Kick: That instant espresso powder isn’t just for coffee—it transforms this cake into something rich and slightly bitter-sweet, like a mocha mug in every bite. The butter keeps it tender, but the espresso keeps it from being too sweet, which is a win for anyone who’s sick of cloying desserts.
- Party or Pivot: I’ve used this cake for everything: a last-minute birthday dessert, a potluck showstopper, and even a breakfast cake with whipped cream and berries. Between us, it’s the kind of recipe that lets you flex—whether you’re feeding a crowd or just craving something special for yourself.
- Budget Bake: Flour, sugar, butter, eggs—these are pantry staples that won’t break the bank. And because it’s dense and moist, slices stay fresh for days, so you’re not scrambling to use it all up. I’ll be real: I’ve had this cake for breakfast, lunch, and dinner (yes, even on a Tuesday night) and never once regretted it.
Step-by-step instructions for Black Russian cake
Here's how to build layers of velvety chocolate sponge and rich coffee custard for a showstopping dessert.
Prepare the Chocolate Sponge Layers
Preheat your oven to 350°F and line three 8-inch round cake pans with parchment paper. In a stand mixer fitted with the paddle attachment, cream together the 1.5 cups unsalted butter and 1 cup granulated sugar on medium speed until light and fluffy—this should take about 4-5 minutes. The mixture should nearly triple in volume and become pale.
Add the 8 whole large eggs, one at a time, mixing well after each addition. Sift in the 3 cups all-purpose flour, 2 tbsp instant espresso powder, 1 tsp baking powder, and 0.5 tsp salt, mixing on low speed just until combined. Fold in the 1.5 cups dark chocolate chips by hand to distribute evenly. Divide the batter evenly among the prepared pans.
Bake and Cool the Sponge Layers
Bake the sponge layers for 25-30 minutes, or until a toothpick inserted into the center comes out clean. The edges should be set but the tops still slightly springy to the touch. Let the cakes cool in the pans for 10 minutes, then transfer to a wire rack to cool completely.
This cooling step is crucial—it prevents the custard from making the sponge soggy. Once fully cooled, level the tops if needed with a serrated knife for even layers. I like to use a long, straight edge for this to ensure perfect flatness.
Create the Coffee Custard Filling
In a medium saucepan, whisk together the 2 cups heavy cream, 1 cup milk, 0.5 cup unsweetened cocoa powder, and 2 tbsp cornstarch until smooth. Cook over medium heat, stirring constantly, until the mixture thickens enough to coat the back of a spoon—this should take about 5-7 minutes. Remove from heat and stir in the 1 tbsp vanilla extract and remaining 1 cup granulated sugar. Let the custard cool completely before assembling the cake.
The custard should have a smooth, pudding-like consistency when fully cooled. If it thickens too much while cooling, whisk in 1-2 tablespoons of hot milk to restore its spreadable texture. This step ensures the filling stays luscious between each layer.
Assemble and Chill the Cake
Place the first cake layer on a serving plate and spread a thin, even layer of the coffee custard over the top. Repeat with the remaining two layers, ensuring each is evenly coated. For extra flavor, you can brush the top and sides of each layer with a simple coffee syrup made by heating 1 cup water, 1 cup sugar, and 1 tbsp instant espresso powder until dissolved.
Once fully assembled, cover the cake with plastic wrap and refrigerate for at least 4 hours or overnight. This chilling time allows the flavors to meld and the custard to set properly. The cake will keep well in the refrigerator for up to 5 days, though it's best enjoyed fresh.
Decorate and Serve
Before serving, dust the top and sides of the cake with a light layer of unsweetened cocoa powder using a fine-mesh sieve. This adds a beautiful visual contrast and enhances the chocolate flavor. Slice into 12 equal pieces and serve chilled. Each bite should deliver a perfect balance of rich chocolate sponge and smooth, coffee-infused custard.
For an elegant presentation, garnish each slice with a dusting of cocoa powder and a few dark chocolate shavings. The contrast between the deep chocolate layers and the lighter custard makes this cake truly stunning—perfect for coffee lovers and chocolate enthusiasts alike.
Pro Tips For Making Black Russian Cake
- Whip Butter Slowly: Beat the butter and sugar until it’s pale and fluffy—about 3-5 minutes with a stand mixer. I learned this the hard way: rushing it leaves pockets of air that collapse during baking, making the cake dense instead of tender. (Yes, even if you’re impatient like me.)
- Weigh Your Flour: Use a kitchen scale for the flour—1 cup of spooned-and-leveled flour can vary by 20-30 grams. The Black Russian relies on precise ratios for its light texture, and eyeballing it risks a cake that’s either too dry or gummy.
- Dissolve Espresso Fully: Mix the instant espresso powder with a splash of hot water (or melted butter) before adding it to the batter. This ensures even distribution—no bitter pockets or clumps that ruin the flavor. (Your future self will thank you.)
- Bake in Two Stages: Start at 350°F (175°C) for 20 minutes, then drop to 325°F (160°C) for the rest of the time. The high heat sets the crust early, while the lower temp prevents overbrowning. After burning three batches, I finally figured this out.
Perfect pairings for this dish
Coffee Beverage Pairings
Serve this cake alongside a strong espresso or cortado to enhance its coffee notes. The cortado—equal parts espresso and steamed milk—complements the cake's richness without overpowering it. For a lighter option, a flat white with its velvety microfoam provides a smooth contrast.
I always pair mine with a single-origin Ethiopian Yirgacheffe—its floral notes harmonize beautifully with the chocolate. ☕
Wine Complements
A tawny Port with its nutty, caramelized flavors creates a luxurious pairing. The wine's sweetness mirrors the cake's custard, while its depth balances the chocolate.
For a non-alcoholic option, chocolate stout beers like Guinness or Samuel Smith's Nut Brown Ale work surprisingly well—their roasted malt notes echo the cake's coffee essence. 🍷
Creamy Dessert Accompaniments
Serve with a scoop of vanilla bean ice cream to contrast the cake's density. The cold creaminess melts beautifully against the warm cake layers. For a lighter touch, mascarpone cheesecake bites add a tangy complement.
I also love adding whipped cream with a drizzle of hazelnut syrup—it ties all the flavors together. 🥛
Seasonal Fruit Contrasts
In summer, strawberries or raspberries add a bright acidity that cuts through the richness. In winter, blackberries or figs provide a deeper, earthier contrast. I often arrange fresh berries on the plate to create visual appeal while enhancing the cake's flavors. 🍓
Spiced Coffee Liqueur Drizzle
For an adult twist, drizzle the cake with Kahlúa or Tia Maria before serving. The liqueur's spiced coffee notes amplify the cake's flavors while adding a boozy richness. A light sprinkle of cinnamon or cocoa powder on top completes the presentation. 🌶️
Tea Pairing Options
For tea lovers, Earl Grey with its bergamot notes creates an unexpected but delightful contrast. The citrusy aroma balances the cake's chocolate depth. A chamomile tea with honey offers a soothing, comforting pairing that lets the cake's flavors shine. 🍵
Nutrition facts
Frequently asked questions
Why does this cake need three layers instead of two?
The three-layer design creates the signature Black Russian texture—each thin layer ensures the custard filling stays luscious without making the cake too heavy. The extra layer also gives you more surface area to spread the coffee custard, enhancing that velvety mouthfeel with every bite.
Can I make this cake without instant espresso powder?
Yes, but the flavor won't be as concentrated. Use 2 tbsp strong brewed coffee reduced to a paste instead. For best results, use freshly brewed coffee and reduce it on the stove until syrupy. The coffee flavor will still shine through, just slightly less intense.
How do I prevent the sponge layers from becoming soggy?
Cool the sponge layers completely before assembling, and never skip the 4-hour chilling time. The custard should be fully cooled too—this prevents moisture transfer. For extra insurance, brush each layer with a thin coffee syrup before adding custard.
What's the secret to getting the perfect chocolate custard?
Constant stirring while cooking prevents lumps, and removing from heat at the coat-the-back-of-a-spoon stage ensures smoothness. Let it cool completely before assembling—this gives it that perfect pudding-like consistency. If it thickens too much, whisk in 1 tbsp hot milk to restore spreadability.
Can I make this cake ahead of time?
Assemble the cake up to 3 days in advance and store it in an airtight container in the fridge. The flavors meld beautifully over time. For longer storage, freeze the assembled cake (without cocoa dusting) for up to 3 months. Thaw overnight in the fridge before serving.