
Snacks
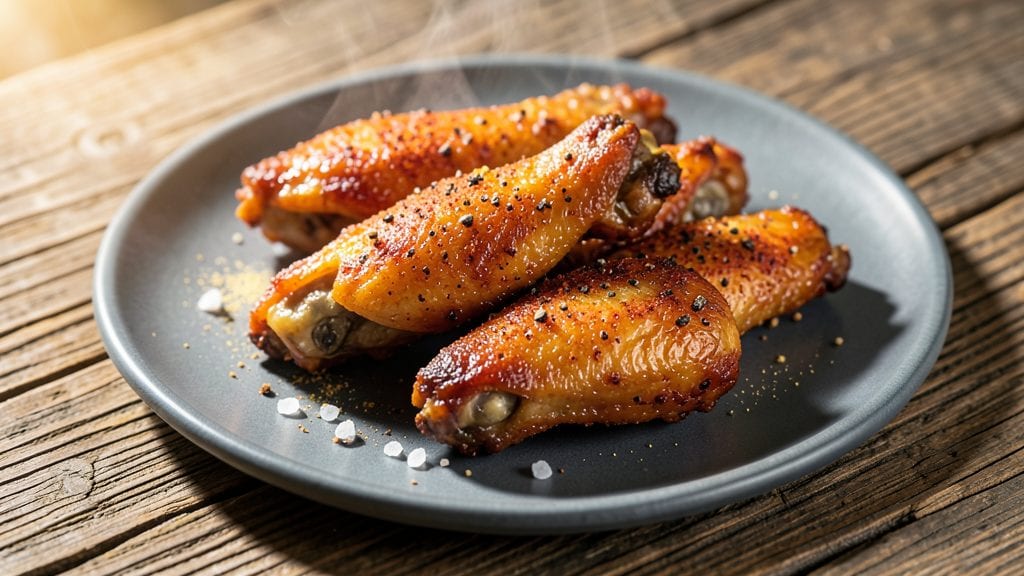
This basic fried chicken wings recipe delivers restaurant-quality crunch without needing a deep fryer—just an air fryer and 15 minutes of hands-off cooking. I developed this method after years of perfecting crispy wings at home, where traditional frying always left my kitchen smelling like grease and my hands sticky.
The secret lies in a double-dredge technique that creates a shield of seasoning and starch, ensuring every bite stays crispy even after dipping.
The beauty of this recipe is its foolproof simplicity: four essential ingredients (wings, flour, spices, and oil) transform into golden, shatteringly crisp wings that hold their shape. No need for marinating or complicated prep—just season, coat, and air-fry.
The wings emerge with a caramelized crust that’s impossible to resist, while the inside remains juicy and tender. This method also eliminates the mess and fire hazards of deep frying, making it perfect for weeknight snacks or game day.
What sets these wings apart is their versatility—serve them as-is for a clean, crispy bite, or toss in your favorite sauce for a sticky-sweet or tangy-spicy finish. The air fryer’s even heat ensures consistent crispiness across every wing, a challenge even deep fryers struggle with.
Whether you’re feeding a crowd or craving a single serving, this recipe delivers professional results with minimal effort.
Pair with classic ranch, buffalo sauce, or a honey mustard dip for the ultimate snack experience. The wings stay crispy even after dipping, proving that healthier cooking doesn’t mean sacrificing flavor or texture. Ready to transform your snack game? Let’s get started with this game-changing method.
Ingredients for basic fried chicken wings
Four core ingredients transform raw wings into golden, shatteringly crisp air-fryer perfection.
| Ingredient | Amount | Notes |
|---|---|---|
| Chicken Wings 🍗 | 2 lb | Split into drumettes and flats, tips trimmed |
| All-Purpose Flour 🌾 | 1 ½ cups | White or bread flour for optimal crispiness |
| Diamond Crystal Kosher Salt 🧂 | 1 tbsp | Fine grain preferred for even coating |
| Ground Black Pepper 🌶️ | 1 tbsp | Freshly cracked for robust flavor |
| Garlic Powder 🧄 | 1 tbsp | Non-GMO preferred for purity |
| Smoked Paprika 🌶️ | 1 tbsp | High-quality for authentic smokiness |
| Onion Powder 🧅 | 1 tsp | Finely milled for even distribution |
| Avocado Oil 🫒 | ½ cup | High smoke point for air frying |
| Cornstarch 🌾 | ½ cup | For extra-crispy texture |
| Butterflake Seasoning 🧂 | 1 tbsp | Optional for enhanced flavor depth |
| Ice Water 💧 | ½ cup | For slurry consistency |
The chicken wings form the foundation—opt for bone-in, skin-on wings from a trusted supplier like Whole Foods or your local butcher, as they yield superior texture. Look for wings with a vibrant, slightly glossy skin and minimal bruising. Costco often carries high-quality frozen wings in bulk, which work exceptionally well for this method. Trim the tips and separate the drumettes from the flats to ensure even cooking. The wings should be completely dry before coating, as any moisture disrupts the crisping process. For optimal results, let them air-dry on a wire rack for 10-15 minutes post-thawing if using frozen wings.
Substitutions are limited but strategic: bread flour can replace all-purpose flour for an even crispier crust, though it requires slightly more water in the slurry. If you lack cornstarch, potato starch works equally well. For the seasoning blend, McCormick's Gourmet Seasoning provides a reliable shortcut, though a homemade mix of salt, pepper, paprika, and garlic powder delivers superior depth. The avocado oil can be swapped for refined peanut oil, which has a similarly high smoke point. Avoid olive oil—its low smoke point compromises crispiness. For a tangier profile, add 1/2 tsp of lemon zest to the seasoning mix.
Store uncooked wings in an airtight container lined with parchment paper for up to 3 days in the refrigerator. Pre-mixed seasonings keep their potency for 6 months when stored in a sealed container away from light and moisture. Cooked wings retain their crispiness for 24 hours if reheated in the air fryer at 375°F for 3-4 minutes. For meal prep, portion wings into single-serving containers with a sprinkle of fresh seasoning to maintain texture. The slurry mixture can be made up to 2 days ahead and refrigerated in an airtight container.
Why You'll Love This Recipe
- Here’s what sold me: these wings reheat like a dream. Toss them back in the oven for 5 minutes, and they’re crispy again—no soggy nightmares. Plus, they’re cheap enough that I can make a big batch without breaking the bank, so I’m always covered. Budget win, flavor win.
- Pantry-Only Crunch: I swear by this recipe because it uses exactly what’s already in my cupboard—no fancy marinades or specialty blends. Just flour, salt, pepper, and garlic powder tossed together until the wings are coated like a perfect golden shield. That’s it. No hunting for ingredients, no stress.
- Garlic Kiss Magic: Between us, the secret weapon here is that pinch of garlic powder in the seasoning. It’s not overpowering, but it lingers—crispy outside, juicy inside, with just enough warmth to make every bite feel like a hug. My husband always asks, “What’s in this?” and I just smile.
- Game Day MVP: This recipe is my go-to for game days, lazy Sundays, or when I need to feed a crowd without slaving in the kitchen. Double the batch, toss them in the oven for 10 minutes at 400°F, and boom—warm, crispy wings ready to devour. (Yes, even on a Tuesday night.)
Step-by-step instructions for air-crisped fried chicken wings
This method delivers restaurant-quality crispiness without deep frying—just precise technique and patience.
Prepare the Chicken Wings for Maximum Crisp
Pat the 2 lb chicken wings completely dry with paper towels, including inside the cavity and under the wings. This step is non-negotiable—any moisture prevents proper browning. Split each wing into drumettes and flats at the joint, then trim any excess fat from the tips. Arrange them on a wire rack set over a baking sheet to ensure air circulation on all sides.
Preheat your air fryer to 375°F for 5 minutes to ensure even cooking. While it heats, season the wings lightly with 1 tbsp diamond crystal kosher salt and 1 tbsp ground black pepper, focusing on the exposed meat. This initial seasoning creates a flavor base before the dry coating. Let them sit at room temperature for 15 minutes—this prevents steam from forming when they hit the hot air fryer, which would soften the crust.
Create the Dry Coating for Extra-Crispy Texture
In a large bowl, whisk together the 1.5 cups all-purpose flour, 1 tbsp garlic powder, 1 tbsp smoked paprika, 1 tsp onion powder, and 1 tbsp butterflake seasoning (if using). This dry blend should be uniform with no clumps—rub it between your fingers to break up any lumps. The cornstarch will be added later, so don't include it yet.
Working in batches to avoid overcrowding, toss the seasoned wings in the dry flour mixture until fully and evenly coated. Shake off any excess, but don't worry about a perfect layer—this ensures a crispy exterior without a thick, heavy coating. Transfer the coated wings to a plate and set aside. This step is where the magic happens—the right balance of flour and spices creates that iconic crispy shell.
Make the Slurry for Double-Crisp Coating
In a separate bowl, whisk together the 0.5 cup cornstarch and 0.5 cup ice water until smooth and lump-free. The ice water is critical—it creates a thin, even slurry that will help the coating adhere perfectly. The cornstarch adds an extra layer of crispiness that regular flour alone can't achieve.
Dip each wing into the slurry, allowing any excess to drip off. Then, immediately return it to the dry flour mixture, pressing gently to ensure the slurry adheres to the wings. This double-coating technique is what delivers that shatteringly crisp texture. Work quickly but carefully—wet wings will steam instead of crisp. Arrange the double-coated wings on the wire rack once again, ensuring they don't touch.
Air-Fry in Batches for Even Crispiness
Cook the wings in a single layer in the preheated air fryer at 375°F for 12-15 minutes, flipping them halfway through. They're done when the coating is a deep golden brown and the internal temperature reaches 165°F at the thickest part of the meat. Avoid overcrowding—the wings need space to crisp, not steam.
Here's the thing—don't open the air fryer during cooking. Each time you peek, you release heat and steam, which can make the wings soggy. If you're unsure, check the internal temperature with a meat thermometer. The wings should be crispy outside and juicy inside, with no pink remaining. Let them rest on a wire rack for 3-5 minutes before serving to maintain their crisp texture.
Serve Immediately with Classic Dipping Sauces
Transfer the crispy wings to a serving platter and serve immediately while they're still hot and crunchy. The wings should hold their shape but still be tender enough to pull apart easily. If any wings lose crispiness during resting, return them to the air fryer for 1-2 minutes at 375°F to restore their crunch.
Pair with classic dipping sauces like blue cheese dressing, ranch, or honey mustard to complement the smoky, spiced flavor profile. The key to success lies in the double-coating technique and precise air frying—skip either, and you'll miss out on that perfect balance of texture and flavor.
Pro Tips For Making Basic Fried Chicken Wings
- CRISP THE FLOUR: Pat the wings dry with paper towels after the flour coating—yes, even if they feel sticky. I used to skip this, and my first batch always turned out greasy instead of crispy. A quick rub with a second paper towel (the kind that absorbs like crazy) makes all the difference.
- SALT THE WINGS FIRST: Toss the raw wings with 1 teaspoon of kosher salt before dredging in flour. This seasons the meat underneath the crust, not just the surface. I learned this the hard way when my wings tasted bland no matter how much I salted after frying.
- WATCH THE HEAT: Start frying in oil at 350°F (175°C), but crank it up to 375°F (190°C) once the wings go in. Too low, and they steam instead of fry; too high, and they burn before the inside cooks. A thermometer is worth it here—your stovetop’s "medium-high" is a lie.
- REST THE WINGS: Let the fried wings sit on a wire rack for 10 minutes before tossing in the garlic powder mix. This lets the crust set properly, so it doesn’t turn soggy when you add seasoning. I know, I know—you want to eat them now—but trust the process.
Storing and reheating your leftovers
Refrigerator Storage
Store cooked wings in an airtight container with parchment paper between layers to maintain crispiness for up to 3 days. I use glass Pyrex containers because they prevent moisture buildup better than plastic.
Let the wings cool completely before storing to avoid condensation. For extra crunch, sprinkle a pinch of cornstarch on top before sealing—this acts as a moisture barrier. 💡
Freezer Prep
For longer storage, freeze wings in a single layer on a baking sheet for 1 hour to prevent clumping, then transfer to a freezer-safe bag. They’ll keep for 2 months without significant texture loss.
When ready to eat, thaw overnight in the fridge—never microwave as this makes them rubbery. I label bags with the date to track freshness.
Air Fryer Reheating
Reheat frozen wings directly from frozen at 375°F for 10-12 minutes, shaking the basket halfway. For refrigerated wings, use 350°F for 5-7 minutes. The air fryer’s high heat restores crispiness better than the oven. If wings seem dry, spray lightly with avocado oil before reheating. 🔥
Oven Alternative
If you lack an air fryer, use a baking sheet at 400°F for 8-10 minutes, flipping once. Place wings on a wire rack over the sheet to prevent sogginess.
Broil for 1-2 minutes at the end to crisp the coating. This method works but requires closer monitoring to avoid burning.
Sauce Refresh
Reheated wings lose some sauce adhesion. Toss them in 1 tbsp melted butter or 2 tbsp warm sauce post-reheating to restore moisture. For extra flavor, sprinkle with fresh garlic powder or smoked paprika before serving. The wings will taste nearly as good as fresh! ✨
Nutrition facts
Frequently asked questions
Can I use regular flour instead of the cornstarch slurry?
Yes, but your wings won't be as crispy! The cornstarch slurry creates an extra layer that locks in crunch. If you skip it, use 1 extra tablespoon of flour per wing and air-fry at 390°F for 2 minutes longer to compensate. The slurry is the secret weapon for that restaurant-style crunch.
Why do my wings turn out greasy instead of crispy?
Greasy wings usually mean overcrowding or undercooked flour. Always cook in a single layer with 1-inch gaps between wings. For extra crispiness, pat them extra dry and let them rest 5 minutes after frying before serving. If using frozen wings, thaw them first—ice crystals prevent proper browning.
What's the best way to keep wings crispy when dipping?
Serve wings at room temperature (not hot) and use a wire rack on your serving tray to allow air circulation. For extra insurance, sprinkle with powdered sugar or cornstarch before dipping—it absorbs moisture. Avoid sauces with high water content (like ranch) if you want maximum crunch.
Can I make these wings in an oven instead of air fryer?
Preheat oven to 425°F and bake wings on a wire rack over a baking sheet for 20-25 minutes, flipping halfway. The key is high heat and proper airflow—don't stack wings. For extra crisp, broil 2 minutes at the end. The air fryer is faster, but oven works perfectly for larger batches.
How do I make these wings spicier?
Add ½ teaspoon cayenne pepper or 1 teaspoon chili powder to your dry seasoning mix. For heat lovers, toss cooked wings in 1 tablespoon melted butter mixed with 1 teaspoon hot sauce before serving. Start with less—you can always add more spice, but you can't remove it!