Main Courses
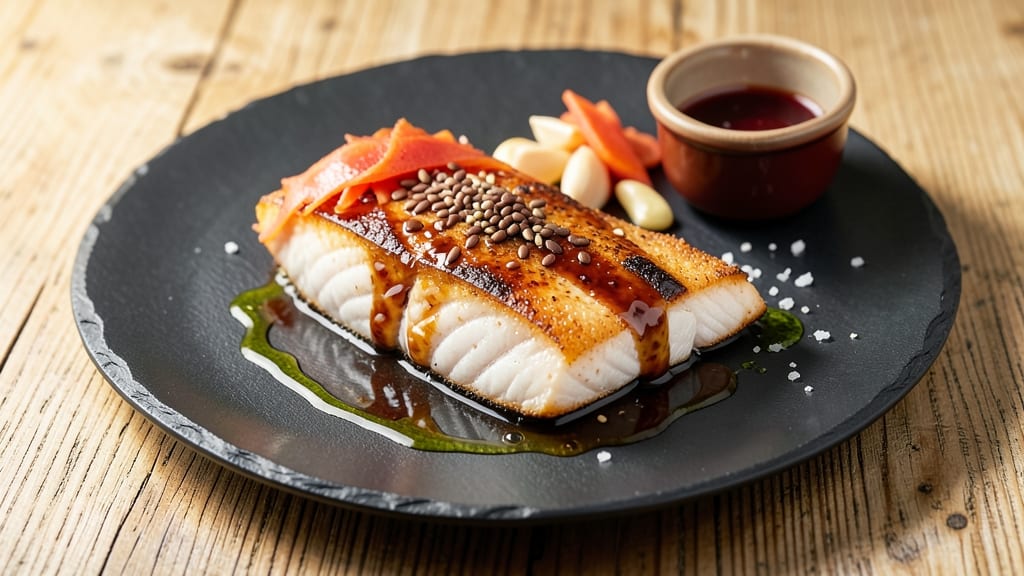
This baked teriyaki fish recipe delivers crispy edges and silky centers with a perfect balance of sweet-savory glaze that'll make you question why you ever ordered takeout.
The secret lies in a foolproof marinating technique that tenderizes the fish while building deep umami flavor—no frying required, just oven magic that transforms simple fillets into restaurant-quality bites.
I've perfected this method over countless weeknight dinners, where it consistently delivers juicy results even when I forget to set a timer.
The beauty of this recipe is its simple yet professional approach: a homemade teriyaki sauce that's easier than store-bought but packed with depth, and baking techniques that ensure crispy skin without drying out the delicate centers.
White fish like cod or halibut works best, but even firm white fish like mahi-mahi delivers impressive results. The sauce caramelizes beautifully in the oven, creating those coveted sticky edges that make every bite worth waiting for.
What you'll end up with is fish that's golden and crispy on the outside, meltingly tender inside, all blanketed in a glossy teriyaki glaze that's perfectly balanced between sweet and savory.
The aroma alone will have everyone gathering at your table, and the first bite delivers that satisfying contrast of textures—crunchy from the caramelized edges, silky from the cooked fish, and sticky from the reduced sauce.
This is the kind of weeknight dinner that feels like a celebration without requiring extra effort.
Serve it over steamed jasmine rice or with a simple side salad to let the fish take center stage. The leftovers reheat beautifully too, making this an excellent meal prep option when you're planning ahead.
Let's get started with this restaurant-quality technique that'll change how you think about baked fish forever.
Ingredients for baked teriyaki fish
Simple ingredients, restaurant-quality results—this teriyaki fish delivers crispy edges and silky centers every time.
| Ingredient | Amount | Notes |
|---|---|---|
| White Fish Fillets 🐟 | 4 whole | Cod, halibut, or mahi-mahi preferred |
| Extra-Virgin Olive Oil 🫒 | 2 tbsp | For coating fish fillets |
| Diamond Crystal Kosher Salt 🧂 | 1 tsp | Fine grain preferred |
| Freshly Ground Black Pepper 🌶️ | ½ tsp | Freshly cracked for best flavor |
| Fresh Ginger Root 🧅 | 2 tbsp | Finely grated, peeled |
| Garlic Cloves 🧄 | 4 cloves | Minced, fresh preferred |
| Low-Sodium Soy Sauce 🍶 | ½ cup | Kikkoman preferred |
| Honey 🍯 | ¼ cup | Wildflower for depth |
| Rice Vinegar 🍶 | ¼ cup | White or seasoned |
| Sesame Oil 🫒 | 1 tbsp | Toasted sesame oil |
| Toasted Sesame Seeds 🌾 | 1 tbsp | For garnish |
| Jasmine Rice 🍚 | 1 ½ cups | Uncooked, long-grain |
| Water 💧 | 2 cups | For rice cooking |
| Cornstarch 🌾 | 1 tbsp | For sauce thickening |
| Green Onions 🧅 | 2 whole | Sliced, for garnish |
The fish is everything here. Look for fresh, center-cut fillets—thick enough to stay moist but thin enough to cook quickly. Whole Foods or your local seafood counter usually have the best quality, but frozen works too (thaw overnight in the fridge). Halibut holds up best to the marinade, but cod and mahi-mahi are equally delicious. The ginger and garlic? Freshly grated and minced make all the difference—pre-minced garlic loses flavor fast, and pre-grated ginger gets watery. If you're short on time, Trader Joe's sells pre-minced garlic in a jar that works in a pinch.
No sesame oil? Avocado oil at half the amount works, but you'll lose that nutty depth. Short on honey? Maple syrup or agave gets you close, though the flavor will be slightly different. The cornstarch is key for thickening the sauce—don't skip it, or you'll end up with a runny glaze. For extra umami, add 1 tbsp fish sauce to the marinade. The rice vinegar matters too—seasoned rice vinegar adds a subtle sweetness that balances the soy. And if you're feeling fancy, swap the jasmine rice for forbidden black rice for a striking presentation.
This fish reheats beautifully—just pop it in a 350°F oven for 8-10 minutes until warmed through. Store leftovers in an airtight container for up to 3 days, though I rarely have any. The sauce keeps for 5 days in the fridge if you make extra (which you will). For meal prep, bake the fish ahead and reheat the sauce separately—it caramelizes better when fresh. The rice? Cook it fresh the day of—leftovers get gummy, no matter how you slice it.
Why You'll Love This Recipe
- No-Fuss Prep: I swear by this—just pat the fish dry, drizzle olive oil, sprinkle salt and pepper, and let the teriyaki sauce do the work. Honestly, the ginger and fish meld into something special with almost no effort.
- Umami Bomb: That teriyaki glaze? It’s where the magic happens—sweet, salty, and sticky, with the fresh ginger cutting through the richness. The fish stays moist inside while the edges get that perfect crisp, and I’ll never go back to bland baked fish again.
- Weeknight to Dinner Party: Serve it with rice and steamed veggies for a quick weeknight meal, or plate it elegantly with a side salad and sesame seeds for guests. Between us, it’s my go-to when I need something reliable but still feels special.
- Leftovers That Don’t Suck: The sauce keeps the fish tender for days, so I make a big batch and reheat portions in seconds. Not the prettiest, but the taste makes up for it—especially when I toss it into fried rice or over noodles. Budget-friendly and zero waste.
Step-by-step instructions for baked teriyaki fish with glazed crispy edges
Here's how to achieve that perfect balance of caramelized crust and tender fish every time.
Prepare the Teriyaki Glaze and Marinate the Fish
In a small saucepan, combine the 0.5 cup low-sodium soy sauce, 0.25 cup honey, and 0.25 cup rice vinegar over medium heat. Bring to a gentle simmer and cook for 3-4 minutes until slightly thickened and reduced by about 20%. You'll see the mixture darken slightly and develop a glossy sheen - this is your signal it's ready.
While the glaze reduces, place the 4 whole white fish fillets on a plate. In a small bowl, whisk together 1 tablespoon sesame oil, 1 teaspoon diamond crystal kosher salt, and 0.5 teaspoon freshly ground black pepper. Pour this marinade over the fish and let it sit for 10 minutes. This brief marinade ensures the fish absorbs flavor while maintaining its delicate texture - don't overdo it or the fish will become tough.
Create the Ginger-Garlic Rice Base
Rinse the 1.5 cups jasmine rice under cold water until the water runs clear, then drain well. In a small skillet, heat 1 tablespoon extra-virgin olive oil over medium heat. Add the 2 tablespoons finely grated fresh ginger root and 4 minced garlic cloves, cooking for just 30 seconds until fragrant - you should smell that bright, aromatic punch of ginger and garlic.
Transfer the ginger-garlic mixture to a bowl and set aside. In a separate pot, combine the rinsed jasmine rice with 2 cups water and bring to a boil. Reduce heat to low, cover, and simmer for 15 minutes until the rice is tender and the liquid is absorbed. Stir in the ginger-garlic mixture, then spread the rice evenly on a baking sheet to cool slightly - this will help prevent soggy fish when baking.
Assemble and Bake for Perfect Texture
Preheat your oven to 400°F. Line a baking sheet with parchment paper and arrange the marinated fish fillets in a single layer. Spoon about 1/4 cup of the prepared rice onto each fillet, pressing gently to create a base that will help hold the fish in place during baking.
Drizzle each fillet with about 2 tablespoons of the prepared teriyaki glaze, making sure to coat the top surfaces completely. Bake for 12-15 minutes until the edges are golden brown and crispy, while the centers remain just opaque. The fish is done when it flakes easily with a fork and the internal temperature reaches 145°F - this ensures silky texture without dryness.
Finish with Sauce and Garnish
While the fish bakes, whisk together the remaining teriyaki glaze with 1 tablespoon cornstarch in a small saucepan. Cook over medium heat for 2-3 minutes until the sauce thickens slightly and becomes glossy. This step creates that perfect balance of sweet and savory that clings beautifully to the fish.
Once the fish is done, drizzle the thickened sauce evenly over each fillet. Sprinkle with the 1 tablespoon toasted sesame seeds and top with sliced green onions. Serve immediately with the remaining ginger-garlic rice on the side - the contrast of fluffy rice with crispy fish edges creates an unforgettable texture experience.
Pro Tips For Making Baked Teriyaki Fish
- Preheat Like It’s Hot: Your oven should hit 425°F before the fish goes in—no waiting. I learned this the hard way when my first batch turned out rubbery because I rushed. That high heat sears the teriyaki into a sticky glaze instead of letting it pool as water.
- Dry the Fish First: Pat those fillets thoroughly with paper towels—no wet spots. The moisture steams instead of browning, and you’ll end up with sad, soggy fish. Trust me, the extra 30 seconds saves the dish.
- Salt the Ginger: Toss your freshly grated ginger with a pinch of kosher salt before adding it to the teriyaki. It mellows the bite and keeps the sauce from turning bitter. (Yes, even if it sounds weird.)
- Baste Mid-Bake: After 8 minutes, pull the fish out and spoon that teriyaki sauce over the top. The residual heat caramelizes it into a glossy finish. Skip this, and you’ll just have fish swimming in a pool of underused sauce.
Essential equipment for great baked teriyaki fish
Baking Sheet Essentials
Start with a half-sheet baking pan (13x18 inches) lined with parchment paper—this prevents sticking and makes cleanup effortless. I swear by Starfrit parchment paper because it's sturdy enough to handle the weight of fish and sauce without tearing.
For extra crispy edges, I recommend using a dark-colored baking sheet (like USA Pan Hard-Anodized)—they conduct heat better and promote browning. 🔥
Temperature Tools
A meat thermometer is non-negotiable for perfect results. I use the Thermoworks Smoke because it's durable and has a backlit display—critical for checking the fish's internal temperature of 145°F.
For the oven, a laser thermometer (like Kizen) helps verify your oven's actual temperature, which can vary from the set dial. Preheat your oven for at least 15 minutes before baking to ensure even heat distribution.
Marinating Station
Use a glass or ceramic dish (not metal) for marinating the fish—it won’t react with acidic ingredients like rice vinegar. I like Le Creuset stoneware dishes because they’re non-porous and easy to clean.
For measuring small amounts like 1 tablespoon sesame oil, a small glass measuring cup (like OXO Good Grips) is more precise than a spoon. A microplane (I use Bamix) for grating fresh ginger saves time and ensures even texture.
Sauce Thickening Tools
For thickening the teriyaki sauce, a small stainless-steel saucepan (like All-Clad Stainless) is ideal because it heats evenly and won’t impart flavors. A whisk (I prefer Macalla 12-inch) helps incorporate the cornstarch smoothly without lumps.
If you’re making extra sauce, a glass storage container (like Pyrex) keeps it fresh in the fridge for up to 5 days. 💡
Garnish and Serving
Toasted sesame seeds and sliced green onions need a sharp knife—I use a Japanese santoku knife (like Shun Premier) for clean cuts. For serving, a wooden spoon (like OXO Good Grips) helps scoop the ginger-garlic rice without crushing it.
A slotted spoon is perfect for transferring fish to plates without spilling the sauce. Don’t forget a small bowl for holding extra sauce on the table!
Nutrition facts
Frequently asked questions
Can I use frozen fish for this baked teriyaki recipe?
Yes, but thaw it properly first. Place frozen fillets in a sealed bag and refrigerate overnight for 12-24 hours. Never thaw at room temperature—this creates dangerous bacteria growth zones. For quicker thawing, use the cold water method: seal the fish in a bag and submerge in cold water (change water every 30 minutes until fully thawed). Pat dry completely before marinating to ensure crispy edges.
How do I prevent the fish from sticking to the baking sheet?
Line your baking sheet with parchment paper and lightly oil it with 1/2 teaspoon olive oil before placing the fish. For extra insurance, chill the fish for 15 minutes before baking—this helps the marinade set and prevents spreading. If using a non-stick sheet, avoid overcrowding and bake at 400°F for the full 12-15 minutes to develop that crispy crust.
Can I make the teriyaki sauce ahead of time?
The sauce keeps well in an airtight container in the fridge for up to 5 days. For best results, reheat it gently in a saucepan over low heat until warmed through (don't boil or it'll separate). If storing longer, freeze portions in ice cube trays—just thaw overnight in the fridge before using. The cornstarch helps it thicken beautifully when reheated.
What if my fish turns out dry?
Overcooking is the usual culprit—fish is done when it reaches 145°F internally. If yours dried out, try these fixes next time: reduce baking time by 2 minutes, use thicker fillets (at least 1-inch thick), and don't overcrowd the pan. For dry fish, revive it by placing on a plate, drizzling with 1 tablespoon warm teriyaki sauce, and covering with foil for 5 minutes to steam.
What other proteins work well with this teriyaki glaze?
This same glaze works beautifully on chicken thighs (bake at 375°F for 25-30 minutes) or tofu (press and bake at 350°F for 20 minutes). For shrimp, toss peeled shrimp in the marinade and bake at 400°F for 8-10 minutes until pink. The sauce's balance of sweet and savory complements all these proteins—just adjust cooking times based on thickness.