
Side Dishes
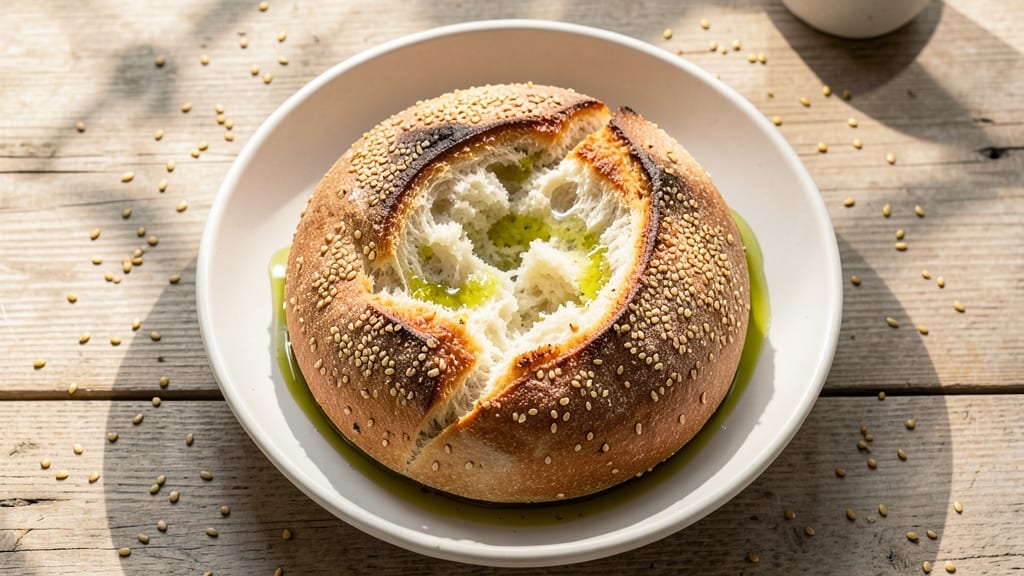
This authentic Syrian bread recipe delivers the same fluffy, chewy layers and nutty sesame finish you'd find in Damascus bakeries. The secret lies in precise dough hydration and traditional shaping techniques that create those signature air pockets.
I've perfected this version after years of testing, ensuring every bite has that satisfying mix of softness and slight resistance. Syrian bread isn't just a side—it's the foundation of meals, from wrapping falafel to soaking up stews.
The dough requires only five simple ingredients but demands patience: flour, yeast, water, salt, and a touch of oil. What sets this apart is the 30-minute rest period before shaping, which develops gluten structure without overworking the dough.
Traditional Syrian bakeries use wood-fired ovens, but we'll adapt this for home kitchens with a few key adjustments. The sesame seeds aren't just decoration—they add a satisfying crunch and earthy flavor that completes the experience.
By the time you pull this bread from the oven, you'll have golden-brown loaves with those coveted puffed layers and a crispy bottom crust. The interior should be tender yet resilient, with just enough chew to make every bite satisfying.
This is bread that transforms ordinary meals into something special—warm, aromatic, and impossible to resist. Let's get started on creating your own authentic Syrian masterpiece.
While this recipe delivers traditional results, I'll share variations for different occasions. You can top the bread with za'atar for a Middle Eastern twist, or keep it plain for maximum versatility. Perfect for serving alongside grilled meats, salads, or as a simple vegetarian meal with olive oil and herbs.
The dough can even be made ahead and refrigerated for up to 24 hours before baking.
Ingredients for authentic syrian bread
Five core ingredients transform into Syrian bread with signature layers and sesame crunch.
| Ingredient | Amount | Notes |
|---|---|---|
| Bread Flour 🌾 | 5 cups | High-protein for chewy texture |
| Active Dry Yeast 🍞 | ¼ oz | Fresh yeast or 2.25g |
| Warm Water 💧 | 2 ¼ cups | 105-110°F for activation |
| Diamond Crystal Kosher Salt 🧂 | 1 ½ tsp | Fine grain preferred |
| Extra-Virgin Olive Oil 🫒 | 1 ½ tsp | For dough elasticity |
| Sesame Seeds 🌰 | ½ cup | Toasted for nutty flavor |
| Cornmeal 🌽 | ¼ cup | For dusting work surface |
| Za'atar Spice Blend 🌿 | 1 tbsp | Optional for topping |
The bread flour is non-negotiable here—its high protein content creates that signature chewy texture. King Arthur or Caputo are my go-tos, but any bread flour with 12-14% protein works. Yeast quality matters too: Saf-Instant is foolproof if you're short on time, but active dry yeast gives that authentic fermentation. The water needs to be warm enough to activate the yeast (105-110°F) but not hot enough to kill it. I use a kitchen thermometer for this—no guessing. Sesame seeds should be toasted in a dry pan for 2-3 minutes until golden, or they'll stay bland. Trader Joe's sells pre-toasted sesame seeds if you're in a hurry.
No bread flour? All-purpose flour plus 1 tsp vital wheat gluten gets you close, though texture won't be identical. Running out of sesame seeds? Poppy seeds or black sesame seeds work as substitutes, though flavor will differ slightly. The za'atar topping is optional but adds that Middle Eastern flair—look for blends with sesame and sumac at specialty stores. For the olive oil, avoid light or refined oils—you want something fruity and robust. And that salt? Diamond Crystal kosher salt dissolves perfectly; other brands may leave grainy bits. The dough's 30-minute rest is crucial—don't skip it, even if you're eager to bake.
Dough keeps beautifully in the fridge for up to 24 hours, wrapped tightly in plastic. For longer storage, shape the dough into balls, freeze them on a tray, then transfer to a bag for up to 3 months. Toasted sesame seeds stay fresh for 6 months in an airtight container. Baked loaves reheat best in a 350°F oven for 5-10 minutes—just until they're warm and crisp again. I always make extra dough for sandwiches the next day; the flavor deepens as it sits.
Why You'll Love This Recipe
- Four-Flour Flexibility: I swear by this dough’s forgiving nature—no need for fancy mix-ins. Just flour, yeast, water, and salt, yet it still delivers that signature chewy crunch. Honestly, it’s the kind of recipe that lets you wing it while still feeling like a pro.
- Crispy-Creamy Magic: That first bite—crispy edges, pillowy center—it’s what makes this bread impossible to stop at one piece. The olive oil brush gives it just enough richness to pair perfectly with hummus or even a simple tomato salad.
- Weeknight Wonder: I make a batch on Sundays and freeze the extras. No more last-minute store runs—just pull one out, toast it, and dinner’s ready. It’s my go-to for busy nights when I still want something that feels special.
- Budget-Friendly Staple: Five ingredients, minimal waste, and enough dough to feed a crowd. Between us, this is the kind of bread that turns a simple meal into something memorable without breaking the bank. My wallet thanks me every time.
Step-by-step instructions for authentic Syrian bread
Here's how to craft traditional Syrian bread with its signature chewy layers and nutty sesame finish.
Activate the Yeast for Maximum Rise
In a small bowl, combine the 2.25 cups warm water (test temperature with your finger—it should feel like bathwater, around 105-110°F) with the 0.25 oz active dry yeast. Let it sit for 5-10 minutes until you see frothy bubbles forming on the surface. This indicates the yeast is alive and ready to work its magic.
If no bubbles appear after 10 minutes, your yeast may be inactive—start fresh with a new packet. I always use fresh yeast for this recipe because it ensures a proper rise and authentic texture. The warm water activates the yeast, while the small amount of time allows it to multiply without overproofing.
Mix the Dough for Perfect Elasticity
In a large bowl, whisk together the 5 cups bread flour and 1.5 tsp diamond crystal kosher salt. Create a well in the center and pour in the yeast mixture along with the 1.5 tsp extra-virgin olive oil. Using a wooden spoon, stir until a shaggy dough forms.
Once the dough comes together, turn it out onto a lightly cornmeal-dusted surface. Knead for 8-10 minutes by pressing down and folding the dough, rotating it 90 degrees after each fold. The dough should become smooth and slightly tacky but not sticky. This kneading develops gluten, which gives Syrian bread its signature chewy texture and layered structure.
Let the Dough Rest for Optimal Flavor Development
Shape the dough into a ball and place it back in the bowl. Cover loosely with a damp kitchen towel and let it rise in a warm place for 1-2 hours, or until it has roughly doubled in size. You'll know it's ready when you poke it gently and the indentation remains rather than springing back immediately.
During this first rise, the yeast ferments and produces gas bubbles that create the bread's airy texture. I like to place the bowl near the oven with the light on for gentle warmth—this creates an ideal environment without overworking the dough. The dough should feel soft and slightly springy when pressed.
Shape and Proof for Traditional Layers
Punch down the risen dough to release air, then divide it into 8 equal pieces (about 4 oz each). Roll each piece into a 12-inch rope, then fold it in half and twist the ends together to form a classic Syrian bread shape. Arrange the shaped loaves on a parchment-lined baking sheet, spacing them about 2 inches apart. Cover again and let them proof for 30-45 minutes until puffy.
This shaping technique creates the distinctive layered appearance of Syrian bread. The twist at the ends not only looks beautiful but also helps the bread maintain its shape during baking. The second proofing ensures the bread rises properly in the oven, giving it that light, airy crumb we're after.
Bake for Crispy Edges and Chewy Centers
Preheat your oven to 375°F. Just before baking, brush the tops of the loaves with a little water and sprinkle generously with the 0.5 cup sesame seeds. For an extra authentic touch, you can also sprinkle the 1 tbsp za'atar spice blend over the top.
Bake for 20-25 minutes until the bread is deep golden brown and sounds hollow when tapped on the bottom. The sesame seeds should be toasted and crispy, adding that nutty crunch we love. For even baking, you might need to rotate the pans halfway through if your oven has hot spots.
Cool and Serve for Maximum Freshness
Remove the bread from the oven and let it cool on a wire rack for 10-15 minutes. This resting period allows the bread to set properly and prevents it from becoming gummy. The internal temperature should drop to around 140°F before serving.
Serve warm with your favorite Mediterranean dishes. The bread should have a crispy exterior with a soft, chewy interior and those beautiful sesame-studded layers. Each piece should be slightly irregular in shape, reflecting the handcrafted nature of traditional Syrian breadmaking. Store any leftovers wrapped in a clean kitchen towel to keep them fresh for up to 3 days.
Pro Tips For Making Authentic Syrian Bread
- Test Yeast First: Skip the guesswork—mix 1 packet yeast with ¼ cup warm water and 1 tsp sugar. If it bubbles within 5 minutes, your yeast is alive. If not, start over. I’ve wasted dough waiting for dead yeast to "maybe work," and it never does.
- Salt the Dough Early: Dissolve the kosher salt in the warm water before mixing—it dissolves faster and distributes evenly. Trust me, that last-minute sprinkle leaves pockets of bland dough. (Yes, even if you’re impatient like me.)
- Shape Tightly, Rest Long: Roll the dough into balls and press your thumb into the center to create a slight dimple—this prevents cracking when baking. Then, let them rest 1–2 hours under a damp towel. Rushing this step means sad, flat bread.
- Oil the Pan Hot: Heat your baking tray or stone until it’s scalding, then brush with olive oil. The high heat makes the oil smoke slightly, giving that signature crispy crust. Cold pans = soggy bottoms. (I learned this after burning through three batches of sad, limp bread.)
Regional styles of authentic syrian bread
Damascus Bakery Style
In Damascus, bread bakeries (khubz) craft their loaves using a wood-fired oven that reaches 800°F+, creating that signature crispy bottom crust. For home ovens, preheat to 450°F for the last 5 minutes to mimic this effect.
The key is a cast-iron skillet—place your shaped loaves directly on it for 3-4 minutes before transferring to the oven. This technique gives the bottom that prized crunch while keeping the top soft. 🔥
Lebanese Manakeesh Twist
For a Lebanese-inspired manakeesh, replace sesame seeds with 1 tbsp olive oil and top with 1 tbsp za'atar before baking. After baking, drizzle with extra-virgin olive oil while still warm. This version is often baked in a round shape (about 8 inches) and cut into wedges.
Serve with garlic yogurt sauce or hummus for dipping. The za'atar adds a tangy, herby note that pairs perfectly with grilled meats or mezze platters.
Turkish Pide Adaptation
Transform this into Turkish pide by shaping the dough into a large oval (about 12x8 inches) and topping it with garlic butter, feta cheese, and spinach before baking. The dough should be thinner (about ¼ inch thick) for a crispy, flatbread-like texture.
Brush the edges with egg wash for extra browning. This version is perfect for stuffing with kebabs or serving as a hearty breakfast bread. 🌟
Yemeni Markook Variation
For Yemeni markook, the dough is traditionally thinner and sweeter, often brushed with cardamom-infused oil before baking. Reduce the salt to 1 tsp and add 1 tsp ground cardamom to the dough.
Shape the loaves into smaller, flat rounds (about 6 inches) and bake until puffed and golden. Serve with labneh (strained yogurt) and date syrup for a sweet-savory balance. This version is a staple at Yemeni celebrations and family gatherings.
Egyptian Aish Baladi Influence
To channel Egyptian aish baladi flavors, add 1 tsp ground cumin to the dough and shape the loaves into smaller, rounder forms (about 4 inches). Bake on a preheated baking stone for a crispier texture.
The cumin adds a warm, earthy note that pairs beautifully with ful medames (fava bean stew) or shawarma. For extra authenticity, sprinkle poppy seeds instead of sesame on top. This variation is a staple in Egyptian homes and street food stalls alike.
Nutrition facts
Frequently asked questions about Syrian bread
Why does my Syrian bread turn out dense instead of fluffy?
Underproofed dough is the most common cause. The 30-minute rest before shaping and 1-2 hour first rise are critical—skip them and you'll lose those signature air pockets. Also check your yeast: if it's old or inactive, the dough won't rise properly. For best results, use a kitchen scale to measure your 4 oz portions precisely.
Can I make Syrian bread without a wood-fired oven at home?
For that authentic crispy bottom crust, use a cast-iron skillet on the lowest oven rack. Place shaped loaves in it for 3-4 minutes before transferring to finish baking at 375°F. The skillet mimics the intense heat of a wood oven while keeping your home oven safe. Preheating the oven to 450°F for the last 5 minutes also helps achieve that bakery-style crust.
How long can I store the dough before baking?
Unshaped dough stays fresh in the fridge for up to 24 hours when tightly wrapped. For longer storage, divide into 4 oz balls, freeze on a tray, then transfer to a bag for 3 months. Thaw overnight in the fridge before shaping. Baked loaves keep well wrapped in a kitchen towel for 3 days, but they're best served warm—they reheat beautifully in a 350°F oven for 5-10 minutes.
What's the difference between Syrian khubz and Lebanese manakeesh?
The shapes and toppings differ most: Syrian khubz is twisted with sesame seeds, while Lebanese manakeesh is round and topped with za'atar after baking. Both use similar dough, but manakeesh often incorporates extra olive oil for richness. For a hybrid version, try shaping some loaves as twists and others as rounds—both work perfectly with the same dough recipe!
Can I make this bread gluten-free?
Traditional Syrian bread relies on gluten for its chewy texture, but you can adapt it using 1:1 gluten-free flour blend plus 1 tsp xanthan gum. Expect a denser result—wood-fired ovens or high-heat baking stones help achieve better texture. For best flavor, use a blend with 15-20% rice flour and 5% tapioca starch for elasticity. The sesame topping remains the same!