
Breakfast & Brunch
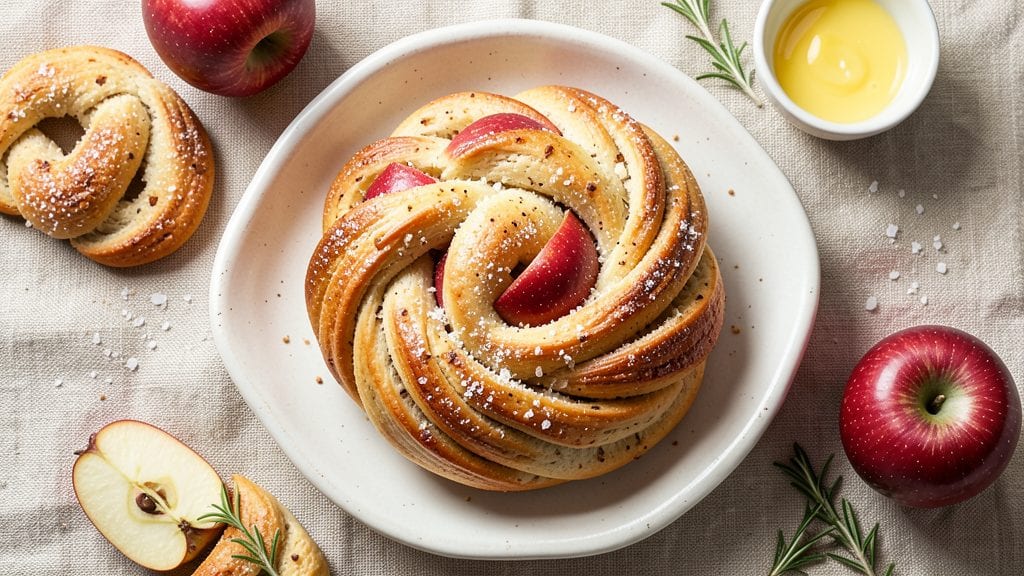
This apple braid bread recipe transforms simple dough into a golden, flaky masterpiece with sweet cinnamon swirls and tender apples baked right into every layer. The secret lies in a precise balance of butter and flour, creating those signature flaky layers while keeping the texture light and airy.
I perfected this recipe after years of baking, and it never fails to impress—whether served warm with butter or as a showstopping centerpiece for brunch.
What sets this recipe apart is the way the apples caramelize during baking, infusing the bread with natural sweetness while maintaining a tender crumb. The dough rests twice—once before shaping and again after braiding—to ensure maximum rise and a crispy, golden crust.
Every slice reveals those beautiful swirls of cinnamon-spiced apple filling, making it as beautiful as it is delicious.
By the time you pull this loaf from the oven, you'll have a fragrant, golden braid with crisp edges and a tender interior. The aroma alone will have everyone gathering around your table, and the first bite delivers that perfect combination of flaky, buttery layers and sweet, spiced apple filling.
This is the kind of bread that makes breakfast feel like a celebration.
Serve it warm with a pat of butter, a drizzle of honey, or even as a dessert with a dusting of powdered sugar. The possibilities are endless, but the technique remains foolproof—once you try this apple braid bread, you'll never go back to store-bought again.
Ingredients for apple braid bread
Four cups flour, one cup butter—simple ingredients for a showstopping apple braid.
| Ingredient | Amount | Notes |
|---|---|---|
| All-Purpose Flour 🌾 | 4 cups | Sifted for light texture |
| Unsalted Butter 🧈 | 1 cup | Cold, cubed for flakiness |
| Granulated Sugar 🍚 | ¼ cup | For dough sweetness |
| Instant Yeast 🍞 | 2 tsp | Ensures quick activation |
| Large Eggs 🥚 | 1 whole | Room temperature |
| Milk 🥛 | ½ cup | Warm for yeast activation |
| Salt 🧂 | ½ tsp | Kosher or sea salt |
| Cinnamon 🌿 | 2 tbsp | Ground, not cassia |
| Brown Sugar 🍯 | ¼ cup | Packed, for filling |
| Apples 🍎 | 2 medium | Peeled, thinly sliced |
| Vanilla Extract 🍯 | 1 tsp | Pure alcohol-free preferred |
| Powdered Sugar 🍚 | 2 tbsp | For dusting finished bread |
The butter needs to be cold—cut it into cubes and chill for 30 minutes if it's warm. Land O'Lakes or Plugrá are my go-tos for baking butter. The apples should be firm and sweet—Honeycrisp or Fuji work best, but Granny Smith adds tartness if you prefer. Peel them first, then slice thinly (about 1/8-inch thick). If your kitchen knife isn't great for this, a mandoline makes it effortless. The cinnamon? Penzeys or McCormick ground cinnamon stays fresh longer than the cheap stuff.
No vanilla extract? Vanilla bean paste works too, or even a scraped vanilla bean. Short on brown sugar? Substitute white sugar plus 1 tsp molasses. The dough will feel sticky—don't panic, it's normal. If you're worried about overmixing, use a stand mixer with the dough hook on low speed. The yeast is instant, so no proofing needed before mixing. For the filling, toss the sliced apples with cinnamon, brown sugar, and a pinch of salt before weaving them into the braid—this keeps them tender.
Dough keeps for 2 days wrapped in plastic in the fridge. The filled braid? 1 day max—it's best baked fresh. For make-ahead prep, shape the dough, wrap tightly, and refrigerate overnight. The next morning, let it sit at room temp for 1 hour before braiding. Leftover slices? Toast them—they're even better the second day.
Why You'll Love This Recipe
- No-Knead Magic: I swear, the dough comes together in five minutes—just mix, fold, and let the yeast do the work. No stand mixer, no elbow grease, just you and a bowl while the house stays quiet.
- Sweet Butter Bliss: That rich, caramelized sugar and butter swirled through the dough? It’s like biting into a cinnamon roll’s dream. The eggs bind it just enough to keep it tender, but the butter makes every slice feel indulgent.
- Weeknight Hero: Slice it warm for breakfast, pack it for lunches, or serve it cold with jam at a picnic. Honestly, I’ve used it as a sandwich base, a dessert, and even toasted it for French toast—it’s that adaptable.
- Budget-Friendly Staple: Flour, sugar, butter, yeast—these are pantry basics that stretch into something special. A single batch feeds four for days, and the leftovers? Toast them until crispy for a free, delicious snack.
Step-by-step instructions for apple braid bread
Here's how to create those perfect flaky layers and sweet apple swirls everyone will love.
Mix the Dough for Perfect Flakiness
In a large mixing bowl, combine the 4 cups all-purpose flour, 0.5 tsp salt, and 2 tsp instant yeast. Whisk these dry ingredients together until evenly distributed—this ensures the yeast activates properly throughout the dough. In a separate small bowl, warm the 0.5 cup milk to about 110°F (it should feel warm but not hot to the touch), then stir in the 1 whole large egg and 1 tsp vanilla extract. Pour this wet mixture into the dry ingredients and stir until just combined.
Add the 1 cup cold, cubed unsalted butter to the bowl and use a wooden spoon or your hands to work it into the dough until it begins to come together. I like to press the butter pieces into the flour mixture first to help create those flaky layers later. Once the dough forms a shaggy mass, turn it out onto a lightly floured surface and knead gently for about 2 minutes—just until it holds together. Over-kneading develops gluten, which can make the bread tough instead of tender.
Prepare the Apple Filling
While the dough rests, prepare the apple filling. Peel and thinly slice the 2 medium apples (about ¼-inch thick slices). In a small bowl, combine the sliced apples with 0.25 cup packed brown sugar and 2 tbsp cinnamon. Toss everything together until the apple slices are evenly coated. This mixture should be sweet and fragrant—if it smells amazing now, you're on the right track. Set the filling aside while you prepare the dough for shaping.
I always recommend using a mix of tart and sweet apples (like Honeycrisp and Granny Smith) for the best flavor balance. If your apples are particularly juicy, you might want to sprinkle them with an extra pinch of cinnamon to help absorb some of that liquid before using them in the bread.
Shape the Dough and Add the Filling
Divide the dough into 3 equal pieces (about 12 ounces each) and roll each piece into a 12-inch long rectangle on a floured surface. Keep the rectangles about ¼-inch thick—this ensures even baking and proper layering. Spread one-third of the apple filling evenly over one of the rectangles, leaving about ½-inch border uncovered. This border prevents the filling from oozing out during baking.
Roll up each rectangle tightly starting from the long side, creating 3 long log-shaped dough pieces. Pinch the seams gently to seal and place them side by side on a parchment-lined baking sheet. The logs should touch each other lightly—this helps them braid together nicely. Cover the baking sheet loosely with plastic wrap and let the dough rise in a warm place for 30-45 minutes, or until the dough has puffed up noticeably and feels spongy to the touch.
Braid and Bake for Golden Perfection
After the dough has risen, carefully remove the plastic wrap and gently braid the three logs together. Start by placing one log horizontally, then bring the ends of the other two logs over it in an alternating pattern, tucking the ends under to secure. This creates that classic braided pattern. Place the braided loaf seam-side down on the same parchment-lined baking sheet and let it rest for 10 minutes—this helps it hold its shape during baking.
Preheat your oven to 375°F. Brush the top of the braided loaf with a little milk (about 1 tablespoon) to create a golden crust. Bake for 25-30 minutes, until the bread is deep golden brown and sounds hollow when tapped on the bottom. If the top browns too quickly, tent it loosely with aluminum foil for the last 10 minutes of baking to prevent over-browning.
Cool and Serve Warm
Remove the apple braid from the oven and let it cool on a wire rack for 10-15 minutes. This resting period allows the filling to set slightly and the bread to firm up, making it easier to slice. While it cools, dust the top generously with 2 tbsp powdered sugar for that classic finish. The powdered sugar adds a sweet contrast to the warm, spiced apple filling and buttery crust.
Slice the bread into 1-inch thick pieces and serve warm. The layers should be flaky and golden, with a tender crumb and pockets of sweet, spiced apple filling throughout. For the best experience, serve with a dollop of whipped cream or a scoop of vanilla ice cream—it's the perfect balance of warm and cool textures. Store any leftovers in an airtight container at room temperature for up to 2 days, or freeze for up to 1 month.
Pro Tips For Making Apple Braid Bread
- CHILL THE DOUGH: Don’t rush the first rise—let the dough go slow in the fridge overnight. The apples will stay fresher, the flavor deeper, and you’ll avoid that dense, chewy texture that happens when yeast gets overworked. (Yes, even if you’re impatient like me.)
- SOFTEN BUTTER FIRST: Take the butter out of the fridge 30 minutes before mixing—room temp makes it easier to cream with sugar, and it blends smoother into the dough. Cold butter pockets = uneven texture in your braid. Trust me, your future self will notice.
- SKIP THE OVERHANDLING: Once you shape the braid, resist the urge to tweak it. Every poke and prod deflates the air pockets, and you’ll end up with a flat, sad loaf. Let it rest 10 minutes before baking—it’ll hold its shape better.
- USE COLD APPLES: Slice apples thin and toss them in lemon water right before adding to the dough. Warm apples turn mushy fast, and you’ll end up with a soggy center. Cold slices keep their bite and caramelize beautifully in the oven. (Pro move: Honeycrisp or Fuji hold up best.)
Storing and reheating this dish
Room-Temp Prep
Let your baked apple braid sit at room temperature for 1-2 hours before storing—this prevents condensation buildup in airtight containers. I place mine on a wire rack to keep it dry. The bread's texture improves overnight as the apples release their juices evenly. 💫
Fridge Storage
Wrap cooled loaves tightly in plastic wrap, then place in an airtight container for up to 3 days. The powdered sugar coating helps preserve freshness.
Reheat slices in a toaster or oven at 350°F for 5-7 minutes—this restores the flaky layers perfectly. For extra crispiness, brush with melted butter before reheating.
Freezer Magic
Slice the bread first, then wrap individual pieces in parchment paper and store in a freezer bag for up to 3 months. To reheat, thaw overnight in the fridge, then warm in a skillet over medium heat for 2-3 minutes per side until golden.
The freezer preserves the apple filling's moisture better than refrigeration. ✨
Reviving Stale Slices
If your apple braid loses its flakiness, revive it by placing slices on a baking sheet and heating at 300°F for 8-10 minutes. The residual moisture in the apples helps restore tenderness.
For a quick fix, microwave slices for 15 seconds with a damp paper towel—this softens the crust without drying out the filling.
Applesauce Hack
If your bread develops a soggy bottom (common with juicy apples), transform it into homemade applesauce. Simmer leftover slices with ½ cup water and 1 tbsp brown sugar for 10 minutes, then mash. This turns "mistakes" into a delicious breakfast topping! 🍎
Gift-Worthy Packaging
For gifting, wrap cooled loaves in parchment paper, tie with baker's twine, and place in a gift box with a powdered sugar shaker. Add a note: "Best served warm with butter." The presentation makes it feel like a bakery treat—guaranteed to impress! 💛
Nutrition facts
Frequently asked questions
Can I use frozen apples in this recipe?
Yes, but thaw and drain them first! Place frozen apple slices in a colander and let them sit at room temperature for 10-15 minutes to remove excess moisture. Pat them dry with a paper towel before mixing with the cinnamon and brown sugar. This prevents a soggy braid during baking.
Why did my apple braid turn out dense instead of flaky?
Over-kneading or warm butter are the most common culprits. Keep the butter cold and work the dough just until it comes together—no more than 2 minutes of kneading. Also ensure your yeast is fresh (test it in warm milk first) and that the dough rises in a warm place (75-80°F) for proper expansion.
How do I make this recipe gluten-free?
Replace the all-purpose flour with a 1:1 gluten-free baking flour blend (like Bob's Red Mill) plus ½ tsp xanthan gum. Use the same measurements, but expect a slightly denser texture. Add 1 extra tablespoon of milk if the dough feels too dry. The braiding technique remains identical—just handle the dough more gently.
Can I substitute cinnamon with another spice?
For a different flavor profile, try ½ tsp pumpkin pie spice or ¼ tsp nutmeg + ¼ tsp cardamom. Avoid cloves or allspice—they can overpower the delicate apple flavor. If using a spice blend, reduce the cinnamon to 1 tbsp total to maintain balance. Always taste the filling before braiding!
What's the best way to serve leftover slices?
Toast them until golden and serve with whipped cream or vanilla ice cream for dessert. For breakfast, pair with peanut butter or a fried egg. Another great option: warm slices with melted butter and a sprinkle of coarse sugar for caramelized crunch. Store leftovers in an airtight container for up to 3 days.