
Main Courses
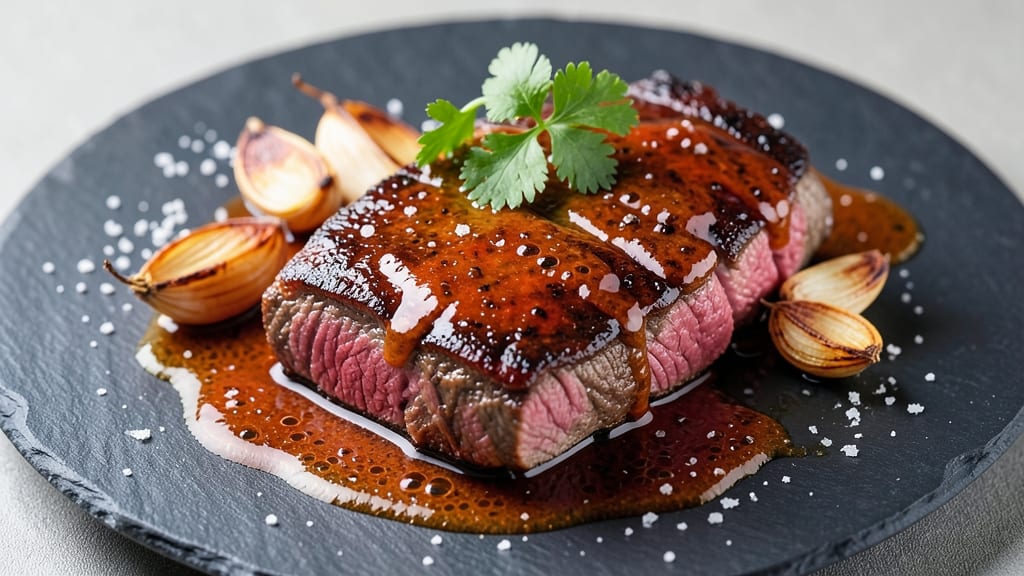
This adobo steak recipe transforms tough cuts into melt-in-your-mouth perfection through a time-honored Filipino technique that balances tangy vinegar with savory soy and aromatic garlic.
The result is a dish where the meat practically falls apart at the touch of a fork, bathed in a rich, caramelized sauce that clings to every bite.
I first discovered this method during a trip to Manila, where my aunt insisted it was the secret to feeding a crowd without sacrificing flavor or texture.
The beauty of this recipe lies in its simplicity—just a handful of pantry staples work together to create restaurant-quality results. The marinade does double duty as the braising liquid, infusing the steak with deep umami flavors while tenderizing it over hours of gentle cooking.
Whether you choose the traditional stovetop method or opt for an Instant Pot shortcut, the outcome remains consistently tender and deeply flavorful. Professional chefs often call this the ultimate "foolproof" dish, and after perfecting it myself, I can see why.
What makes this steak truly special is how the sauce evolves during cooking—starting bright and acidic, then mellowing into a thick, glossy glaze that caramelizes beautifully.
The aroma alone will have everyone gathering around the table, and the first bite delivers that perfect balance of sweet, salty, and tangy that defines adobo.
This dish pairs effortlessly with steamed rice to soak up every last drop of that precious sauce, making it a complete meal in one package.
While traditional recipes call for long braising times, I’ve included modern adaptations that deliver the same results in half the time without sacrificing authenticity. The key is patience—letting the flavors meld and the meat transform into something so tender it practically dissolves.
Once you try this version, you’ll understand why adobo steak remains a staple in Filipino homes and restaurants alike. Let’s get cooking!
Ingredients for adobo steak
Six ingredients transform tough beef into melt-in-your-mouth perfection with Filipino-inspired umami magic.
| Ingredient | Amount | Notes |
|---|---|---|
| Chuck Roast 🥩 | 3 lb | Cut into 2-inch chunks |
| Canned Tomatoes 🍅 | 2 cans | 28 oz each, San Marzano preferred |
| White Vinegar 💧 | 1 cup | White or apple cider vinegar |
| Soy Sauce 🍶 | ½ cup | Kikkoman preferred for balance |
| Brown Sugar 🍚 | ½ cup | Light or dark, packed |
| Garlic Cloves 🧄 | 8 cloves | Peeled, smashed slightly |
| Bay Leaves 🌿 | 2 whole | Dried, standard size |
| Black Peppercorns 🌶️ | 1 tsp | Crushed lightly |
| Salt 🧂 | 1 ½ tsp | Kosher or sea salt |
| Olive Oil 🫒 | 2 tbsp | For searing meat |
| Garlic Powder 🧄 | 1 tsp | For extra depth |
| Long-Grain White Rice 🍚 | 2 cups | Uncooked, for serving |
| Fresh Bay Leaves 🌿 | 2 whole | Optional garnish |
The chuck roast is your secret weapon here—it's the cut that actually tenderizes during braising. Most grocery stores carry it pre-cut into chunks, but if you're buying a whole roast, ask the butcher to cube it for you. I always grab mine from Costco when I'm feeding a crowd, but the regular supermarket stuff works perfectly for this recipe. Look for good marbling—the white streaks of fat—that's what keeps the meat juicy. The canned tomatoes? San Marzano is ideal, but any good-quality canned tomatoes will do. Just drain them well before using—you want the sauce to be thick, not watery.
No white vinegar? Apple cider vinegar or rice vinegar works just as well—they all bring that bright acidity that cuts through the richness. Soy sauce substitutes? Coconut aminos for a lighter taste, or Worcestershire sauce for a deeper umami punch. The brown sugar can be swapped for muscovado or coconut sugar if you're avoiding refined sugar. Fresh garlic cloves are non-negotiable here—they're the heart of the flavor. If you're short on time, garlic powder at half the amount will get you close, but nothing beats the real thing. The bay leaves? Don't skip them—they add that subtle earthy depth that makes this sauce sing.
This dish tastes even better the next day, so make extra if you can. The sauce keeps for 5 days in the fridge, and the meat stays tender for 4 days if stored properly. For leftovers, I like to portion the meat and sauce into containers so I can reheat just what I need. The rice? Cook it ahead and keep it warm—this dish is all about that perfect rice-to-sauce ratio. Freeze portions of the sauce separately if you want to keep it for 3 months—just thaw and reheat gently.
Why You'll Love This Recipe
- Pantry-Friendly Magic: I swear by this recipe when I forget to shop—just grab the chuck roast, a can of tomatoes, and whatever’s lurking in my spice cabinet. The vinegar and soy sauce cut through the richness, and the brown sugar adds that caramelized depth without extra effort.
- Umami Bomb: That tangy-sweet glaze? Chef’s kiss. The vinegar tenderizes the chuck while the soy sauce and brown sugar create this irresistible sticky crust. It’s the kind of flavor that makes you slow down mid-bite.
- Leftover Goldmine: This dish tastes even better the next day—seriously. I’ll make a double batch on Sundays and reheat slices for sandwiches or toss them into rice bowls all week. The sauce clings to every bite like a hug.
- Budget Powerhouse: Chuck roast is affordable, and the ingredients are basic but transformative. For under $10, I feed four people a meal that feels fancy without breaking the bank. Here’s what sold me—it’s the rare recipe where cost and quality align perfectly.
Step-by-step instructions for adobo steak recipe
This method transforms tough chuck roast into melt-in-your-mouth tenderness through slow braising.
Sear the Chuck Roast for Deep Flavor
Heat a heavy Dutch oven over medium-high heat until hot. Add the 2 tablespoons olive oil and swirl to coat the bottom. Working in batches if needed, add the 3 lb chuck roast cut into 2-inch chunks, letting them sear undisturbed for 3-4 minutes per side until developing a deep golden-brown crust. This step creates the Maillard reaction that builds rich flavor.
As the meat browns, you'll notice the fat begin to render and sizzle loudly. Don't crowd the pan—give each piece space to develop that perfect crust. Transfer the seared meat to a plate and set aside, leaving all the browned bits in the pot. These flavorful fond bits will form the base of your sauce later.
Build the Adobo Sauce Foundation
Reduce heat to medium and add the 8 smashed garlic cloves to the Dutch oven, cooking for 30 seconds until fragrant. Be careful not to burn them—they should smell sweet and nutty, not bitter. Add the 2 whole dried bay leaves, 1 teaspoon crushed black peppercorns, and 1½ teaspoons salt, stirring to combine.
Pour in the 1 cup white vinegar and let it simmer for 2 minutes until it reduces by about half and the acidity mellows slightly. This step mellows the vinegar's sharpness and prepares the pot for the tomatoes. The vinegar's acidity helps tenderize the meat while building the sauce's characteristic tangy depth.
Combine Tomatoes and Braising Liquids
Add the 2 cans canned tomatoes (about 28 ounces total), ½ cup soy sauce, and ½ cup packed brown sugar to the pot. Stir well to incorporate all the browned bits from the bottom. Bring the mixture to a gentle simmer, then reduce heat to low. The sauce should bubble softly—you're looking for a gentle rolling simmer, not a vigorous boil.
Return the seared chuck roast to the pot, spooning some of the sauce over the meat to ensure it's well-coated. Add the 1 teaspoon garlic powder and give everything a gentle stir. The meat should be mostly submerged in the sauce, with just the tops peeking above the liquid. This ensures even cooking and maximum flavor infusion.
Braise Until Fork-Tender
Cover the Dutch oven with a tight-fitting lid and transfer to a preheated 325°F oven. Here's where the magic happens—braising at this gentle temperature for 2 to 2½ hours until the meat is fork-tender. You'll know it's ready when a fork slides in easily with no resistance, and the meat pulls apart in strands.
About halfway through cooking (after 1 hour), give the pot a gentle stir and add ½ cup hot water if the sauce appears too dry. The meat should be swimming in flavorful liquid throughout the entire process. If you're impatient and check early, resist the urge to peek—the heat loss from opening the oven will extend your cooking time.
Rest and Serve with Perfect Rice
Remove the lid and let the sauce reduce slightly for 10 minutes on the stovetop, giving it time to thicken and intensify in flavor. Transfer the chuck roast to a serving platter and tent loosely with foil. Let it rest for 15 minutes—this crucial step allows the juices to redistribute throughout the meat, ensuring each bite is moist and flavorful.
While the meat rests, cook the 2 cups long-grain white rice according to package instructions. For serving, spoon the meat over the rice and ladle the rich adobo sauce on top. Garnish with the 2 whole fresh bay leaves for presentation. The finished dish should have a glossy, slightly thickened sauce that clings beautifully to the tender meat, delivering that perfect balance of sweet, salty, and tangy flavors.
Pro Tips For Making Adobo Steak
- SEAR THE ROAST FIRST: I learned this the hard way—skipping the sear means flavor hiding in the sauce instead of clinging to the meat. Hit the chuck roast with high heat in a hot pan (no oil needed—it’ll render out) until deep brown crusts form on all sides. That’s where the magic starts.
- USE THICK TOMATOES, NOT JUICE: Canned tomatoes packed in juice water down the sauce faster than you can say "second pot." Drain them first, then crush by hand—you’ll get a thicker, richer base that actually clings to the meat. (Yes, even if you’re impatient like me.)
- DON’T RUSH THE VINEGAR: Adding white vinegar at the end? Big mistake. It needs time to mellow and marry with the soy and sugar. Stir it in after the tomatoes simmer for 10 minutes—let it work its tang, not dominate. Trust me, your taste buds will notice the difference.
- BROWN THE SUGAR: That brown sugar isn’t just for sweetness—it’s for depth. Caramelize it in the pan for 2-3 minutes before adding liquids. The deeper color and nutty notes cut through the vinegar’s sharpness and make the sauce taste like it simmered for hours. (Your future self will thank you.)
Flavor customization for this adobo steak
Classic Filipino Style
The traditional approach focuses on balancing soy sauce and vinegar for that signature tangy-savory profile. I recommend using Kikkoman soy sauce for authentic flavor, paired with white vinegar (or apple cider vinegar for subtle sweetness).
The brown sugar adds just enough caramelization to mellow the acidity. For extra depth, add 1 tbsp fish sauce—a Filipino pantry staple that enhances umami without overpowering. 🌶️
Sweet & Tangy Variation
Crank up the sweetness by doubling the brown sugar to 1 cup and adding ½ cup pineapple juice to the braising liquid. This tropical twist works beautifully with ribeye steak instead of chuck roast.
For color, stir in 1 tbsp turmeric during the final 10 minutes of cooking—it adds vibrant hue and earthy warmth. Garnish with fresh cilantro for brightness.
Spicy Adobo Kick
For heat lovers, add 2 tbsp sambal oelek (or 1-2 fresh Thai chilies, sliced) with the garlic. To balance the fire, increase the brown sugar to ¾ cup. For smoky depth, char 2 cloves garlic directly over a gas flame before adding them to the pot.
Serve with steamed jasmine rice and pickled red onions to cut through the heat. 🔥
Instant Pot Shortcut
Skip the oven and use your Instant Pot for a 1-hour version. Sear the meat first, then add all ingredients (except rice) and cook on High Pressure for 45 minutes, followed by a 10-minute natural release.
Finish by reducing the sauce on the stovetop for 5-7 minutes to thicken. This method locks in juices perfectly—ideal for weeknight dinners.
Coconut Milk Creaminess
Swap out ½ cup of the vinegar for ½ cup coconut milk to create a richer, almost curry-like sauce. This works especially well with flank steak cut into strips.
Add 1 tsp ground cumin and ½ tsp cinnamon for warmth. The sauce will be velvety—great for serving with coconut rice or naan bread for dipping.
Smoky Grill Adaptation
For outdoor cooking, sear the meat on the grill, then transfer to a cast-iron skillet with the adobo sauce. Cover and cook on indirect heat for 1.5-2 hours at 275°F, basting occasionally.
Finish with wood smoke by adding 2 soaked wood chips (hickory or apple) to the coals. The smoky char elevates the dish to BBQ-level deliciousness. ✨
Nutrition facts
Frequently asked questions
Can I use this recipe with other cuts of beef besides chuck roast?
While chuck roast is ideal for its fat content and tenderness, you can use ribeye (cut into chunks) or flank steak (sliced thin) for quicker cooking. For tougher cuts like brisket, increase braising time to 3 hours. Ribeye will stay more tender but may not break down as dramatically. Always adjust cooking time based on your cut's thickness.
How do I know when the meat is fully tender?
The meat is ready when it easily pulls apart with a fork and the juices run clear. For chuck roast, this typically takes 2-2½ hours in the oven. A quick test: Press a piece gently with tongs—if it crumbles, it's done. Overcooking can make the meat mushy, so err on the side of slightly underdone if needed, as it continues cooking while resting.
What if I don't have a Dutch oven?
No problem! Use a heavy pot with a tight-fitting lid—even a large stainless steel pot works. For best results, choose something with thick sides to maintain even heat. If your pot is light (like aluminum), reduce the oven temperature by 25°F to prevent boiling over. The key is keeping the meat submerged in liquid throughout cooking.
Can I make this recipe without soy sauce?
Yes, but the flavor will be less authentic. Substitute with ½ cup coconut aminos for a lighter taste or ½ cup Worcestershire sauce for deeper umami. For a vegetarian version, use ½ cup tamari (gluten-free soy sauce) or ½ cup mushroom sauce. The vinegar and garlic will still provide the tangy backbone, but the savory depth will be different.
How far ahead can I prepare this dish?
This recipe tastes even better the next day! Store the meat and sauce separately in the fridge for up to 4 days. Reheat gently on the stovetop, adding a splash of water if the sauce thickens too much. For leftovers, portion the meat and sauce into containers so you can reheat just what you need. The sauce can also be frozen for 3 months—thaw and reheat before serving.