
Side Dishes
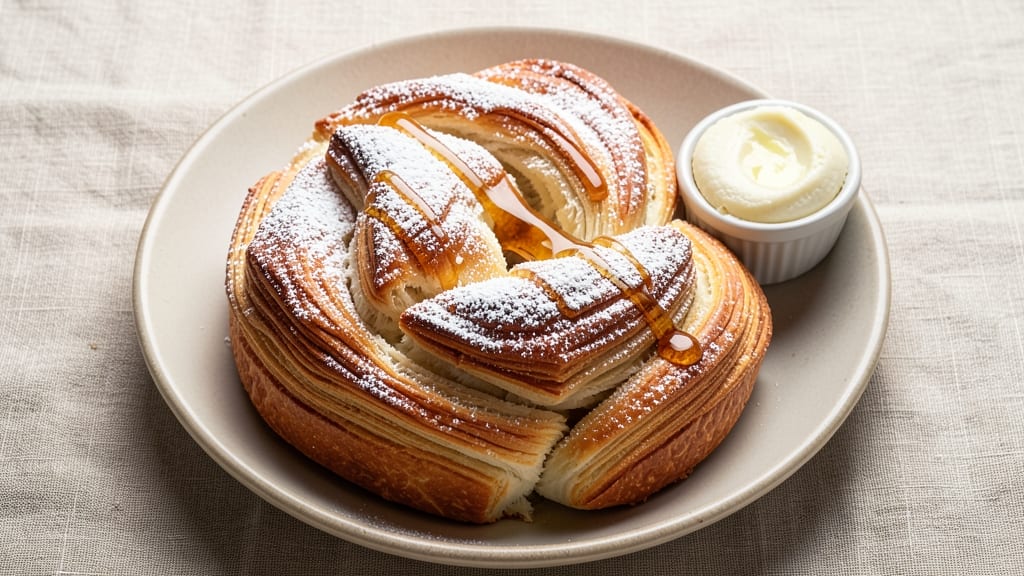
Creating accordion bread with its signature flaky layers that separate effortlessly is a skill every home baker should master—it transforms any meal into something special. The secret lies in precise dough preparation and careful folding techniques that build those signature layers, much like puff pastry but with a yeast-based foundation.
I’ve perfected this method over years of testing, ensuring each fold creates the perfect structure for golden, crispy layers that shatter at the touch of a fork.
This recipe delivers restaurant-quality results with just a few simple ingredients and about 3 hours of total time, including resting periods. The dough requires patience—letting it rest between folds allows the gluten to relax and creates those delicate, flaky sheets.
Once baked, the bread develops a crisp exterior with a tender, airy interior that melts in your mouth, making it ideal for serving alongside soups, stews, or as a showstopping centerpiece for holiday dinners.
The magic happens during the folding process, where each layer builds upon the last to create the iconic accordion effect. With a few key techniques—like using a rolling pin with even pressure and ensuring proper dough thickness—I’ve made it foolproof for bakers of all skill levels.
The end result is a bread so visually stunning and delicious that guests will ask for seconds before they even take their first bite.
Once mastered, this accordion bread becomes a versatile staple in your kitchen—perfect for pairing with rich gravies, hearty meats, or even as a base for open-faced sandwiches.
The recipe includes optional garnishes like garlic butter or fresh herbs to elevate the flavor even further. Let’s get started on creating your own masterpiece.
Ingredients for accordion bread
Four cups flour, cold butter, and patience create magic layers that separate like butter.
| Ingredient | Amount | Notes |
|---|---|---|
| All-Purpose Flour 🌾 | 4 cups | High protein for structure |
| Active Dry Yeast 🍞 | ¼ oz | Or 2 1/4 tsp packet |
| Unsalted Butter 🧈 | ½ cup | Cold, cubed for folds |
| Granulated Sugar 🍚 | 1 tbsp | Activates yeast |
| Salt 🧂 | 1 tsp | Kosher or sea salt |
| Whole Milk 🥛 | ½ cup | Warmed to 110°F |
| Large Eggs 🥚 | 1 whole | Room temperature |
| Vegetable Oil 🫒 | 2 tbsp | For dough bowl |
| Garlic Cloves 🧄 | 2 cloves | Minced for butter |
| Fresh Parsley 🌿 | ¼ cup | Chopped for garnish |
| Olive Oil 🫒 | 1 tbsp | For brushing |
The flour is non-negotiable here—King Arthur or Bread Flour gives that perfect chew. Whole Foods or King Arthur's website sell it in bulk if you bake often. The butter needs to be cold but pliable—take it out 30 minutes before starting. I always grab Land O'Lakes unsalted from the grocery store; it's reliable and affordable. For the yeast, check the expiration date—old yeast won't activate properly, and you'll end up with flat dough. Store it in the freezer for freshness.
No garlic butter? Skip it entirely—this bread shines on its own. Short on parsley? Fresh thyme or rosemary works too, just adjust to taste. The milk should be lukewarm—too hot kills the yeast, too cold slows it down. If you forget to warm it, just microwave it for 10 seconds. The dough will be sticky, but that's normal—don't add extra flour or you'll ruin the layers. For the egg, if it's cold, let it sit out for 10 minutes before using. Trust me, the difference is noticeable.
This dough needs 3 hours of rest, so plan ahead. Store it in the fridge between folds—up to 24 hours if you need to pause. Once baked, it's best served fresh, but keeps for 2 days in an airtight container. Freeze slices for up to 3 months—just toast from frozen. I always make two loaves; one for dinner and one for sandwiches the next day. The leftovers reheat beautifully in a 350°F oven for 5 minutes
Why You'll Love This Recipe
- No-Knead Magic: I swear by this recipe—just mix the dough, let it rise once, then fold it like a letter. No punishing kneading, no waiting hours; the yeast does all the work while I sip my coffee.
- Buttery Crispy Layers: That crispy golden edge from the butter? Oh, it’s good. The sugar caramelizes just enough to give every bite a subtle sweetness, while the salt keeps it balanced—like a hug in bread form.
- Party in a Pan: Between us, this bread is my secret weapon for gatherings. Slice it warm for sandwiches, toast it for breakfast, or serve it cold with soup—it handles everything without falling apart.
- Budget-Friendly Staple: Flour, yeast, butter—these are pantry basics that won’t break the bank. A single batch stretches for days, and the leftovers? Perfect for French toast or croutons. Zero waste, all win.
Step-by-step instructions for accordion bread recipe
Here's how to create those magical, flaky layers that'll have everyone asking for seconds.
Activate the Yeast and Mix the Dough
In a small bowl, combine the 0.5 cup warm whole milk (about 110°F), 1 tbsp granulated sugar, and 0.25 oz active dry yeast. Let this sit for 5-10 minutes until it becomes frothy—this means your yeast is alive and ready to work. If it doesn't bubble, your yeast might be dead, and you'll need to start over.
In a large bowl, whisk together the 4 cups all-purpose flour and 1 tsp salt. Make a well in the center and pour in the yeast mixture along with the 1 whole large egg. Mix gently until a shaggy dough forms. Then, add the 0.5 cup cold unsalted butter, cubed, and knead by hand or with a stand mixer fitted with a dough hook for 5-7 minutes until smooth and elastic. The dough should be slightly tacky but not sticky—if it's too wet, add a little more flour.
Let the Dough Rest and Shape It
Place the dough in a bowl lightly greased with 2 tbsp vegetable oil, cover it with a damp towel, and let it rise in a warm place for 1-2 hours or until it has doubled in size. This resting period allows the gluten to relax, making it easier to fold and layer later. Poke the dough gently—if it springs back slowly, it's ready.
Once risen, turn the dough out onto a lightly floured surface and divide it into 4 equal pieces. Roll each piece into a 12-inch-long rectangle about 1/8-inch thick. The goal here is to create thin, even layers, so take your time and keep the dough as smooth as possible. If it resists rolling, let it rest for another 10 minutes before trying again.
Fold and Layer Like an Accordion
Starting with one rectangle, brush the surface lightly with 1 tbsp olive oil—this helps create separation between the layers. Fold the dough in half like a letter, then fold it in half again to form a compact square. Repeat this process with the remaining dough pieces, keeping them separate.
Now, stack the 4 folded squares on top of each other. Brush the top layer with a little more olive oil, then carefully unfold the top square just enough to create a pocket. Gently place the minced 2 cloves garlic and 0.25 cup chopped fresh parsley into the center of the stack. This step is where the magic happens—those flavors will infuse into every layer as it bakes.
Bake to Golden Perfection
Preheat your oven to 375°F and place a baking sheet inside to warm. Shape the stacked dough into a loaf pan or a round shape on the baking sheet, brushing the top with a little more olive oil. Let it rise again for 30-45 minutes until it puffs up noticeably. The dough should feel springy when pressed gently with your finger.
Bake for 30-35 minutes until the bread is deep golden brown and sounds hollow when tapped on the bottom. If the top browns too quickly, tent it loosely with foil to prevent over-browning. The layers should separate beautifully, revealing those flaky, buttery pockets. Let it cool for 10 minutes before slicing—this ensures clean layers and prevents crumbling.
Serve Warm and Enjoy
Slice the bread into thick pieces to showcase those stunning layers. Serve it warm with your favorite soups, stews, or simply toasted with a little butter. The layers should separate effortlessly, revealing the crispy, flaky texture that makes this bread so special. Store any leftovers in an airtight container for up to 3 days, or freeze for longer storage—just reheat in the oven to restore that fresh-baked magic.
Pro Tips For Making Accordion Bread
- Chill the Dough Properly: After the first rise, pop that dough in the fridge for 12–24 hours instead of letting it rise at room temp. I learned this the hard way—room-temperature rises make the butter too soft, and your accordion folds won’t hold their shape when baking. Cold dough = crispier layers, every time.
- Use Cold Butter: Cut that unsalted butter straight from the fridge into cubes, then toss it into the flour before adding liquid. Warm butter melts into the dough, and you’ll end up with a dense, gummy mess instead of those flaky, buttery layers. Trust me, your future self will notice the difference.
- Fold Like a Pro: When building the accordion layers, keep the dough square and fold it tight—no gaps. I used to rush this, and the layers would puff unevenly. Press the edges firmly, then seal with a little water to guarantee clean, crisp folds. (Yes, it looks fussy, but the result is worth it.)
- Bake with Steam: Spray the baking sheet with water before loading in the accordion bread, then bake with the oven door cracked open for the first 10 minutes. The steam helps the layers rise uniformly—no more sad, flat tops. After that, finish baking with the door closed for a golden crust. (Your kitchen will smell amazing.)
Common mistakes when making perfect results
Over-Kneading the Dough
One of the biggest mistakes is over-kneading the dough, which develops too much gluten and makes it tough instead of tender. I’ve seen beginners knead for 10+ minutes thinking more is better—stop at 5-7 minutes when the dough pulls away cleanly from the bowl.
Over-kneaded dough loses its delicate layers and becomes chewy rather than flaky. If your dough feels resistant or springs back too quickly, it’s a sign you’ve gone too far. 💡
Skipping Resting Periods
Rushing the dough’s resting time between folds is a recipe for disaster. The dough needs at least 1-2 hours to relax its gluten structure—this is what creates those signature flaky layers.
If you skip this step or rush it, the layers won’t separate properly, and you’ll end up with a dense loaf. I always set a timer and let the dough rest in the fridge if I’m short on time; it’s worth the wait.
Uneven Dough Thickness
Inconsistent rolling thickness throws off the entire accordion effect. Each rectangle should be 1/8-inch thick—any thicker, and the layers won’t separate cleanly. Use a rolling pin with even pressure and check thickness with your fingers.
If some areas are thicker, gently press them down. I like to use a Lodge cast iron skillet as a guide for even rolling—it keeps the dough flat and consistent.
Folding Too Tightly
When folding the dough into squares, resist the urge to press too hard—this can squish the layers and prevent proper separation. Fold gently but firmly, like tucking in a blanket. If you fold too tightly, the bread will lack those dramatic, crispy layers.
Think of it as creating a neat package rather than compressing it. The goal is to build layers, not flatten them. ✨
Overloading the Center
Stuffing the center with too much garlic or herbs can weigh down the dough and prevent it from rising properly. Stick to the 2 cloves garlic and 0.25 cup parsley called for—any more can make the bread dense.
Distribute the filling evenly and avoid packing it in too tightly. The flavors should infuse without overpowering the bread’s delicate structure.
Baking at Wrong Temp
Baking at 375°F is critical—any hotter, and the bread burns before the layers set; too cool, and it won’t rise properly. Use an oven thermometer to confirm your oven’s accuracy.
If your bread isn’t golden brown after 30-35 minutes, tent it with foil to prevent over-browning. The layers should puff up dramatically, revealing crispy, buttery pockets when sliced. 🔥
Nutrition facts
Frequently asked questions
Why does this bread need multiple resting periods?
The resting periods are essential for creating those signature flaky layers. Each 1-2 hour rest allows the gluten to relax, making it easier to fold without tearing. This relaxation also helps the layers separate beautifully when baked. Think of it like giving the dough time to "breathe" between each fold—skipping these steps results in dense, uneven layers.
Can I make accordion bread without a loaf pan?
Shape the stacked dough into a round or oval on a baking sheet instead. Brush with olive oil and let it rise before baking. For extra flair, try shaping it into a free-form oval or even a braided loaf. The key is maintaining even thickness—1/8-inch—for consistent layers. A baking stone works great for even browning too.
How do I know when the bread is fully baked?
Your bread is done when it reaches a deep golden brown color and sounds hollow when tapped on the bottom. The internal temperature should be 190-200°F. If the top browns too quickly, tent it loosely with foil to prevent over-browning while the center finishes baking. The layers should puff dramatically and separate cleanly when sliced.
What if my layers don't separate when sliced?
This usually happens when the dough wasn't rested enough between folds or if the layers were pressed too tightly during folding. For next time, ensure each 1/8-inch rectangle is rolled evenly and folded gently like a letter. Also, make sure the dough has fully risen before baking—it should spring back slowly when pressed. Patience during resting periods makes all the difference!
Can I make this bread ahead of time?
Yes! Shape the dough and refrigerate it overnight before baking. The cold slows fermentation, giving you more control over the rise. For best results, bake it straight from the fridge at 375°F with an extra 5-10 minutes of baking time. Store baked bread in an airtight container for 3 days or freeze slices for 3 months. Toast from frozen for freshness.